Sunday, November 23, 2014

Kontakt Demystified: Understanding the Three Different Kontakt VST Plugins

For as long as I've been using Native Instruments Kontakt, I've encountered people confused about the purpose and function of the three different VST plugin files that ship with Kontakt 4 and 5. My goal here is to clear up any misconceptions and show the actual practical differences between the different VST options.

THE THREE PLUGINS

Of the many forms that Kontakt takes (standalone, AU, VST, AAX- and formerly RTAS), only the VST format offers multiple plugin flavors. VST users have the following choices:
  • Kontakt 5
  • Kontakt 5 16out
  • Kontakt 5 8out
When a VST plugin loads in your DAW it has to tell the DAW how many audio outputs the plugin supports. Even though your DAW might never use all the channels the plugin advertises, the plugin still makes them available, and each of these available outputs consumes a small amount of RAM and CPU resources- whether it's used or not. Other plugin formats give your DAW a little more control over how many plugin channels to enable. To give VST users similar flexibility when working on very resource-intensive projects or on older computers with limited CPU and RAM, Native Instruments provides three slightly different VST plugin files.

In the rest of the post we'll look at the specific differences between each of the three versions of VST plugin included with Kontakt, but here are some things to remember:
  • The three VST plugins are identical, except in the number of output channels they make available to your DAW, and their factory default output configurations. There are no other functional differences.
  • All three VST plugins are capable of delivering audio on separate output channels. The 8out and 16out plugins are not the only "multi-output" ones. In fact the regular "Kontakt 5" plugin offers more outputs than both of the other two combined!
  • Your DAW sees each plugin flavor as a different "product." You can have instances of all three VST plugins in the same DAW project, and they will all have their own settings.
  • Each plugin flavor can have its own default output setup. (Note: This can be a complex topic, which I hope to talk more about in a future post.)

THE DIFFERENCES EXPLAINED

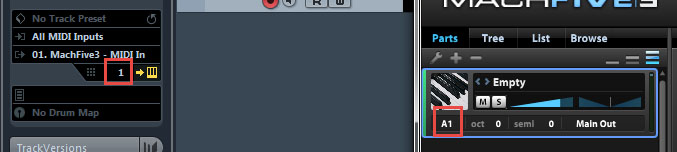
Here we'll look at the visible, measurable differences between each VST plugin file in Kontakt 5. You will see similar results in Kontakt 4, although actual RAM and CPU values may be different. First, let's get some terminology and concepts out of the way, since the way outputs work when Kontakt is running as a plugin can get a little complicated.

Here we have a Kontakt multi rack with four instruments loaded into it. Each instument has been assigned to its own output channel, and each output channel is named after the instrument routed to it. The Output list shows the channel name and plugin output number for each of Kontakt's current channels.

I have customized the channel names to match the instrument names. Often the channels will have more generic names, like "Inst 1" or "st. 1"

Here's a portion of the Kontakt Outputs Section showing the different output channels for the four instruments. The channel names appear at the top of each output channel column, and the plugin output numbers appear at the bottom. These are all stereo channels, so each channel uses two plugin outs. NOTE: The channel name is not always necessarily the same as the instrument name, so in the Output list above and the channel columns below, you might see different, often more generic, names for each of your channels, until you configure them otherwise.


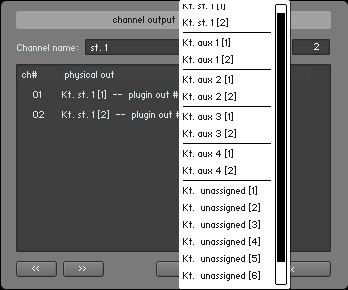
This Kontakt instance is loaded in Cubase, and along the left we see the stereo VST output channels, each labeled with their respective plugin output names. These match the names in the "physical out" list in the Channel Output Configuration dialog of Cubase. This is a stereo channel (so it contains 2 Kontakt audiochannels). This is the only place in Kontakt where we see how the plugin out name (which is what your DAW sees) maps to Kontakt's channel name and plugin output number (which are what Kontakt displays in the Outputs Section).


Here's something to remember: The names of Kontakt's output channels (which route instrument output through plugin output) are easily editable, but the actual plugin output names are not. As a result, is possible to have a Kontakt aux channel send output on a "Kt. Inst" channel in your DAW and for an instrument channel in Kontakt to send audio to a "Kt. aux" channel in your DAW. It can get very confusing! There is a way to clear up this confusion, but we'll tackle that topic some other time.

I used Steinberg Cubase 7.5 and Ableton Live 9 to measure RAM and CPU usage. Some quick notes:
  • To measure Cubase RAM usage, I created three different projects, each with a single instance of one of the Kontakt plugins loaded. I activated All Outputs in Cubase for each plugin variety, which created separate VST channels for each plugin output. I compared the RAM consumed for each of these projects against loading Cubase with an empty project.
  • To measure Ableton Live RAM usage, I also created a different project for each plugin variety. Instead of creating additional MIDI tracks for each plugin output, I just created a single additional MIDI track with a single External Instrument device in it. This is probably why Live RAM usage was so much lower; Cubase automatically adds VST channels when outputs are activated in the DAW.
  • To measure CPU usage in Live, I created a different project for each Kontakt plugin variety and loaded a single Kontakt instrument and MIDI clip, then duplicated that MIDI track 9 times, so that there were 10 separate instances of the plugin, all playing the same MIDI clip. I recorded the value of Live's built-in CPU meter while the clips were playing.

THE "KONTAKT 5" PLUGIN

Here's the info on the VST plugin that's just called "Kontakt 5". This one defaults to delivering 8 instrument channels and 4 fully mapped aux channels.
  • Output channels available: 12 stereo pairs, 40 mono outputs, 64 outputs total.
  • RAM used in Cubase 7.5: 117 MB
  • RAM used in Live 9: 68 MB
  • Live CPU usage (playing 10 plugin instances): 22%
 Default Outputs Section layout:

Default plugin output list:
Note that it's scrolled to the bottom of the list.

Cubase output selection list:
Note that it's scrolled to the top of the list.

Live output selection list:
Live does not appear to give access to all possible channels of the "Kontakt 5" plugin. Note that this screenshot is from the Audio From list in an additional MIDI track in Live. The MIDI track that hosts the plugin always gets Kt. Inst 1 (main outs). Other MIDI tracks can only access the outputs beyond Kt. Inst 1.

THE "KONTAKT 5 16out" PLUGIN

The Kontakt 5 16out plugin defaults to a single stereo instrument channel, plus three mapped aux channels, but gives you some room to add additional channels and aux mappings. Unlike the "Kontakt 5" variant, the 16out plugin exports the first instrument channel as "Kt. st. 1" instead of "Kt. Inst 1."
  • Output channels available: 5 stereo pairs, 6 mono outputs, 16 outputs total.
  • RAM used in Cubase 7.5: 69 MB
  • RAM used in Live 9: 67 MB
  • Live CPU usage (playing 10 plugin instances): 21%
 Default Outputs Section layout:

Default plugin output list:


Cubase output selection list:


Live output selection list:

THE "KONTAKT 5 8out" PLUGIN

The Kontakt 5 8out plugin only maps outputs for the first instrument channel. You can use the remaining outputs for other instruments or aux channels as needed. Like the 16out variant, the 8out plugin exports the main outs as "Kt. st. 1" instead of "Kt. Inst 1."
  • Output channels available: 4 stereo pairs, 0 mono outputs, 8 outputs total.
  • RAM used in Cubase 7.5: 61 MB
  • RAM used in Live 9: 66 MB
  • Live CPU usage (playing 10 plugin instances): 20%
 Default Outputs Section layout:

Default plugin output list:

Cubase output selection list:

Live output selection list:

CONCLUSIONS AND RECOMMENDATIONS

You may have noticed that the difference in RAM and CPU impact between the three VST plugin options is actually quite small. If you normally work on small-to-medium size projects and you have a fast and powerful DAW computer, you can likely safely use the full "Kontakt 5" plugin all the time without problems.

The default output mappings of each plugin type do lend themselves to certain workflows, though, so I can suggest some cases where you might consider using a specific VST plugin, without getting into the potential messiness of setting up your own output configurations inside of Kontakt.
  • If you normally only use a single Kontakt instance in your projects, and you set up Kontakt multi racks to support multi-timbral use, the regular "Kontakt 5" plugin is probably best. A single instance of Kontakt uses less RAM (and a little less CPU) than adding separate instances for every instrument, and the default output mappings for "Kontakt 5" give you 8 stereo instrument channels and all 4 aux channels, with no special tweaks required. Do note that some DAWs or plugin hosts might not be able to access all of the channels the "Kontakt 5" plugin can offer. For example, Ableton Live 8 and 9 have a hard limit of 32 audio channels (16 stereo pairs) per VST plugin (confirmed with Ableton Support in November 2014).
  • If you prefer to load a new Kontakt instance for each Kontakt-based instrument you use in a project AND you also like to use Kontakt's built-in effects, "Kontakt 5 16out" is a good choice, since it automatically gives you a working instrument channel and three aux channels, and it does use less memory and CPU than loading full "Kontakt 5" for each instance.
  • If you like using a single instance of Kontakt for each instrument, but you don't usually use Kontakt's built-in effects, then "Kontakt 5 8out" is a solid choice, because it uses the least amount of RAM and CPU per instance, and the default output mappings support only a single instrument channel, which is all you'll probably need for most cases- although you CAN add up to 3 extra stereo channels if you ever need to layer parts.
In all of the above cases, you can set up different Outputs Section configurations that suit your most common setup preferences (for example, maybe the first two channels could be for instruments, and then you'd use the remaining plugin outputs for the aux channels), and you can set up a different default configuration for each of the three plugin types.

In a future post, I hope to cover the strange relationship between Kontakt's "plugin outs" and the output channels that your DAW sees, but the above information will serve you as long as you stick to Kontak'ts "Kt. st.," "Kt. Inst." and "Kt. aux" outputs.

Sunday, November 16, 2014

How to Build a Multi-output Drum Kit in MOTU MachFive 3

Building a drum kit in a traditional sampler like MOTU MachFive 3 is a bit different from building a more typical sample-based instrument (like a sampled synthesizer) in a number of ways:
  • Drum sounds are usually "one-shots," where the whole sample plays all the way through instead of stopping the moment you release the key.
  • Drum kits often have "choke groups," where some of the sounds are mutually exclusive. This is most common with hi-hat sounds, where a closed-hat hit cuts short a longer open-hat sound.
  • To avoid the telltale "machine gun effect" with programmed drums, many kits use multiple recordings of the same instruments and play them back in a "round robin" fashion, so each hit sounds a little different from the last.
  • Since drums and other percussion sounds have very different tonal qualities and are frequently processed and EQed in very different ways, it's common to route individual drum sounds to their own audio channels for unique processing.
While MachFive is a very capable and powerful instrument, its deeply-layered interface and lack of electronic documentation or other online resources can make it difficult for a new user to figure out how to pull all of the above elements together to make a full-featured drum kit. I'm going to walk you through the process of building a kit that meets all of the stated requirements.

As an added bonus, you'll be able to use this knowledge to get the most out of third-party drum-based instuments, such as UVI's excellent BeatBox Anthology.

The kit we are going to build.
For the purposes of illustration, I recorded some drum samples and uploaded them for you to use as you work through the tutorial. I also included a short MIDI clip that you can use to check your work.

At the very bottom of this post you'll also find the video tutorial I recorded to supplement this walkthrough.

I've broken this process into two parts. First we'll build a new kit from scratch, and once that's all done we'll set the kit up for multi-output use.

PART 1: BUILDING THE KIT


  1. Download the sample pack I put together for this tutorial and unzip it.
  2. Launch MachFive. I like to run it as a standalone for this part (just because it's quicker than loading your DAW first), but you can open it as a plugin if you like.
  3. Click the Wrench icon in the top section of the MachFive interface and go to Preferences > General. Make sure One Shot is checked for Sample drag’n’drop mode, then close the preferences box.
  4. Select an Empty part in the Parts tab of the sidebar.
  5. Use the Browse tab of the sidebar to locate the tutorial samples that you unzipped earlier.
  6. In the main MachFive window, select the Edit view and make sure that at least the Oscillators, Keygroup Editor, and Edit sections are displayed.
  7. Drag the M5 Kick sample to the C1 key on the virtual keyboard in the Keygroup Editor. This will create your program’s first layer, keygroup, and oscillator. Your keygroup will have a 1-note range and contain a single SAMPLE oscillator that contains the kick sample.

    You should be able to play the C1 note on your MIDI controller (or touch it on the virtual keyboard) and hear the kick drum play back.
  8. Next drag the M5 Snare sample onto the D1 note of the virtual keyboard. This will add a new keygroup and oscillator for the snare sample to your existing program layer.
  9. In the Layers section of the List tab of the sidebar, click the + sign to add a new layer.
  10. Rename the layers by double-clicking their names and then entering a new one. I named the first layer Main Drums and the second layer Hi Hats.
  11. Click the layer that you just created so that it is the only one highlighted in the Layers list. You’ll notice that your Kick and Snare keygroups are temporarily hidden in the Keygroups section of the main window.

    Note
    You can highlight all layers at once by clicking the gray area underneath the last layer. If you click the gray area again, all layers will be deselected/hidden. Just select a layer and then click the gray area again to display all layers again.

    Only the empty Hi Hats layer is selected.
  12. Back on the Browse tab of the sidebar, drag the M5 Closed Hat sample to F#1 and the M5 Open Hat sample to A#1. Your Hi Hats layer now has two keygroups, one for each sample.

    Try playing the samples with your MIDI controller. You’ll find that you can play both hi hat sounds at the same time, which usually isn’t desirable for hi hat sounds. We’re going to fix that next.
  13. Back on the List tab, with the Hi Hats layer selected, locate the ex. group column in the Keygroups section of the sidebar. You might have to scroll to see it. If you can’t find the column, right-click any one of the column headers and then check ex. group in the shortcut menu that appears.

    Once you can see the ex. group column, set the ex. group value for both of the hi-hat keygroups to 1. (You can change the value by dragging your mouse vertically over the numbers, or double-clicking the numbers and entering the value from the keyboard.) Setting ex. group to a non-zero value creates a “choke group” for the hi-hats, where playing one keygroup will cut the other short, just like a real hi-hat.


    After setting the ex. group values to 1, try playing the Hi Hat sounds again. You should find that the two Hi Hat samples now cut each other off when triggered.

    Note
    We put the hi-hats on their own layer so that it is clear when you’re looking at the keygroup layout which keygroups are set up for exclusivity (since layers can have different colors). It is not required to put them on separate layers, since exclusivity groups are a keygroup option.
  14. Back in the List view, select the Main Drums layer so that only it is visible, and then switch to the Browse tab.
  15. Click the first M5 Shaker sample in Browse tab, and then SHIFT+CLICK the last M5 Shaker sample, so that all eight samples are selected.
  16. While the files are selected hold down the ALT key while dropping them onto the A3 key of the virtual keyboard. This opens the Sample Drag’n’Drop menu.
  17. Because my shaker sample files are named a certain way, we can make use of MachFive’s built-in mapping methods when importing them into the program. Select NoteName RoundRobin under Mapping method, and Main Drums under Destination.

    When you click OK, MachFive creates a single keygroup, and adds a new Sample oscillator for each sample, automatically setting them up for round-robin play. (Try playing the A3 key on your MIDI controller. You should hear a different shaker sound each time you hit it.)

    If you select any of the newly-created oscillators, you can see that Cycle is selected in the OSC(S) portion of the Edit section. The other oscillators for the Kick and Snare keygroups are set to All, which means that all samples in that keygroup play at once (which is fine, since there's only one sample per kegroup for those sounds in this kit).
  18. At this point, if you look in the List tab of the sidebar, you should see that there are two layers and five keygroups.
  19. To save your kit, click the Wrench icon in the main section of MachFive and select Save Program and Samples. This will save an M5P file and all the imported samples into the selected location. The samples will be stored in a subfolder inside the folder where the M5P is saved.

PART 2: SETTING UP MULTIPLE OUTPUTS

In this section we’re going to use MachFive in multi-output mode and assign different drum sounds to different audio tracks in a DAW for individual processing. I’m going to use Steinberg Cubase 7.5 here, but the general steps should work in most DAWs.
  1. Start up your DAW and load MachFive3 as a plugin. In Cubase 7.5, I like to add it as a “rack instrument” in the VST Instruments dialog.

    Note
    On some platforms and plugin formats, the MachFive plugin might come in different versions. If you have more than one choice, make sure to load the “Multi-output” version. On 64-bit Windows, there is only one MachFive plugin, and it does support multi-output.
  2. Add a MIDI track to your DAW that points to your MachFive instance. In Cubase you have the option to create a new MIDI track when you load a plugin. If you haven’t done that already just add the new MIDI track and direct its output to MachFive’s MIDI in. Take note of the channel you set here.
  3. Configure your DAW so that it can receive four additional stereo outputs from MachFive. In Cubase you do this by clicking MachFive3’s Activate Output button in the VST Instruments dialog and then clicking on the outputs you wish to receive. As you can see here, I have enabled four additional stereo channels in addition to the plugin’s main stereo out.
  4. Inside MachFive, select the part with the same MIDI channel as the MIDI track you created in your DAW. (In this case, A1.) If you don’t already have an appropriate part here, you can add one with the + button, and select the correct channel from the drop-down list.
  5. Double-click the “Empty” program name to open up the MachFive browser and locate the M5P program you saved in PART 1 above.

    Click Close in the Browse dialog once the program is loaded. Try triggering some notes in the kit with your MIDI controller to make sure everything’s working so far.

  6. In the List tab on the sidebar, make sure all layers are selected so you can see all of the keygroups listed.
  7. Locate the output column in the keygroups section. You will probably have to scroll to see it.

    Important
    If you can’t find the output column, it may be hidden. To show it, right-click one of the column headers under Keygroups and then check output in the shortcut menu that appears. You should now be able to scroll and see that column.
  8. Click the gray area beneath the keygroups to deselect them. (If you don’t do this, changing any field in the Keygroups section will apply to all keygroups in the program.) With the groups deselected, right-click the Output value for each keygroup, and set it accordingly:

    Kick: Out 2, Snare: Out 3, Hi Hats (both keygroups): Out 4, Shaker: Out 5

    Note
    In MachFive, only part outputs can be assigned to anything other than Main Out. MachFive’s Aux buses, which are typically used for send effects, always go to Main Out, and can’t be reassigned. For this reason, when you’re building a multi-output program, you should only use the individual output channels, not the one labeled Main Out. Otherwise you might end up mixing that keygroup’s output signal with effects playing through MachFive’s main outs.
  9. You might want to use wrench > Save Program And Samples As to save a separate multi-output version of your kit.
  10. Back in your DAW, if you have your MachFive MIDI track armed, you should be able to trigger different notes in your kit and hear them play back through different input channels in your DAW. In Cubase, you can expand MachFive3’s folder under VST Instruments to see the different channels. I have renamed my channels here to indicate which instrument and MachFive output they represent.
  11. Now that all instruments are coming in via their own audio channels, you can add insert effects and apply EQ to each incoming channel independently. I took this snapshot while playing a MIDI clip on my kit. You can see that each sound group is coming in on its own channel and I have processing plugins on each channel.

VIDEO WALKTHROUGH


VIDEO BED MUSIC

I wrote this little track to serve as intro and bed music for my tutorial video. It's not really a full-on completed composition, but you can hear what I've got so far here: