
After a bit of searching I ran across this thread at the official Steinberg forums, where numerous other Cubase users were complaining of the same issue. Someone there actually posted a solution which sort of works, but it's not very complete and can actually be pretty dangerous (so please don't follow the steps you see there), but I do credit that poster for identifying the root cause of the problem: Too many extra multimedia device entries in the Windows registry.
Update (April 2022): While this article is quite old, the steps are mostly the same for Windows 10 (and probably 11). Just note that where it says to open the "System control panel" below you should now search for "View advanced system settings" in the Windows search box. Also, the above-linked thread no longer exists, but it discussed manually removing entries under the registry key HKEY_LOCAL_MACHINE\SOFTWARE\ASIO. If, after performing the steps in this article you still see some additional unwanted entries in Cubase's Audio Driver Setup dialog, you can now safely remove them using the Windows Registry Editor. See this knowledge base article from Steinberg for further details.
Every time you plug a USB device into a different port on your computer or on a USB hub, Windows creates a new device entry for it. Say you have a USB headset and you plug it into three different ports on your USB hub- Windows will actually create three different device entries as a result, but only one (if any) will be active at any one time. The problem is that Cubase scans your registry for multimedia devices, and every entry it finds increases the startup time a little bit- even if it's for a device you no longer use.
Note: The screenshots and specific steps below were done on my 64-bit Windows 7 system, but this should work for all Windows versions from XP up to Windows 8.
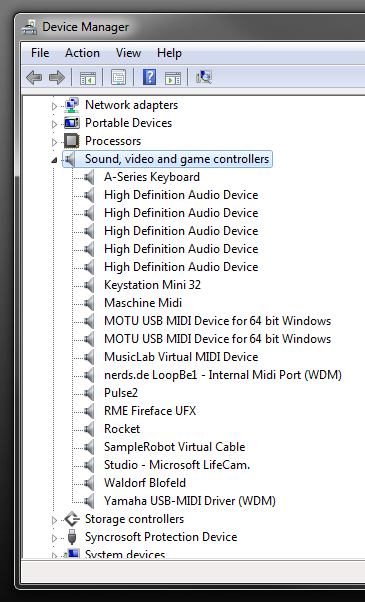
The devices that Cubase cares about all appear under Sound, video and game controllers in the Windows Device Manager. Our goal here is to delete any duplicate or obsolete entries from the system, but there's a problem: By default, Windows will only show you devices that are currently connected to your computer- even if you enable the "show hidden devices" feature in Device Manager. For example, before I performed the steps for this blog entry, this is what Device Manager showed me, even after I went to View > Show hidden devices:

I can see my keyboard controllers, audio and MIDI interfaces, and even a few synths... but what about all the other audio devices I had connected to my computer over the previous months? Well, this is what we have to do:
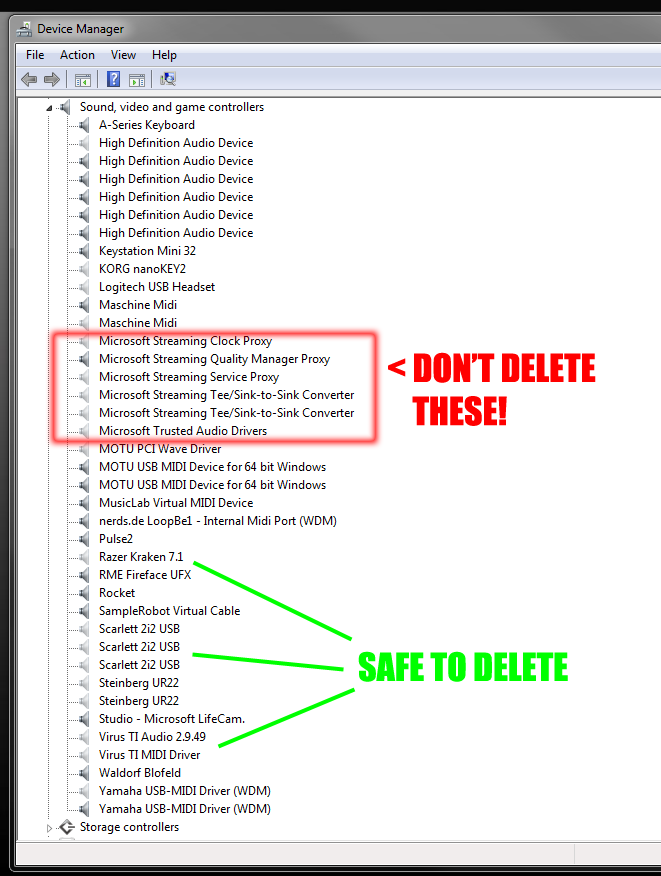
Here's what I saw after performing the above steps. Notice the huge difference- all those grayed-out hidden devices! My computer still had entries from pieces of gear that I don't even own anymore!

Important
Please note that some of these hidden entries are important operating system components that you should not remove. Basically leave any of the Microsoft stuff alone. Only perform the following steps on devices that you recognize and know that it will be safe for you to remove.

Before trimming out the extra devices, the "Initialize: MIDI" stage of Cubase startup was taking 24 seconds on my PC. Now it takes only 16 seconds (a 33% reduction). If you have fewer multimedia devices plugged in than I do, you'll probably see even faster speeds.
The problem
Every time you plug a USB device into a different port on your computer or on a USB hub, Windows creates a new device entry for it. Say you have a USB headset and you plug it into three different ports on your USB hub- Windows will actually create three different device entries as a result, but only one (if any) will be active at any one time. The problem is that Cubase scans your registry for multimedia devices, and every entry it finds increases the startup time a little bit- even if it's for a device you no longer use.
Note: The screenshots and specific steps below were done on my 64-bit Windows 7 system, but this should work for all Windows versions from XP up to Windows 8.
Displaying the extra device entries
The devices that Cubase cares about all appear under Sound, video and game controllers in the Windows Device Manager. Our goal here is to delete any duplicate or obsolete entries from the system, but there's a problem: By default, Windows will only show you devices that are currently connected to your computer- even if you enable the "show hidden devices" feature in Device Manager. For example, before I performed the steps for this blog entry, this is what Device Manager showed me, even after I went to View > Show hidden devices:
I can see my keyboard controllers, audio and MIDI interfaces, and even a few synths... but what about all the other audio devices I had connected to my computer over the previous months? Well, this is what we have to do:
- Close the Device Manager control panel if you currently have it open.
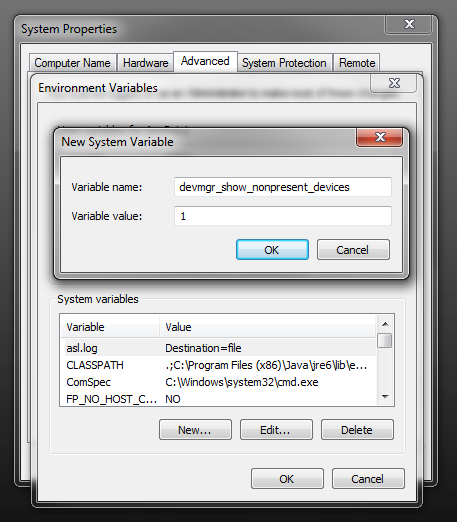
- Open the System control panel and click Advanced system settings.
- On the Advanced tab of the System Properties dialog box that appears, click Environment Variables.
- In the Environment Variables dialog that appears, click the New... button in the System variables section of the dialog.
- In the Edit System Variable dialog, enter devmgr_show_nonpresent_devices for Variable name and put 1 for Variable value.
- Click OK > OK > OK and then close the System control panel.
- Now open the Device Manager control panel, and enable View > Show hidden devices.
- Now expand the Sound, video and game controllers section of the Device Manager. You will probably see a number of new entries now. The little speaker icons next to the "hidden" entries will appear grayed out compared to those for the active devices.

Removing the extra device entries
Here's what I saw after performing the above steps. Notice the huge difference- all those grayed-out hidden devices! My computer still had entries from pieces of gear that I don't even own anymore!
Important
Please note that some of these hidden entries are important operating system components that you should not remove. Basically leave any of the Microsoft stuff alone. Only perform the following steps on devices that you recognize and know that it will be safe for you to remove.
- Right-click a device entry that you wish to remove, and then click Uninstall.
- If the device's drivers were not provided with the Windows operating system, Device Manager will ask if you want to delete the device driver along with the device entry. Only check this box if you do not plan to use this device anymore on your computer. (Otherwise you will have to reinstall the drivers if you ever connect the device again.) Since I was removing entries for devices I'd actually sold, I would delete any duplicates first without checking the "delete the driver software" box, but I would check the box when removing the final instance. (For example, I deleted the first two Scarlett 2i2 entries without checking the box, but then checked the box when I deleted the third and final entry.
- After repeating the above steps for each unwanted device entry, close the Device Manager and then launch Cubase and see if things start up any quicker.


Before trimming out the extra devices, the "Initialize: MIDI" stage of Cubase startup was taking 24 seconds on my PC. Now it takes only 16 seconds (a 33% reduction). If you have fewer multimedia devices plugged in than I do, you'll probably see even faster speeds.
