Somewhat heartbroken by the reality that I would never get my hands on one of Nintendo's mini consoles (since I refuse to give scalpers my money), I started looking for alternatives- and I quickly discovered that for not much more money than the original retail price of the NES Classic Edition I could build my own mini NES that played not 30 but 791 NES games- and could also play over 14000 additional games from 37 platforms other than the original Nintendo Entertainment System. So I built one, and now I'm gonna show you how to build your own.
HOW IS THIS POSSIBLE?
Our ability to make super-cheap purpose-built classic gaming devices is thanks to the Raspberry Pi Foundation, a non-profit organization who developed a computing platform with the goal of making it inexpensive and easy to learn how to make digital products. The Raspberry Pi is a single-board computer that runs a (usually Linux-based) custom operating system, often with a specific purpose. In our case, we'll be using a gaming environment called RetroPie that runs on top of a special Linux build created for the Raspberry Pi.If you're not a "computer person" or a Linux expert- don't worry. The following instructions will walk you through every step of the process. But for those of you who are interested, the system we are building is based upon the following technologies:
- The Raspberry Pi 3 is the computer itself. It's a single board that includes a processor, RAM, audio/video support, and WiFi/Ethernet networking.

The Raspberry Pi 3. - Raspbian is a Linux-based operating system that supports the Raspberry Pi hardware.
- RetroPie is a collection of hardware emulators that runs on top of the Raspbian operating system.
- EmulationStation is an emulator "front-end" that RetroPie uses to provide an attractive, unified interface for browsing and launching games that you can navigate entirely with your game controllers.
- We will be using a pre-built RetroPie image simply called "Nacho's Image" that includes all of the above software in addition to the "ROMs" for literally thousands of classic video games.
BEFORE YOU START
In order to follow these instructions, you will need the following items:- A television set with an available HDMI port.
- An HDMI cable for connecting the Pi to your TV (the Raspberry Pi has a standard full-sized HDMI connector).
- A computer running Windows, Linux, or Mac OS that can read microSD cards or SD cards (most microSD cards ship with a full-sized adapter). If your computer doesn't have any card reading ports, a USB 3 card reader or USB 2 card reader will do the trick.
- A very small Phillips-head screwdriver.
- At least 70GB free space on your computer for downloading images and tools.
THE SHOPPING LIST
Depending on which controllers you pick and whether or not you decide to include a wireless keyboard, the cost of building your own fully-functioning supercharged mini NES runs anywhere from $110 to $194 USD- which is less than most people are paying for the 30-game NES Classic Edition on eBay right now. Here are all the individual components you need:- CanaKit Raspberry Pi 3 with 2.5A Micro USB Power Supply. ($43 USD). This kit includes the Raspberry Pi 3 board, two heat sinks, and a power supply. (The power supply included in this kit is for USA-style AC/DC household electrical outlets. If you are outside the United States, you might need a kit with a different power supply.)
- Buffalo iBuffalo Classic USB Gamepad ($19 USD per controller). These are nice, weighty USB gamepads that work for most of the games included in the RetroPie image. I have two of these, but for a less expensive option there is also the Classic SNES USB Controller 2-pack, which is a $17 USD for two controllers. These aren't as heavy feeling as the iBuffalo controllers, but they do work. In order to control games that work better with analog sticks, the system supports Xbox controllers and many others, as well.
- SanDisk Ultra 64GB microSDXC UHS-I Card with Adapter ($23 USD). The Raspberry Pi doesn't have any built-in storage. Instead it reads its operating system and files from connected microSD cards or USB drives. Having a fast microSD card is important because it affects the speed of your Raspberry Pi. A 64GB card is required for the specific RetroPie image I discuss later in this post, but you can get larger or smaller cards if you intend to use different images.
- Old Skool NES case for Raspberry Pi 3 ($20 USD). There are a number of cases you can get for your Raspberry Pi (including the "official" Pi case), but this one is the closest in appearance to the original NES.
- LoveRPi MicroUSB Push On Off Power Switch Cable for Raspberry Pi ($7 USD). The Raspberry Pi doesn't have a power button of its own. This cable sits between your power adapter and the Raspberry Pi, giving you a simple on/off toggle switch, which is much nicer than having to plug the Pi in every time you feel like using it.
- OPTIONAL: Logitech K830 Illuminated Living-Room Wireless Touchpad Keyboard for Internet-Connected TVs ($63 USD). While not required for following these setup instructions or for playing most of the console and arcade games in the RetroPie image, some of the computer-based emulators do require keyboard and/or mouse input: ScummVM, Infocom, MS-DOS, for example. You also need at least a keyboard if you want to do any in-depth configuration of the underlying Raspbian operating system. This keyboard is great because it's wireless, has great rechargeable battery life, and has backlit keys. Logitech also makes a much less expensive keyboard (the K400) that is similar but uses AA batteries instead of built-in recharging, and lacks the backlit keys. Honestly any USB keyboard/mouse will do, but I really like the Logitech combo solutions, mainly because they're wireless and only take up one USB port.
ABOUT THE RETROPIE IMAGE I USE
I'm using a RetroPie image called "Nacho's Image" that comes pre-configured with nearly 15,000 games for 38 different consoles and platforms. The image requires a microSD card that's at least 64GB in size. Here's a quick rundown of the image's contents:- Amstrad CPC: 486 titles.
- Atari 2600: 647 titles.
- Atari 5200: 71 titles.
- Atari 7800: 63 titles.
- Atari Lynx: 77 titles.
- Bandai WonderSwan: 112 titles.
- Bandai WonderSwan Color: 95 titles.
- Classic Arcade Games: 2158 titles.
- ColecoVision: 140 titles.
- Commodore 64: 2231 titles.
- Commodore Amiga: 2 titles.
- DAPHNE (Laserdisc Arcade Emulator): 16 titles.
- Infocom (text adventure emulator): 79 titles.
- Mattel Intellivision: 212 titles.
- MS-DOS: 1168 titles.
- MSX Computers: 649 titles.
- NEC PC Engine (TurboGrafx-16): 303 titles.
- Nintendo 64: 303 titles.
- Nintendo DS: 100 titles.
- Nintendo Entertainment System (NES): 791 titles.
- Nintendo Game & Watch: 54 titles.
- Nintendo Game Boy: 490 titles.
- Nintendo Game Boy Advance: 1129 titles.
- Nintendo Game Boy Color: 528 titles.
- Nintendo Virtual Boy: 26 titles.
- Philips Videopac (Magnavox Odyssey): 52 titles.
- Scumm VM (adventure game emulator): 94 titles.
- Sega 32X: 33 titles.
- Sega Dreamcast: 3 titles.
- Sega Game Gear: 249 titles.
- Sega Master System: 267 titles.
- Sega Mega Drive: 819 titles.
- Sega SG-1000: 68 titles.
- Sinclair ZX Spectrum (Timex): 382 titles.
- SNK Neo Geo: 155 titles.
- SNK Neo Geo Pocket: 49 titles.
- Super Nintendo Entertainment System (SNES): 786 titles.
- Vectrex (GCE/Milton Bradley): 21 titles.
There is no single clear answer on whether it's strictly legal to share and/or use the classic game ROMs included in this image or available elsewhere on the internet. In the United States some of these game ROMs are covered by Fair Use doctrine in the sense that if you own the actual physical cartridge or arcade cabinet you're allowed to keep and use back-ups of those ROMs as you please. But at the end of the day, many of the companies that made these games don't exist anymore, and there is no way to legally purchase the majority of these games in the USA or anywhere else. Most of these titles are essentially abandonware. You can easily remove individual games you're not sure about from the image as needed.
DOWNLOADING AND PREPARING THE RETROPIE IMAGE
In order to download the Raspberry Pi image, you need a BitTorrent client that supports magnet links, and you then need a way to write the downloaded image to your microSD card. There are dozens of free torrent clients and image burning tools for all major operating systems. I will recommend some specific tools I've used on Windows and Ubuntu Linux.
Recommended Programs
All of the utilities I use for these steps are free, and two of them are available for Windows, Mac OS, and Linux. My instructions assume you're using these tools.
- Deluge is a cross-platform BitTorrent client.
- Etcher is a cross-platform tool that burns image files to SD cards.
- 7-zip is the tool I use to extract 7z, XZ, BZIP2, GZIP, TAR and ZIP files on Windows. There is a Linux version called p7zip-full. (Note: 7-zip isn't required for the specific RetroPie image I'm using for these instructions, but some other images available on the internet need to be extracted before you can burn them to an SD card.)
- Install the latest version of Deluge and Etcher if you haven't already. (If you are running Ubuntu Linux, follow the "Debian and Ubuntu based Package Repository" instructions on this page to install Etcher. You can install Deluge from the command line like this: "sudo apt-get update; sudo apt-get install deluge")
- Select the following magnet link with your mouse and copy it to your clipboard by pressing CTRL+C:
magnet:?xt=urn:btih:01CC41757907698CEF75FD8BCCFB14 07CE1CC4D1&dn=Nacho%27s% 20Image.img
Note: The above link may appear on multiple lines in your browser, but you must copy the whole thing (so select both lines of text if it appears that way on your screen). - Launch Deluge. (Windows users: If you are prompted with a Windows Security Alert message about the Windows Firewall, make sure to that both the Private networks and Public networks boxes are checked, and then click Allow access.)
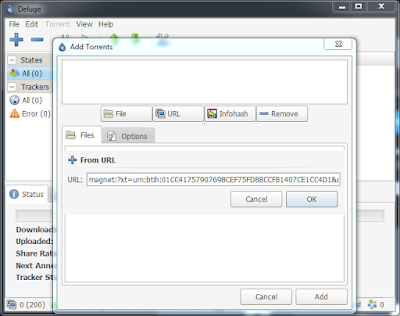
- Click the blue + icon and then click the URL button in the Add Torrents screen. If the magnet link is already in your clipboard it should pre-populate in the "URL" box. If there is no link listed next to URL, just press CTRL+V to paste the link there, and then click OK.
- Click Add to close the Add Torrents dialog. The program should now indicate that you're downloading a file called "Nacho's Image.img".
- Wait for the download to complete. Note: This could take several hours! Try to avoid quitting Deluge until the image is completely downloaded, but Deluge will resume the download the next time you run it if you ever have to stop the download while it's in progress. You will know that the download is complete when its status changes from "Downloading" to "Seeding."
- Insert the microSD card into your computer's card reader. Ignore any prompts to format the drive if they appear.
- Launch Etcher and click Select image, and then browse to the directory where Deluge downloaded the image (it defaults to the "Downloads" directory in your user profile, unless you changed this location in Deluge's Edit > Preferences screen). Select the file "Nacho's Image.img" and then click Open.
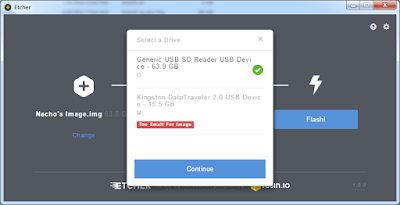
- Click the Select drive button in Etcher. If the program detects more than one potential external drive it will give you a choice. Be sure to choose the card reader containing your 64GB microSD card, and then click Continue.
- Once the image and target drive are selected, click Flash! Depending on the speed of your card reader, your computer, and even the card itself, burning the image can take anywhere from a few minutes to a couple of hours.
- Safely eject the drive from your card reader. This image is formatted with the Microsoft FAT32 file system, which is readable by all major operating systems, in case you ever need to add or remove games.
ASSEMBLING THE HARDWARE
Hardware setup is the fastest part of this whole project. To reduce the chance of damaging your Pi via electrostatic discharge, try to work on a clean, flat surface in an area with a hard floor instead of carpet.- Unpack your Raspberry Pi board and the heat sinks. Remove the plastic film covering the adhesive under each heat sink and attach the heat sinks squarely on their respective chips. (The big chip is the CPU and the smaller one is for networking.)
- Place the Raspberry Pi board between the upper and lower halves of the case, making sure to align the screw holes that fasten the halves together with the holes on the Pi board, and also making sure the ports are facing the correct directions.
- Ethernet and USB ports face the front "cartridge slot" of the Old Skool NES case.
- The left side of the case is where power, HDMI, and audio go.
- The rear of the case is the location of the microSD slot.
- Carefully fasten the two halves of the case together with the included screws, using a very small Phillips-head screwdriver. Do not over-screw.
- Connect the Pi's HDMI connector to an available HDMI port on your TV or HDMI switcher.
- Firmly insert the formatted microSD card in the slot at the rear of the device. The card will only go one way (note that the Pi's card reader is technically at the underside of the board, so the pins of the card will be facing up when you insert the card).
- Turn on your TV set and select the appropriate HDMI input.
- Note: Don't plug any game controllers into your Pi yet! We'll do that in the next section.
- Plug your power adapter into an available power outlet and connect it to the female connector of your On/Off Power Switch Cable. Then connect the male end of the cable to your Pi's Micro-USB power connector. If the power switch is already in the ON position you will see a bright red LED illuminated on the back of the unit. If the LED is not lit, press the power button to turn the device on. If everything is working properly you should be greeted by the Nacho image's introduction video. (The video's pretty cool, but you will probably grow tired of seeing it every time you boot your Pi. I'll explain how to disable this in a later section.)
CONFIGURING YOUR CONTROLLERS
Now that you've got your image burned and your device assembled you're almost ready to play some games.- After the intro video plays, the RetroPie image drops you into the EmulationStation top menu. The first thing you'll want to do here is connect one of your USB game controllers.
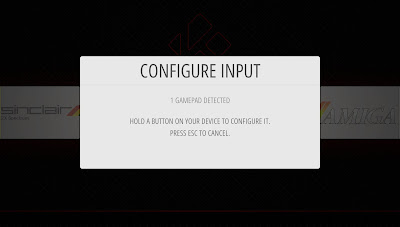
- If EmulationStation doesn't recognize your controller, it will prompt you to configure it. You should see a screen like this. Press any button on the controller that you wish to configure.
Note
If you don't get this screen when you plug in the controller, your controller might already be at least partially recognized. You can press Start on your controller to bring up EmulationStation's main menu, then use the controller's D-pad (plus pad) to navigate down to Configure Input, and then press A to display this screen.
- Once you have selected a controller to configure, the "Configuring" screen appears. This screen prompts you to press buttons or move controls in the requested directions so that the emulators know how to map the in-game controls to your individual controllers. Press the corresponding physical controls on your controller as requested, and repeat the process until you reach the end of the list.
Important
Sometimes you might be prompted to use a button or control that isn't physically present on your current controller. In this case, just press and hold down ANY button on your controller until the screen skips to the next control. You won't be able to exit the configuration wizard until you get to the end of the list.
- Once you've reached the end of the list and OK is selected, press A on your controller to save the settings for the current controller.
- Repeat the above steps for any of the controllers you plan to use. You can re-configure your controllers at any time by pressing Start on your controller and choosing Configure Input from the main menu.
NAVIGATING EMULATIONSTATION AND PLAYING GAMES
EmulationStation is designed to be fully controllable with your game controller. You only need a keyboard (and sometimes a mouse) for specific emulators, or for doing Raspbian or RetroPie configuration.- Once the Pi is fully booted up, you land on the main EmulationStation screen:
- Move left or right with your D-Pad to choose which platform/console emulator you would like to use.
- Press A to see the list of games available for the selected system. Move down or up with your D-Pad to select a game. If you hold the Up or Down control for a while, the list will scroll very quickly, allowing you to navigate through very long lists.
- Once you have selected a game to play, press A.
- To exit any game and return to the EmulationStation menu, press START+SELECT on your controller at the same time.
- From the game list of any given platform, you can move left or right with the D-pad to cycle through the game lists of other platforms, or press B to return to the main EmulationStation screen.
- To gracefully shut your Raspberry Pi down you can press Start on your controller to bring up the main menu and then use the D-pad to select Quit, and press A. Then on the Quit screen, select Shutdown System and press A.
Note: I personally rarely do this. Normally I just toggle the on/off switch on my power switch cable. Knowing this graceful shutdown process is useful in cases where you want to configure Raspbian or RetroPie, though. (You would use the Quit EmulationStation option instead of Shutdown System in these cases. Doing so drops you to a terminal prompt, which requires a keyboard to navigate.)
ADDITIONAL NOTES AND TROUBLESHOOTING
Note: Some of these steps require that you have a USB keyboard connected to your Pi!Jittery video and audio at first-time use
The first time you connect your Raspberry Pi to your television and start up a new image, it can take a few minutes for the device to completely configure its video and audio settings. So you might notice some flickering video or choppy audio for the first few minutes that you use the system. This should clear up automatically after a short while. If it doesn't clear up, you might need to change some settings in the RetroPie configuration screen.
No audio when connected to an HDMI television set
First off, you should always make sure your TV is powered on and has the right HDMI port selected before powering on your Raspberry Pi. (If you turn on the TV or select the input port after the Pi has booted, the Pi might not detect your TV's audio connection.) Try doing this first (rebooting Pi after the TV is already on and selected) before continuing with the next steps.
The default settings of this image support most HDMI TVs, however some televisions use a different way of "presenting" their audio inputs to connected devices in a way the default RetroPie settings don't recognize. I have had to make the following change in order to get RetroPie to work on one of the TVs in my house.
- With the Raspberry Pi powered on, exit EmulationStation by pressing F4 on your keyboard or bringing up the Main Menu and choosing Quit > Quit EmulationStation.
- At the command prompt, enter the following command:
sudo nano /boot/config.txt
- Navigate down to the line that says "#hdmi_drive=2". Remove the # so the line looks as follows:
hdmi_drive=2
- Press CTRL+X, and then press y to save the change.
- Type the following command to reboot the device:
reboot
While most of the games in this image work great, there are a few that simply don't work, and others that might have special requirements. Here are some things to check and/or keep in mind if a game isn't working as expected:
- Some games might require a different controller- for example if your controller has no analog sticks but the game was designed for analog controls, you won't have an ideal experience. Try switching out controllers if you suspect this is the case. I haven't figured out what's required to properly control Nintendo DS games, for example. Most of those games assume you have a stylus for touch control, but I don't know how that translates to the emulator included on RetroPie. If you know the answer, please leave a comment!
- Some games/emulators require a keyboard or mouse. For example, all of these emulators assume you have a keyboard connected: MS-DOS, ScummVM, Infocom, VideoPac.
- Sometimes the default button mappings might not be what you expect for a specific game. Try using X/Y instead of A/B, for example. Many of the games and emulators have configurable mappings, although the details of this are out of scope for this post. But you might look into custom mappings if you don't like the default control settings.
- If you have multiple controllers connected to your Pi, all of them can navigate the main menus but usually only one of them is "Player 1" and another is "Player 2", etc. Make sure you're holding the correct controller if the controller doesn't seem to respond during gameplay.
- Some games just don't work right on the Raspberry Pi, or with any current emulator. Try doing a web search for the specific game to see if other Pi users have gotten it to work. The RetroPie image you downloaded is customizable. If you find any games that you confirm just don't work, you can remove them and their associated metadata from your microSD card to free up space for other games.
If you'd like to skip the video that plays by default every time this image boots up, you can change this in the RetroPie settings. Note that these settings require a USB keyboard attached to your Pi.
- With the Raspberry Pi powered on, exit EmulationStation by pressing F4 on your keyboard or bringing up the Main Menu and choosing Quit > Quit EmulationStation.
- Enter the following command (note that unlike Windows, Raspbian is case-sensitive):
cd /home/pi/RetroPie-Setup
sudo ./retropie_setup.sh
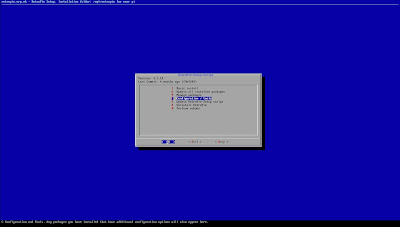
- The RetroPie-Setup Script screen appears. You can use the arrow, TAB, and ENTER keys to navigate menus in this program, and you can also use hotkeys (any letter highlighted in red) where available to select options. On the first screen, select the Configuration / tools option.
- On the Choose an option screen, use your arrow keys to scroll down to the splashscreen - Configure Splashscreen option and press ENTER.
- Select Choose splashscreen.
- Select RetroPie splashscreens.
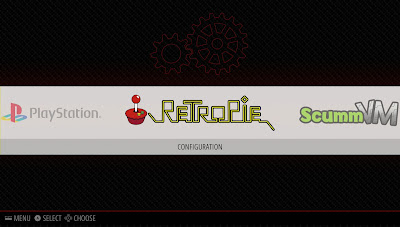
- Choose one of the available splashscreens listed here. I use the one called retropie-2015.png. It looks like this:
- After making your selection, you should see a message that says "Splashscreen set to" and the path of the file you selected. Press ENTER.
- Exit the RetroPie Setup program. You can do this by pressing Esc or using a Cancel option, where available.
- Enter this command to reboot your Pi:
reboot
While you do not need to connect your Pi to a network in order to use the preconfigured games in this image, you might want to enable Wi-Fi networking in order to remotely administer and customize your device. There is already a pretty good post about how to do this at the RetroPie site.
Note: When the RetroPie documentation talks about "the Retropie menu in emulationstation" they mean you use the left/right controls on your D-Pad to select RetroPie as if it were a console/platform:
And when you press A from there, you see this menu:
Important: Enabling Security on your Raspberry Pi
Although recent versions of the Raspian OS disable SSH access by default, I have noticed that it is enabled in the RetroPie image that I use. If you never connect your Pi to a network, this isn't a big deal, but if your device is connected to either your Ethernet or Wi-Fi networks, this is a potential security risk. To protect yourself, you should either disable the SSH feature if you're not going to use it or change the device's default password so your device can't be easily overtaken by a scripted attacker.
The raspi-config tool included with Raspian is where you can disable/enable SSH. You can get to it from a command line by exiting EmulationStation and running this command:
sudo raspi-config
You can also access it by selecting RetroPie from the main EmulationStation screen and choosing the "Raspi-Config" option from the RetroPie menu. You control the SSH setting inside the "Interfacing Options" screen of raspi-config. This page explains the process in detail.
You should also change the default password of your device if you ever plan to leave it connected to a network. If you're familiar with the Linux passwd command, you can use that. Otherwise you can use the Change User Password option in raspi-config to do this.
(The default username in Raspbian is pi and the default password is raspberry.)
I hope you found this guide helpful. Game on!

