Wednesday, February 10, 2016

Razer's Terrible Game Scanner Service

I'm no gamer but I love Razer Inc's peripherals. At both home and work I use their BlackWidow keyboards, DeathAdder mice, and Goliathus mousepads. They're reliable and they look and feel great. Sadly, today I discovered something about them that is not so great: The Razer Game Scanner Service.

I launched Sysinternals DebugView today to do some debugging and was surprised to see the following:

Some service installed on my computer was pumping tons of messages to my computer's debug console, writing the same message several times a second: "GameScannerService(RzProcessManager) (0xb20) (0xcb4)." It didn't take long to figure out that this service is part of the Razer Comms package, which must have installed along with the default Razer Synapse applications that you're prompted to install when you plug a new Razer device into your computer. I don't even have any games installed on this computer, so I obviously don't need this service- but I've got a much bigger problem: This is a Windows logo-certified commercial product that's installed on literally millions of machines around the world that's pumping thousands and thousands of lines of useless information to the debug consoles of those computers all the time. That's a huge waste of collective CPU resources, and it's just plain terrible design. Release-build software shouldn't ever dump anything to the debug console, ever. How in the world did this get past Razer QA and Microsoft's certification labs?

Since I don't need the service, I just disabled it in the Services control panel:
  1. Launch Services.msc.
  2. Locate Razer Game Scanner in the list of services.
  3. Double-click the service's entry, then click Stop and set the Startup type field to Disabled and then click OK.
Depending on the features you need, you might be able to simply uninstall Razer Synapse from the Programs and Features control panel.

Thursday, February 4, 2016

SOLUTION: How to Remove the "Launch Quick Remote" Icon from Your Android Lock and Home Screens

My Samsung Galaxy S5 phone received a couple of software updates earlier this week, and beginning yesterday a mysterious new icon appeared on both my lock screen and my home screen...


The icon obscured anything beneath it, and if I tried to drag it out of the way my phone's screen would dim like it was covered by a gray transparent overlay. Once this happened I was also no longer able to touch the screen or use the phone's physical buttons. The only way I could regain use of my phone was to pop out the battery and then pop it back in and restart.

This is what the icon looked like:
Here's how it appeared on my lock screen.

And this is how it appeared on my home screen, with the "Launch Quick Remote" bubble.

I had never seen this icon before, it covered up stuff on my screen, and touching it rendered the phone useless. What in the *bleep* was going on? My web searches came up empty, but I ultimately figured out how to fix the problem. It appears that the recent software updates AT&T pushed to my phone this week included an app called Peel Smart Remote, which seems to be some kind of universal remote app for your phone. I've never used it before, and have no desire to start. My first thought was to simply remove the app. Unfortunately, that's not possible on my phone- it's apparently part of AT&T's bundled image for the S5. I was still able to get rid of the icon though. Here's how:

Regaining control over your phone:
  • My phone is an AT&T Samsung Galaxy S5 (Model number: SAMSUNG-SM-G900A) and it's currently running Android version 5.0 (Lollipop). With that model it's really easy to just pop off the back cover, pry out the battery, and then replace it and power the phone back on. Once the phone boots back up you should be able to use your screen and buttons to perform the steps in the next section.
  • If your phone doesn't have a replaceable battery that you can easily pop out, commenter BiggestU passed along this tip: "You can power off by simultaneously holding down the power button and the volume down button for at least 7 seconds. Wait a minute, then turn the power back on again." (I will add that when I did this the phone restarted automatically, instead of shutting down- but it definitely does the trick.)
  • Another commenter, Renay, suggests that there might be a way to regain control of your phone without restarting: "When the screen is stuck, briefly press Vol-up, Home, and Power together. It will give control back immediately."
Getting rid of the icon:
  1. Once you have control over your phone, open up the Settings app and locate the Application manager.
  2. Locate Peel Smart Remote in the list and tap it to open its info.
  3. You will probably find that the app cannot be uninstalled. However, you should be able to disable it. Press the Disable button.

  4. When you return to the list of apps you should now find that Peel Smart Remote is disabled. If you restart your phone now, you should no longer see the icon.

That's all there is to it. I'm still left with some lingering questions, though:
  • Why are Peel/Samsung/AT&T putting this dumb icon on my screen without telling me what the *bleep* it's for?
  • What purpose is this thing supposed to serve anyway when tapping it makes my phone unusable? 
In the App Age, where both documentation and customer support are but distant memories, we may never know...

Monday, February 1, 2016

How to Move Plugins and Sample Libraries Without Reinstalling or Reconfiguring Anything

I was really frustrated when Waves and MusicLab omitted the ability for users to choose where to install their products in Waves Central and RealEight. Even though I've got a kickin' rad DAW PC, my primary system drive is a small SSD and I don't have room on it for anything other than my operating system and my personal files. Neither Waves nor MusicLab would help me move their products to a different drive (I asked), so I came up with a different solution...

In version 1.1.0.0 of UltimatePluginTool, I've added the ability to relocate entire folders to any other folder or drive on your computer in a way that doesn't affect your existing programs. If you've ever moved a Native Instruments product to another drive and then tried to use Maschine or Komplete Kontrol afterward, you know that relocating an application usually requires more work than simply dragging around some files. Well, the new Relocate Plugin Content wizard of UltimatePluginTool addresses those problems by leaving a symbolic link in the old location where your files used to reside which silently redirects any applications who look there to the new, correct location.

The wizard can move the files for you or just create the link if you've already relocated the files. The user guide included with the download has full instructions, and I've posted a video tutorial that walks you through three different examples of the Relocate Plugin Content wizard in action.

Even though I added this feature specifically because I wanted to move some of my music applications to a different drive, UltimatePluginTool's Relocate Plugin Content wizard isn't limited to music software. You can seamlessly locate pretty much any folder on your PC to another directory or drive. I've already used it to move a number of applications onto a secondary "programs and plugins" drive. Liberate your applications and unburden your drives!

Support UltimatePluginTool

I develop and maintain free software on my own time. I don't charge a fee because I want everyone to have equal access to my programs- but if something I wrote helped you and you'd like to express your thanks in a concrete way, you can send a donation of any amount via PayPal. Support from my visitors covers my hosting and licensing costs, and gives me incentive to keep putting out cool new utilities.

If you wish to help out, you can enter a donation amount below and then click on the Donate button. You do not need a PayPal account in order to donate! Just click the "Don't have a PayPal account" option on the page that comes up after you click the Donate button. The donation amount is in U.S. Dollars (USD).

Amount: $


Note: You might receive a personal "thank you" from me in response, but I won't sign you up for any mailing lists and you won't hear from me again unless you contact me first. Thanks for your consideration!

Monday, January 11, 2016

Understanding Windows 10 Upgrade System Settings

Microsoft has gone to great lengths to get users of Windows 7 or Windows 8.1 to upgrade to Windows 10- by hook or by crook. While Microsoft has published very little technical information about their systems for encouraging and pushing Windows 10 upgrades to users of earlier operating systems, some of the published information that does exist is actually wrong or incomplete...


I put together a video that explains some of the well-known Windows settings related to Windows 10 upgrades. It also demonstrates how some of the background tasks that Microsoft installs along with its Windows 10 program files actively reset system settings that you might have changed.

You can view the video here, and the full transcript appears below.


TRANSCRIPT

The Windows Update patch named KB3035583 is most well known for installing the "Get Windows 10" icon app on Windows 7 and Windows 8 computers. The first version of KB3035583 began appearing on peoples' computers in early-to-mid 2015, but Microsoft has released several subsequent versions since that time, under the same name. If your computer is configured to install Windows updates automatically and you already have a version of KB3035583 installed, Windows Update installs the new versions of the patch on your PC as they become available, replacing the pre-existing version.

The 'Get Windows 10' icon app.

Aside from the Get Windows 10 icon app, KB3035583 includes a number of other programs that play different roles in Microsoft's aggressive campaign for the widespread adoption of Windows 10. Like the Get Windows 10 app, these programs are scheduled to run at certain times, or in response to certain events, as defined in the Windows Task Scheduler.

Almost as soon as Microsoft began pushing the Get Windows 10 app to the public, users of Windows 7 and Windows 8 who weren't interested in upgrading to Windows 10 began looking for ways to get rid of the icon and prevent unwanted operating system upgrades. There are some well-known registry values associated with the Get Windows 10 app and various other aspects of Microsoft's Windows 10 upgrade apparatus.

One of these registry values, DisableGWX, hides the Get Windows 10 icon from your notification area. If you have the KB3035583 patch installed and Windows launches a scheduled instance of the Get Windows 10 app, the app immediately checks for this registry value and silently exits without displaying the icon if the value exists and has a value of 1. Having this registry value in place does not prevent the KB3035583 patch from being installed, and doesn't prevent the other background tasks associated with the patch from running. It only prevents the Get Windows 10 icon and related notifications from appearing in your notification area.

Another registry value, AllowOSUpgrade, plays a part in certain aspects of the Windows 10 Upgrade process, although its full purpose is not publicly documented. If the value exists and is set to zero, it appears to prevent Windows 10 Upgrades that are initiated via Windows Update from succeeding. You might think this would protect you from an unwanted Windows 10 upgrade, but it's not quite that simple. You see, on many computers, some of the scheduled background tasks associated with the KB3035583 patch re-enable the AllowOSUpgrade value by setting it to 1.

One of these tasks, refreshgwxconfig-B is scheduled to run twice a day. If yours is one of the affected computers and you manually disable the AllowOSUpgrade value by setting it to 0, the scheduled task will re-enable it the next time it runs.

Note: If you watch the video that accompanies this post, you can see the refreshgwxconfig-B task reset the AllowOSUpgrade setting in real time.

Another Windows 10 registry value that scheduled background tasks routinely reset is ReservationsAllowed. Interestingly, unlike AllowOSUpgrade, which gets enabled every time the tasks run, ReservationsAllowed gets disabled (set to zero) instead. Again, there is very little official information on the purpose of this registry value, and the only Microsoft knowledge base article that mentions it (KB3080351) has been proven to be incorrect. [Update: On January 13 they finally corrected this knowledge base document; it no longer mentions ReservationsAllowed at all.] My own theory as to why the background tasks are disabling the ReservationsAllowed setting is that Microsoft has transitioned away from the reservation system they originally used at Windows 10's launch, and have instead introduced several methods of performing immediate upgrades. You don't need to reserve an upgrade anymore; you simply upgrade.

It might occur to you that simply uninstalling the KB3035583 patch would solve the problem of Windows changing your system settings behind your back. Unfortunately, if you already had previous versions of the patch installed that were subsequently upgraded by newer versions, attempting to remove the patch now just rolls you back to an earlier version. It won't fully remove the patch anymore. (You can see this demonstrated in the video.) And these files are hard to remove manually, since they are protected by additional layers of Windows security that require more than simple administrator access.

GWX Control Panel is a free tool that checks for many of the files and system settings associated with Windows 10 upgrades. It can disable or enable the Get Windows 10 app and  disable or enable the ability to perform Windows 10 Upgrades just like you can do in the Windows registry. It also has a special Monitor Mode that alerts you if it detects new files or settings that may leave you vulnerable to Windows 10. (For example, it notifies you if Windows re-enables the AllowOSUpgrade registry value.) It can also delete hard-to-remove files like the secret Windows 10 Download folders and the KB3035583 program files and scheduled tasks.

GWX Control Panel 1.7.


If you prefer to take care of all these things manually, the information is out there. You just have to know what to look for. GWX Control Panel is just a quick, easy, and free way to reclaim control over your current operating system.

ADDENDUM

My video covered some specific system settings that had been getting discussed (and debated) in the news recently, but here's some additional information not covered in the video. One of the more important registry settings related to the Windows 10 upgrade process is a Windows Update policy setting called DisableOSUpgrade. You can set this value manually, or by editing a property in the Local Group Policy Editor control panel (gpedit.msc). You can find instructions on how to set this property in this knowledge base article.

The 'Turn off the upgrade to the latest version of Windows through Windows Update' option in the Local Group Policy Editor manages the DisableOSUpgrade registry value.

The registry value doesn't exist by default; you must create it manually and set it to 1 (or do so indirectly via the Policy Editor) in order for it to take effect. Also keep in mind that you have to enable this setting in order to disable some Windows 10 upgrade scenarios. One observation here: I've noticed that if you set the DisableOSUpgrade setting manually, that change doesn't get reflected in the Local Policy Group Editor... you can't always trust what you see in the control panel. The only way to be sure the value exists and is set properly is to navigate to the correct location in Regedit (or use the "Save Diagnostic Logs" feature of GWX Control Panel, which will tell you if it determines that the registry value is missing or incorrect).

In the video I discussed a couple of upgrade-related settings that get reset by various KB3035583 background tasks. While I haven't seen any background tasks change the DisableOSUpgrade setting, the registry value is not necessarily permanent, either. The problem is that Microsoft occasionally pushes update patches for Windows Update itself, and these patches sometimes wipe out existing Windows Update settings, including the DisableOSUpgrade value. (Here's an example of one such patch where I and several of my users observed this behavior.) These Windows Update client updates are kind of special, because Microsoft can push them to your computer automatically, even if you have your Windows Update settings configured to "Check for updates but let me choose whether to download and install them" or "Download updates but let me choose whether to install them." This is because they sometimes include necessary changes in order to communicate properly with Microsoft's update servers.

I don't believe this is a malicious or targeted change on Microsoft's part (it's essentially a re-install/clean slate for Windows Update sometimes), but the fact is that you can't expect your Windows 10-related registry changes to "stick" 100% of the time.

Luckily, this is yet another system setting that GWX Control Panel checks for (ever since version 1.3), and the program's Monitor Mode will alert you if any recent updates delete or otherwise change your settings- also and give you the chance to fix it with a single click.

SUMMARY

The TL;DR version of this post is:
  • You can configure several aspects of Windows 10 upgrade behavior by tweaking some registry settings, although concrete information on these settings can be hard to find.
  • Some of these Windows settings can change while you're not looking, as a result of scheduled tasks or occasional Windows Update patches, so some vigilance is advisable if you're intent on keeping your current operating system and minimizing unwanted upgrade notifications.
  • The KB3035583 patch is a lot more than just the "Get Windows 10" icon, and some of its associated scheduled tasks can revert system settings that you change manually.
  • Uninstalling KB3035583 doesn't always actually remove the program files, since Windows only lets you uninstall the most recent version of the update. If you already had a version of the patch installed before the most recent one landed on your system, "uninstalling" the patch will just restore the previous version.
  • GWX Control Panel isn't required to prevent Windows 10 and its associated annoyances, but it's a convenient, quick, and safe way to check and change your settings and fix other Windows 10-related problems and annoyances.

Tuesday, December 29, 2015

GWX Control Panel 1.7 User Guide

GWX Control Panel is a free program that you can use to protect your Windows 7 or Windows 8-based computer from unwanted Windows 10 notifications and upgrades- and version 1.7 of the program introduces a number of features and usability improvements that give you even more control over your computing environment.


This user guide covers all features of the current version of the program and highlights some of the new capabilities and improvements in version 1.7. Head to the download page to pick up the latest version of the program.


UPDATE (January 24, 2016): This user guide might not be as up-to-date as the original GWX Control Panel announcement page. I apologize for the confusion over having different "user guide" posts, but you wouldn't believe how archaic and brittle this blogging platform is. Version 1.7 was such a big update that it was easier for me to just write a new user guide for it from scratch and then import it into the main post once I was finished. Anyway, please check the announcement page for the latest information. There isn't anything in this post that's not covered there.

WHAT'S NEW IN VERSION 1.7

  • (Note this post is only current up to version 1.7.0.2; please check the announcement page for newer information.)
  • The new Delete Windows 10 Programs feature gives you the ability to delete some hard-to-remove Windows 10-related applications with just a couple of mouse clicks.
  • GWX Control Panel now monitors your Windows Update preferences and alerts you if your settings switch to "install updates automatically" mode from one of the other settings that give you more control over your updates. Also, you can now check and change your Windows Update preferences with the new Change Windows Update Settings feature.
  • The program no longer prompts you for restarts after you perform certain operations, due to improved handling of certain system settings.
  • Much more detailed "Save diagnostic info" reports tell you exactly which settings GWX Control Panel detected on your system.
  • Much better user experience for computers with multiple Windows profiles and Standard/Child user accounts.
  • There's a lot more! For a complete breakdown of all updates and features in version 1.7, check out the GWX Control Panel Release Notes section of the announcement page.

WHAT IT DOES AND HOW IT WORKS

The goal of GWX Control Panel is to protect you from unwanted Windows 10 upgrades and notifications without disabling important or popular operating system features, and without requiring you to change the way you work with Windows. Here are some specific ways GWX Control Panel helps you:
  • The Disable 'Get Windows 10' App feature removes Microsoft's "Get Windows 10" nagware app from your notification area.
    This is the 'Get Windows 10' icon app.
  • The Prevent Automatic Windows 10 Upgrades feature checks for system settings that leave you vulnerable to unwanted Windows 10 upgrades and gives you the ability to fix them.
  • The Prevent Automatic Windows 10 Upgrades feature also restores your Windows Update control panel to its normal behavior if it gets hijacked by Windows 10 advertisements or installers. Here are some specific symptoms it fixes:
    This is one of numerous ways that Windows 10 can hijack your Windows Update control panel. In this example, Windows Update is hiding the normal Windows 7 updates behind the "Show all available updates" link.
    The Prevent Automatic Windows 10 Upgrades feature fixes the "Your upgrade to Windows 10 is ready" problem in Windows Update. (Note, some users will have to follow this with Clear Windows Update Cache in order to fully resolve this issue.)
    The Prevent Automatic Windows 10 Upgrades feature can even rescue your PC from impending Windows 10 installs that display the "It's almost time for your upgrade" window.
  • The Delete Windows 10 Download Folders feature locates and deletes hidden Windows 10 installer files that Microsoft secretly downloads to your computer.
  • The Delete Windows 10 Programs feature easily deletes hard-to-remove program files that are known to prepare your computer for Windows 10 upgrades.
  • The program alerts you if your Windows Update settings change from one of the safer "download only" or "check only" options to "automatically install" behind your back and gives you the chance to fix it with the Change Windows Update Settings feature.
  • The optional Save Diagnostic Info feature (in the right-click pop-up menu of the title bar) generates enhanced diagnostic reports that give you detailed information on any settings GWX Control Panel finds that leave you open to unwanted Windows 10 behavior.
  • The optional "Monitor Mode" feature runs quietly in the background watching for unexpected system changes, and alerts you as soon as any new Windows 10 settings or files are detected.
What it doesn't do:
  • Doesn't interfere with any Windows features such as Windows Update or OneDrive; the goal is to keep you safe from Windows 10 without having to change the way you work with your computer. (Note: You can optionally choose to disable automatic Windows updates with the Change Windows Update Settings feature if you prefer, but all update-related settings you can change in GWX Control Panel are safe and reversible.)
  • Doesn't block or hide any specific Windows Update patches. (Although it can detect and optionally delete problematic Windows 10 files that Windows Update installs.)
  • Doesn't include any advertising.
  • Doesn't include any additional third-party software (you can even download it as a stand-alone executable).
  • Doesn't collect any personal data or "phone home" in any way.
  • Doesn't do any specific checking or disabling of Windows "telemetry" features, although this may appear as an optional capability in a future release.
  • Doesn't (yet) prevent the Windows 10 advertisement that Microsoft displays in Internet Explorer. I am currently investigating whether there's a safe way to stop this. (But for now I recommend just using a different browser like Firefox or Chrome if you don't want to see these ads.)

    GWX Control Panel is not yet able to inhibit the "Microsoft recommends upgrading to Windows 10" banner ads in Internet Explorer, but this ability might appear in a future release.

    This is another example of the annoying Internet Explorer "Microsoft recommends upgrading to Windows 10" ads that GWX Control Panel does not (yet) fix. Investigation on how to stop this behavior is ongoing.

DOWNLOADING AND INSTALLING GWX CONTROL PANEL

You can always download the latest version of GWX Control Panel at the Ultimate Outsider Downloads page. The program is available for download either as an installer or as a standalone executable, but I recommend using the installer for the following reasons:
  • The installer gives you some handy Start menu and desktop shortcuts for GWX Control Panel, documentation, and the uninstaller.
  • The installer can provide a better experience for computers with multiple user profiles. (The program's Monitor Mode might not work properly for all users unless you run it from an appropriate location, and the installer takes care of this for you.)
  • Using the installer allows for a more streamlined experience when updating to newer versions of GWX Control Panel, for a number of reasons.
The standalone version is still available for folks who want it, though.


Important
If you maintain a computer with multiple user profiles, please follow these simple tips to ensure the most streamlined and predictable installation and configuration experience:
  • Use an administrator account when installing or uninstalling GWX Control Panel. (Standard and Child accounts actually run software installers using an administrator account's credentials, and this can result in a confusing experience for non-technical Windows users.) The troubleshooting guide has more information about how to use GWX Control Panel with Standard and Child user accounts.
  • If your computer has multiple user profiles, log out of all profiles except your primary administrator user account before installing or uninstalling the program. The installer closes running instances of the program before upgrading or removing GWX Control Panel, but it cannot "see" instances of the process running under other user accounts. The fail-safe thing to handle this is to restart Windows, log in to an administrator account of your preference, then install, upgrade, or uninstall as desired.
When you launch GWX Control Panel, you'll see something like this:

The main GWX Control Panel window in version 1.7.

I posted a quick video tutorial for GWX Control Panel 1.1 at YouTube. There's also another tutorial that covers the new features in versions 1.2 and 1.3. Many features have been added since those videos were produced, however.

THE INFORMATION SECTION

The upper portion of the main GWX Control Panel window is enclosed in a box labeled Information. This is where you can learn how protected your PC is from Windows 10 upgrades and notifications.

Here is a summary of the bits of information available here:
  • Is 'Get Windows 10' icon app running? This indicates whether the Microsoft program that creates the "Get Windows 10" icon in your notification area is currently running. If the program doesn't exist on your computer, it will say, "(App not found)".
  • Is 'Get Windows 10' icon app enabled? This indicates whether Microsoft's "Get Windows 10" is configured to run on your PC. It is possible for this field to say Yes, even if the first field says No, because Microsoft uses a series of scheduled tasks to determine when to run the program. If the program doesn't exist on your computer, it will say, "(App not found)".
  • Are automatic Windows 10 Upgrades allowed? This field indicates whether your computer is vulnerable to unwanted Windows 10 upgrades and related side-effects that can appear in your Windows Update control panel. If this field says Yes, it means that one or more critical system settings are set in such a way that you might experience unexpected Windows 10 upgrades or other upgrade-related behaviors in certain parts of the operating system (such as messages in the Windows Update control panel encouraging you to upgrade to Windows 10). If you would like to know exactly which settings GWX Control Panel discovered, you can find this information in the output file generated by the Save diagnostic info command in the program's system menu. (See "The System Menu" section for more info.)
  • Automatically install Windows Updates? If this field says Yes, it means that you currently have Windows Update configured to automatically install new updates on a regular schedule. This is not recommended if you truly wish to avoid Windows 10, since Microsoft routinely pushes new Windows 10-related updates, and you could easily get an unpleasant surprise by installing all new updates without reviewing them first. This field is new in version 1.7, in response to a number of reports I've heard from Windows users who claimed their Windows Update preferences changed from "download only" or "check only" to "automatically install" without their consent. GWX Control Panel checks for this now so you can catch any unexpected changes.
  • Windows 10 Download folders found? Microsoft pushes the Windows 10 installer files into secret, hidden directories on unsuspecting users' computers through a couple of different methods. This field indicates whether GWX Control Panel detects one or more of the locations where these files are known to reside.
  • Size of Windows 10 download folders: If one or more of the hidden download folders are found, this field indicates the total amount of storage space occupied by the files they contain.
  • Open BT Folder: When the hidden $Windows.~BT download folder is found, you can click this button to open the folder in Windows File Explorer.
  • Open WS Folder: When the hidden $Windows.~WS download folder is found, you can click this button to open the folder in Windows File Explorer. This folder is less common, and is usually the result of running Microsoft's Windows 10 Media Creation Tool.
  • GWX Control Panel Monitor Mode Status: This indicates whether you have enabled the Monitor Mode feature of GWX Control Panel, and also whether a Monitor Mode instance of the program is currently running. Depending on how you've set up your computer, you might have monitor mode enabled for a specific user account or for all users on the PC, and that is reflected in this field as well. (Please see the section on Monitor Mode for more information.)
  • Status and settings summary. Most of the time, this little box gives you a quick summary of your PC's current status as far as Windows 10 files and settings go. This box can also display the current status of operations that take some time to complete.
     

THE BUTTONS

The lower portion of the main GWX Control Panel window contains a number of buttons for configuring and troubleshooting your PC. This is what they do:
  • Enable/Disable 'Get Windows 10' App: This enables or disables Microsoft's Get Windows 10 icon app, either removing or restoring the icon in your notification area, as desired. This button is only available if GWX Control Panel detects the app on your PC.
  • Prevent/Allow Automatic Windows 10 Upgrades: This changes a number of settings that determine whether Microsoft is able to upgrade your PC to Windows 10 or change the behavior of your Windows Update control panel to deliver Windows 10 advertisements and updates. This does NOT disable Windows Update and does not block or hide any Windows Update patches.
  • Delete Windows 10 Download Folders: If any of the hidden Windows 10 installer folders are detected on your computer, you can use this button to delete those files and free up storage space. This button is not available if no download folders are detected. Note that this procedure can take some time (once it starts actually deleting files, you should see the "Size of Windows 10 download folders" field report gradually decreasing sizes. If you have trouble deleting all of the files, you can use the "Save diagnostic info" option in the program's system menu to see if there were any telling error messages.
  • Change Windows Update Settings: This new button in version 1.7 opens a dialog box where you can change how Windows update behaves. These are some of the same options available in the "Change settings" screen of the Windows Update control panel. For the best balance of security and protection from Windows 10, it's recommended that you choose one of the options that lets you choose which updates you wish to install, rather than installing all updates automatically or disabling updates entirely.
  • Clear Windows Update Cache: While not directly related to Windows 10, this step is sometimes necessary to remove some lingering Windows 10 notifications from your Windows Update control panel after using the "Prevent Automatic Windows 10 Upgrades" feature. While this feature isn't harmful, it really isn't necessary in most cases, and it does result in some one-time changes in Windows Update that some users might find annoying. GWX Control Panel lists all known one-time effects when you choose this option and gives you a chance to decide whether to proceed before clearing your update cache.
  • Enable/Disable Monitor Mode: Use this button to manage the Monitor Mode feature of GWX Control Panel. Monitor Mode places an icon in your notification area that alerts you if it detects any changes to your PC that might leave you vulnerable to Windows 10. Please see the "Using Monitor Mode" section below for more info.

    Note: This button configures Monitor Mode for all user profiles on the PC. If you'd like to manage Monitor Mode for just a single user profile, you can use the Enable/disable Monitor Mode for current user command on the system menu.
     
  • Display the User Guide: This launches your default browser to the GWX Control Panel user guide.
     

THE SYSTEM MENU

If you click the icon in the upper-left of the main GWX Control Panel window, you will see the system menu:
The version 1.7 system menu.

  • Check for updates: This opens a dialog box that displays the version of GWX Control Panel you're currently running and links you to the Ultimate Outsider Downloads page to see if a newer version is available.
  • Save diagnostic info: This saves a file called GwxControlPanelLog.txt to your desktop that contains relevant information about your computer and your Windows 10-related settings and files. Beginning with version 1.7 this report explains exactly what system settings it detected on your PC, which will help you understand what's going on behind the scenes when Monitor Mode detects new changes, for example.
  • Restart Monitor Mode: You can use this to launch a Monitor Mode instance if you have Monitor Mode enabled, but it's not currently running.
  • Enable/disable Monitor Mode for current user: Use this to manage monitor mode configuration for a specific user account on the computer. This replicates the behavior of the Enable/Disable Monitor Mode button from version 1.6 whereas in 1.7 that button now manages the feature for all user accounts on the computer.
  • About GWX Control Panel: Just displays a dialog box with the current version and author information.
     

USING MONITOR MODE

When you enable GWX Control Panel's optional Monitor Mode, a new icon will appear in your notification area that will alert you if GWX Control Panel detects any unexpected files or settings that leave you vulnerable to Windows 10. Once enabled, GWX Control Panel will start and quietly monitor your computer whenever you log in to Windows.

Enabling/Disabling Monitor Mode for all users (recommended):
If your computer has multiple user profiles- and especially if some of those profiles are Standard or Child accounts- the best way to use Monitor Mode is to enable it for all users. To do this, just click the Enable Monitor Mode button in the main GWX Control Panel window. The notification icon will appear in the currently logged-on session of Windows, and will also appear for other user accounts who later sign in to Windows.

To disable Monitor Mode, just click the Disable Monitor Mode button. If you do this from a Standard or Child user account, you will have to enter the password of an administrator user account in order to proceed. Please see the troubleshooting guide for more information about the limitations of Standard and Child user accounts.

Note
Version 1.6 of GWX Control Panel only enabled Monitor Mode on a per-user basis, which resulted in some confusing behavior for users running on Standard or Child accounts. As a result, if you upgrade from version 1.6 to 1.7 of GWX Control Panel, you might find that Monitor Mode is enabled for both the current user and for all users. While this is harmless (only one Monitor Mode instance ever runs per-user at a time), you can fix it by disabling Monitor Mode for the current user. (See below.)

Enabling/disabling Monitor Mode for a single user:
If you'd prefer to only have the Monitor Mode icon active on a per-user basis, or if you'd like to disable the single-user Monitor Mode from a previous version of GWX Control Panel, just choose the Enable/disable Monitor Mode for current user option in the program's system menu (accessible by clicking the icon in the upper-left corner of the program window).

Responding to Monitor Mode alerts:
When Monitor Mode detects a Windows 10-related change to your computer, its notification icon flashes with an exclamation mark, and a balloon notification normally appears to draw your attention. (The operating system decides whether or not you see these balloon notifications and how long they appear. Don't worry if you don't see one.)
The Monitor Mode balloon notification.

To see what specific settings or files were detected, open up the main GWX Control Panel window. You can do this in several ways:
  • Click the balloon notification.
  • Double-click the Monitor Mode icon in your notification area.
  • Right-click the Monitor Mode icon and then click Display GWX Control Panel from the shortcut menu.
Any of the above three actions also stops the notification icon from flashing.

Once you have a visible instance of GWX Control Panel open, check the various fields in the program's Information section to see what files or settings may have triggered the alert. If you'd like a more detailed report, you can use the Save diagnostic info option from the shortcut menus of either the Monitor Mode icon or the main GWX Control Panel window.

When alerts are triggered:
Monitor Mode keeps track of which Windows 10 settings or files it discovered, and if you choose not to remedy a specific new finding, it will not alert you again until something else changes. This alerting is done on a per-user basis. Consider this scenario:
  1. User A receives a Monitor Mode alert because some Windows 10 files were detected on the computer. The user dismisses the alert but decides not to do anything about it.
  2. User B logs in to Windows and also receives the alert, but likewise doesn't do anything to fix the problem.
  3. When user A logs back into Windows, Monitor Mode does not alert that user about the same problem again.
Keep this in mind if you receive a Monitor Mode alert about something you don't care about. For example, if you are aware of the risks of leaving your Windows Update set to "Install updates automatically" and wish to leave it that way, just dismiss the Monitor Mode alert and forget about it. You won't be bothered again unless someone changes your Windows Update settings to something else and then changes it back to "install automatically."

The Monitor Mode pop-up menu:
If you right-click the Monitor Mode icon, you'll see this pop-up menu:

Several of the menu options are also available from the system menu of the main GWX Control Panel window, but some are unique to Monitor Mode:
  • Display GWX Control Panel: Opens a visible instance of GWX Control Panel if one isn't already opened. Also dismisses any alerts if the Monitor Mode icon is currently flashing.
  • Reset Control Panel Window Position: If you ever find the main GWX Control Panel window in a strange location such that it is not visible or cannot be moved due to the title bar being out of reach, this option re-centers the program in the middle of your main display.
  • Check for updates: This opens a dialog box that displays the version of GWX Control Panel you're currently running and links you to the Ultimate Outsider Downloads page to see if a newer version is available.
  • Save diagnostic info: This saves a file called GwxControlPanelLog.txt to your desktop that contains relevant information about your computer and your Windows 10-related settings and files. Beginning with version 1.7 this report explains exactly what system settings it detected on your PC, which will help you understand what's going on behind the scenes when Monitor Mode detects new changes, for example.

    Note
    Doing Save diagnostic info from Monitor Mode does not include any potential error messages that might occur when attempting to delete Windows 10 download files. Please use the option from the main GWX Control Panel instance if trying to troubleshoot file delete problems.
  • About GWX Control Panel: Just displays a dialog box with the current version and author information.
     

WORKING WITH STANDARD AND CHILD USER ACCOUNTS

If you have multiple user accounts set up on your Windows PC and some of them are Standard or Child accounts, there are some important things you should know about how GWX Control Panel works when running under these limited account types.

Under normal circumstances (when launching GWX Control Panel from one of the desktop or Start menu shortcuts, or when it loads in Monitor Mode), GWX Control Panel behaves the same for all Windows user account types: It doesn't need administrator permissions when it's just checking your current settings (Monitor Mode never needs administrator permissions). Things get a little more complicated once you attempt to use GWX Control Panel for a system-level change that requires administrator permissions.

If you are using an administrator account and User Account Control (UAC) is enabled, Windows will ask if you want to grant GWX Control Panel permission to make settings to your computer the first time you attempt to perform an action that requires administrator permissions:
The User Account Control prompt when an administrator account attempts a system change in GWX Control Panel.
If you are using an administrator account and User Account Control is disabled, GWX Control Panel will silently grant itself administrator permissions and perform the action you requested.

If you are using a Standard or Child account and try to use a GWX Control Panel feature that requires administrator access, Windows prompts you to enter the password of an administrator account. Important: After you enter the password, GWX Control Panel runs under the user profile of the administrator account until you quit the program!
Windows requires an administrator password if a Standard or Child account tries to make any system-level changes.

In all three of the above cases, GWX Control Panel continues running at elevated permissions until you quit the program. For Standard and Child account users, this can have some confusing side-effects!
  • User-specific settings, like Enable/disable Monitor Mode for current user, will happen under the administrator user's account.
  • The Display the User Guide feature launches the administrator account's default browser with that account's browser settings, bookmarks, etc.
  • The Save Diagnostic Info report will say "User is Administrator=Yes" because Windows is running it under the account of an administrator.
The GwxControlPanelSetup installer requires administrator permissions in order to install/upgrade/uninstall GWX Control Panel. If a Standard or Child account uses the the installer and then checks the option to launch GWX Control Panel in the final page of the setup wizard, that instance of GWX Control Panel inherits the permissions of the installer; it runs under the administrator's account. This is why I recommend that you only run the installer/uninstaller from an administrator account.

Please see the troubleshooting guide for some more information on weird things that Standard/Child user accounts can experience.

REMOVING GWX CONTROL PANEL

How you remove GWX Control Panel depends on which version you downloaded:

If you downloaded the stand-alone version: If GWX Control Panel's Monitor Mode is enabled, use the Disable Monitor Mode button to shut it off. Next, simply locate the GWX_control_panel.exe file you downloaded and delete it.

If you downloaded the installer: Open your Programs and Features control panel in Windows. Locate the GWX Control Panel entry and select it. Next, click Uninstall.  Optionally, you can browse directly to the install folder (the default location is C:\Program Files (x86)\UltimateOutsider\GWX Control Panel) and launch Uninstall.exe. Beginning in version 1.7 there is also an Uninstall GWX Control Panel shortcut in the Start menu, under the GWX Control Panel folder.

SUPPORT GWX CONTROL PANEL

I develop and maintain free software on my own time. I don't charge a fee because I want everyone to have equal access to my programs- and unlike a lot of developers of "free" software, I don't bundle any annoying third-party programs, spyware, or advertising with my tools. However, if something I wrote helped you and you'd like to express your thanks in a concrete way, you can send a donation of any amount via PayPal. Support from my visitors covers my hosting and licensing costs, and gives me incentive to keep putting out cool new utilities.

If you wish to help out, you can enter a donation amount below and then click on the Donate button. You do not need a PayPal account in order to donate! Just click the "Don't have a PayPal account" option on the page that comes up after you click the Donate button. The donation amount is in U.S. Dollars (USD).

Amount: $


Note: You might receive a personal "thank you" from me in response, but I won't sign you up for any mailing lists and you won't hear from me again unless you contact me first. Thanks for your consideration!

Click here on the PayPal page if you don't have a PayPal account.

CONTACTING THE AUTHOR

If you have problems that don't sync up with your expectations or with the user documentation, please let me know. User feedback has been important in helping me decide where to focus for future updates. There are three easy ways to get in touch with me:
  • Leave a comment here on the blog.
  • Visit the Ultimate Outsider page on Facebook and use the Message feature to send me a private message.
  • If you ever decide to send a PayPal donation (see the "Support GWX Control Panel" section above), you can use the "add special instructions to recipient" field to include a personal note. I read and respond to all of those.
     

ISSUES FIXED IN VERSION 1.7.0.2

The version of GWX Control Panel that's currently posted fixes the following issues that users reported with version 1.7.0.1:
  • If you used GWX Control Panel's Monitor Mode and you use the installer to upgrade from an earlier version of the program, the installer didn't automatically restart Monitor Mode after the upgrade is complete. The installer now restores Monitor Mode if you had it enabled previously. GWX Control Panel will also now start Monitor Mode if it detects that you have it enabled but for some reason it isn't running.
  • The new buttons and information fields in version 1.7.0.1 made the program too tall to fit on very low resolution screens. The minimum screen size I tested with internally was 1360x768, but many netbooks have 800x600 screens, which can't display the whole GWX Control Panel program window. Version 1.7.0.2 has been re-arranged so that it doesn't take up so much vertical space.
  • If you already had your Windows Update settings configured to "automatically install updates" this would trigger an alert in Monitor Mode the first time it ran, even if you WANT to have Windows Updates at that setting. The real purpose of this alert is to let you know if Microsoft changes your Windows Update settings without your consent. Version 1.7.0.2 will now only trigger an alert if it detects that Windows Update changed from one of the other three options to "automatically install," which might indicate that a Windows Update patch reverted your Windows Update preferences.
     

FOR MORE INFORMATION

There's a lot more information about the program at these other posts:

Tuesday, December 15, 2015

Amazon Assistant Breaks Gmail Links in Firefox - And How to Fix It

Last week Amazon began rolling out a replacement to their Amazon 1Button App browser add-on called Amazon Assistant. Also beginning some time last week, any time I clicked a link inside an email on my Gmail account, Firefox would just open up a blank page instead of navigating to the link I had clicked. Coincidence???

SYMPTOMS

Firefox is my primary browser, and for the past week this frustrating problem eventually afflicted every one of my Windows-based desktops and laptops. Basically, any time I tried to click a link in Gmail:

I'd end up with a blank screen instead of the link I was hoping to see:

THINGS I TRIED

I went through all the ordinary steps in trying to solve the problem, and none of them worked.
  1. I tried clearing Cached Web Content in the Firefox Advanced > Network options.
  2. I tried removing all Google cookies in Firefox's Privacy options.
  3. I tried switching from Auto-detect to No proxy in Firefox's Advanced > Network > Settings options.
None of this made a difference.

THE SOLUTION

I couldn't find any recent information online about this problem, and none of the solutions people had suggested when this sort of thing happened in the past worked for me. And then I stumbled across this unassuming little tweet:

Eureka!

I'm going to try reporting this issue for Amazon, but for the time being, the only way I've found to make Gmail links work again is to disable or remove the Amazon Assistant add-on. Here's how:
  1. Click the hamburger menu in the upper-right of your Firefox browser window, and then click Add-ons.
  2. On the Extensions tab of the Add-ons Manager, select Amazon Assistant for Firefox and then click Disable (or Remove). The add-on's state will change accordingly.
  3.  Close the Add-ons Manager and return to your Gmail account. Locate an email that contains a link you had previously tried to click and see if it works now.
    Aww yiss!
My thanks to Uncanny Kate Kirby on Twitter for helping solve this mystery!

Sunday, December 6, 2015

Tutorial: Making a Multi-output Drum Kit in UVI Falcon

UVI Falcon has taken the soft synth world by storm since its release, but there's not a whole lot of information out there yet on how to do certain things with this powerful instrument.


This tutorial walks you through the following aspects of building your own sample-based drum kit in Falcon:
  • Using layers in Falcon to send different drum sounds to separate audio output channels that you can mix and process individually in your DAW.
  • Setting up an exclusive group (or "choke group") to simulate real hi-hat behavior.
  • Using Falcon's "custom drop" feature to import multiple samples into a single keygroup.
  • Using the round robin trigger mode to add variety to individual percussion sounds.
  • And finally, we'll see how to apply some of this knowledge to modifying kits in UVI's excellent Beat Box Anthology collection of classic drum machine samples.
To help you get up to speed quickly I've put together a free mini sample pack for this tutorial, which you can download from the Ultimate Outsider Software page. We'll start off by building the kit's layers and importing samples, and then complete the kit by setting up the multi-channel audio routing in a DAW. As an added bonus, I'll show you how to create or modify your own kits using samples from UVI's Beat Box Anthology. I'm using Ableton Live 9 in my examples, but most of what's covered here applies regardless of what DAW you're using. (Part 5 of the written tutorial also includes configuration steps for Steinberg Cubase.)

TUTORIAL VIDEO

I produced a YouTube companion video that covers everything in this written tutorial except for Cubase configuration.


If you prefer written tutorials, read on!

PART 1: ADDING THE KICK LAYER

  1. Open up a new DAW project and create an instance of Falcon. Make sure your left and right panels are both visible. You toggle the panels on or off using the Show/Hide Panel buttons at the top of the Falcon window. Also make sure all the sections of the Edit tab (Program, Layer, Keygroup, Oscillator, Mapping, etc.) are visible by enabling their respective icons. Falcon automatically creates a new, empty program (patch) when you start a new instance.

  2. Download the Falcon tutorial sample pack from the Ultimate Outsider Software page. Extract the samples to a local folder and then browse to them in the file browser tab of Falcon. I've added my copy of the folder to the Favorite Places section of the browser.
  3. Click the wrench icon near the top of the Falcon window to open Falcon Preferences. On the General tab, enable the One Shot option next to Sample drag'n'drop mode. This will ensure that our drum samples automatically play all the way through when triggered.
  4. You'll notice that each of the samples includes the intended MIDI note value in its name. Drag the Kick C1 sample to the C1 key on Falcon's virtual keyboard. This creates a new layer ("Layer 1"), a new keygroup ("Kick C1.wav"), and a new oscillator that contains your sample. You should be able to trigger the sample with your MIDI controller or by clicking its note on the virtual keyboard. If you select the List pane in the left tab of Falcon, you can see the new layer and keygroup.

    Tip: The lower you click on the virtual keyboard, the higher the velocity of the auditioned sound. This velocity sensitivity happens by default, and is the result of velocity modulation to the amp envelope, as shown in the above screenshot (bottom of the window). If you disable or delete the Amp. Env modulator, you will disable velocity sensitivity for this keygroup.

    Note: If you didn't set your drag'n'drop preferences to One Shot in step 3, you can apply one-shot mode to an individual sample oscillator by right-clicking inside the waveform and choosing Set as One Shot on the shortcut menu.
  5. In the List tab of Falcon's left pane, rename the current layer by double-clicking the layer name and typing: Kick

PART 2: ADDING THE SNARE LAYER

  1. Click the + sign in the Layer(s) row to add a new layer.
  2. Double click the new layer's name and rename it to Snare. Leave this layer selected (so that it's highlighted.) The Keygroup(s) pane should appear empty.
  3. Drag the Snare D1 sample from the file browser to the D1 key of the virtual keyboard.

PART 3: PUTTING HI HATS IN AN EXCLUSIVE GROUP

  1. In the List tab, click + in the Layer(s) row to add another layer, and rename the new layer to Hi Hats.
  2. Making sure that only the Hi Hats layer is selected, drag the Closed Hat F#1 and Open Hat A#1 samples to their respective places on the virtual keyboard. Your single Hi Hats layer should now have two keygroups, each containing a single sample oscillator.
  3. In order to make the hi hats behave more like real cymbals, we're going to put them in an "exclusive group," where one hi hat sample cuts the other one short when playing. With the Hi Hats layer selected, scroll the Keygroup(s) view all the way over to the right so you can see the ex. group column.

    Note: If you can't find ex. group, right-click any of the column headers in the Keygroup(s) pane and make sure to check ex. group in the list.
  4. For each of the keygroups under Hi Hats, set the ex. group field to 1. (You can change the values by dragging your left mouse up or down on the fields, or by double-clicking them and entering a new value.) This puts the hi hats into the same exclusive group. Now when you play the two hi hat samples very quickly, triggering one of them will cut the other one short.

PART 4: IMPORTING ROUND-ROBIN SHAKER SAMPLES

  1. Add a new layer in the List tab and name it Shaker.
  2. Make sure that only the Shaker layer is selected, and then SHIFT-select all of the Shaker A3 samples in the file browser. Notice how all of these samples end with something like "rr1?" Falcon recognizes this as an indication that these are intended for a round-robin keygroup.
  3. Hold down ALT on Windows (or OPTION on Mac) while dragging the shaker samples to the A3 key. This brings up the Sample Drag'n'Drop dialog. Select NoteName RoundRobin under Mapping method and make sure Destination points to your Shaker layer, and then click OK.
  4. You should now find that your Shaker layer has a single keygroup that contains all eight shaker samples. Each time you press A3 on your keyboard you will hear a slightly different shaker sample.
  5. At this point we have a basic drum kit that sends all audio to the plugin's "Main Out" bus. Save your work now by clicking the wrench icon and selecting Save Program and Samples. In addition to saving your program as a UVIP file, this command is supposed to create a folder in the same directory containing all samples used in that program.

    Note: On version 1.0.1 of Falcon, Save Program and Samples doesn't appear to actually save the samples (not on my Windows DAW PC anyway). I have found that the Save Program and Samples as command, however, does correctly export the samples. Something to keep an eye on.

PART 5: PREPARE YOUR DAW FOR MULTIPLE PLUGIN OUTPUTS

Before we start setting up our Falcon kit to use multiple outputs, we should make sure our DAW is ready to receive audio from the plugin's various outputs.

Ableton Live

The easiest way to do this in Ableton Live is to make use of the External Instrument device (only available in the Standard and Suite versions of Live).
  1. The MIDI track hosting our Falcon instance receives audio from Falcon's "Main Out" master stereo output. When you're working with multiple outputs, it's best not to assign any parts to Main Out, since that bus is also shared by Falcon's four Aux buses. What this means for our DAW setup is that we'll need four additional MIDI tracks to receive audio from the four layers in our drum kit. I've named my additional tracks Kick, Snare, Hi Hats, and Shaker.
  2. Drag an External Instrument device to the Kick track. Point its MIDI To to the Falcon track, channel 1. Under Audio From, select the Falcon 2 output.
  3. Repeat this for the Snare, Hi Hats, and Shaker tracks, only set their Audio From entries to Falcon 3, Falcon 4, and Falcon 5, respectively.
  4. Select the Falcon track and make sure that it's armed for MIDI input.

Steinberg Cubase

Since all the screenshots up to this point use Ableton Live, we'll take the Cubase setup from the top. I'm going to use the "Rack Instruments" approach (versus the "Track Instruments" approach), because you can use the rack method in all versions of Cubase from 5.0 on. These steps will definitely work in the Pro and Artist editions of Cubase, but probably apply to the limited editions as well.
  1. In a Cubase project, go to Devices > VST Instruments an add Rack Instrument instance of Falcon.
  2. When Cubase asks if you want to create a MIDI track assigned to Falcon, click Create.
  3. Back in the VST Instruments window, click the Activate Outputs icon on the Falcon instance.
  4. In the menu that appears, make sure to enable outputs Falcon 1-Falcon 5. The plugin's Main Out goes to Falcon 1, and the other four outputs are for the individual drum layers.
  5. If you expand the Falcon folder under VST Instruments in your arrangement view you should now see five separate VST channels, one for each output pair enabled on the plugin. You can set up inserts and sends on these channels just like regular audio tracks. In my example, I renamed the VST channels to represent which drum parts they would receive. I also renamed the MIDI track that's routed to the Falcon instance.
    The Cubase project, after renaming the VST channels and MIDI track and importing a MIDI loop.

PART 6: ASSIGN LAYERS TO SEPARATE OUTPUTS

  1. Back in Falcon, locate the output column in the Layer(s) tab of the left pane (you may have to scroll right to see it). This column is actually hidden by default, so if you cannot find it, right-click one of the column headers in the Layer(s) list and then click output on the shortcut menu. 
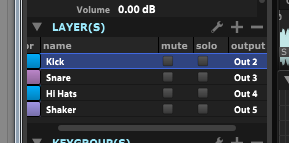
  2. For each layer in your kit, select a different individual output to match the Audio From selections you picked in the previous section. (Kick = Out 2, Snare = Out 3, Hi Hats = Out 4, Shaker = Out 5.)
  3. Now when you play the appropriate notes on your MIDI controller you should see audio coming in on separate tracks in your DAW. Use Save Program and Samples as to save the multi-output version of your kit if you like.
  4. The sample pack I put together for this tutorial includes a MIDI drum loop that you can import in your DAW to test the kit out. Drag the clip onto the MIDI track where your Falcon plugin instance is hosted. You can now apply your own effects and EQ to each drum part in your Falcon drum kit!
  5. At default track volume, the shaker layer is pretty loud in relation to the rest of the kit. If you'd like to adjust the volume of a specific layer, go back into Falcon and locate the volume column in the Layer(s) pane of the List view. You might have to scroll to see it. Also, the volume column is hidden by default, so right-click one of the other column headers and then click volume on the pop-up menu if it's not currently shown. Make sure that only the layer (or layers) you wish to adjust is selected and then adjust the volume field for that layer by dragging down or up.

PART 7: MODIFYING KITS IN BEAT BOX ANTHOLOGY

UVI's Beat Box Anthology is a great collection of kits and samples of dozens of classic drum machines. All of the kits in the collection are set up to send all sounds to the instrument's Main Out. Users of the free UVI Workstation are stuck with this limitation, but Falcon gives you the ability to tweak these kits to suit your needs. Beat Box Anthology is included in UVI's Vintage Vault bundle, and the following steps assume you have both Falcon and Beat Box Anthology installed.
  1. Let's start with a new instance of Falcon, and expand the Soundbanks category to locate the GM Kits under Beat Box Anthology. (The General MIDI kits will work with the MIDI loop included with my Falcon tutorial sample pack.)
  2. Double-click one of the kits to load it into the currently selected Falcon part. I've selected the DR Tracks kit, which is based on the Sequential Circuits Drumtraks unit from 1984.
  3. On the List tab of the left panel we can see that this kit contains two layers. One layer is for the hi hat choke group, while all other sounds in the kit reside on the other. We can assign the hi hats to their own output the same way we did in Part 6 earlier. First, make sure that only the HH layer is selected in the List view, and then scroll over to locate the output column in the Layer(s) section. If you don't see it, right-click one of the column headers and then click output in the shortcut menu to add it to the Layer(s) view.
  4. Change the output setting for this layer to Out 4 (to match the assignments we used in part 6).
  5. For the rest of the drum sounds, we'll need to edit the keygroups assigned to individual samples in the kit. First, make sure that only the Drums layer is selected, and then ensure that you can see the output column in the Keygroup(s) view. Like with the Layer(s) view, the output column is hidden by default.
  6. Now assign the outputs of the individual keygroups to your desired output channels. You might want to hide some columns in your Keygroup(s) view for this step so you can see the keygroup names and outputs without scrolling. You might also find it easier to work in this view by sorting it in root key order, and you can SHIFT-select and CTRL-select multiple keygroups to change their output settings at the same time. Here are output assignments that match what we did when building our own kit in the previous sections, in order of root key note value:

    B0 & C1 (kicks): Out 2
    D1 & E1 (snares): Out 3
    (The HH layer should already be on Out 4)
    A3 & A#3 (shaker): Out 5
     
  7. Next set up your DAW to accept multiple plugin outputs just like we did in section 5 above, and don't forget to arm the Falcon track to intercept your MIDI if you're planning to test your setup out with your keyboard controller.
  8. If you have my Falcon tutorial sample pack, drag the Falcon Drum Loop MIDI clip onto your Falcon plugin track and loop it.
  9. Important: Don't forget to save the modified versions of your kits! Click the wrench icon and use Save Program as or Save Program and Samples as to back up your work.
  10. Unlike most of the UVI libraries, Beat Box Anthology includes individual drum samples that you can access in the file browser to create or modify your own kits. If you have the auto preview button activated, you can audition the samples while you browse by selecting them with your mouse or the arrow keys.
  11. You can drag these samples from the file browser right into your kit.
Well, that's it for now. Check out the Ultimate Outsider YouTube channel or the blog at UltimateOutsider.com for more production tips. Enjoy!