This is Part 3 of a 6-part series. Make sure to check out
Part 1 for the introduction.
Method Two of Four: Virtual Audio Cable with ASIO
While complex, this method enables you to record into SampleRobot at a higher bit-depth than using a virtual audio cable directly. Some of these steps have to be performed in a certain order. If you accidentally do something out of sequence and you find you're not able to get audio to record, you might have to reboot your computer (or at least restart your applications) and try again.
- Difficulty: Advanced
- Advantages: Enables recording at higher bit depths than using Windows audio directly.
- Disadvantages: Lots of steps to set up (and following proper sequence of steps is important). Only worthwhile on SampleRobot Pro or Sampling Suite (the other editions are limited to 16-bit recording). May involve some trial-and-error getting reliable results. Sometimes audio stops working, requiring system restarts.
- Software Required: VB-CABLE, LoopBe1, ASIO4ALL, SampleRobot (Pro or Sampling Suite recommended)
The instrument I recorded while making the screenshots below was the standalone version of
Native Instruments Maschine
. The exact MIDI and audio options in your instrument or plugin host might have different names from what you see in the pictures.
- Install VB-CABLE if you haven't already. You only need the single "VB-CABLE Driver" version, not the "hi-fi" one.
- Install LoopBe1 if you haven't already.
- Install ASIO4ALL if you haven't already.
- If you just installed any of the above software packages, restart your computer now. You will almost certainly not be able to finish these steps unless you restart your PC at least once.
- Make sure no other audio apps are running before launching SampleRobot, and then click the little window under where it says Audio In Device. A list of available devices appears. Select any entry in the list that begins with "ASIO4ALL" and then click OK.
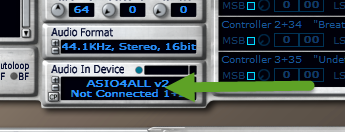 |
| The arrow points to where you should click to select a device. Any "ASIO4ALL" option will work for this step. Also note the little CP button in the lower left of the Audio In Device pane. |
- Click the tiny CP button next to the Audio In Device entry you just selected to open the ASIO4ALL control panel. If the Advanced Options button (the big wrench in the lower right) doesn't have a big red X on it, click it once to display the advanced options.
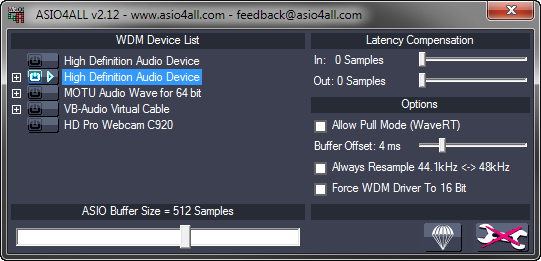 |
| Your initial settings will look something like this. |
- To start off with the ASIO4ALL configuration, first disable ALL devices currently enabled. (Click the little power buttons next to any highlighted devices until they are all turned off/unlit. Also, expand any nodes marked with a + sign and make sure their sub-devices are disabled as well.) Next, expand the VB-Audio Virtual Cable node and make sure that only the In option is enabled (do not enable the Out option). Finally, select the In entry under VB-Audio Virtual Cable and move the ASIO Buffer Size slider all the way to the right, for the maximum sample buffer size of 2048 Samples. When you've done everything right, it should look like this:
- Once your ASIO4ALL settings are correct, close the ASIO4ALL control panel and then close SampleRobot. This unloads the ASIO4ALL driver, ensuring that it uses your new settings the next time you run SampleRobot.
- Launch SampleRobot again and start a new project, either by clicking New in the Projects window or going to File > Project Wizard. Regardless of whether you use the wizard or set your options manually, make sure to choose the following options:
Audio In Device: ASIO4ALL v2 - VB-Audio Point 1+2
Audio Format: 44.1KHz, Stereo, 24bit
MIDI Out Device: LoopBe Internal MIDI
- In my screenshot below you can see I've also selected the following:
Attack Vel: 127
Note Length: 8 seconds
Project Settings > Data Path: (a unique folder for this project)
Note Range: 36/C1 through 51/D#2, 16 notes total, all notes in range selected. (This is the default note range for a Maschine kit.)
- Open up the Sound control panel in Windows and locate the CABLE Input device on the Playback tab. Select CABLE Input, and then click Properties.
- On the CABLE Input Properties dialog, click the Advanced tab and then select 24-bit, 44100 Hz (Studio Quality) under Default Format. Click OK, and then click OK again.
- Start up the instrument you would like to record. If it comes in a standalone EXE version, launch that. Otherwise, load the plugin into your VST host of choice. See part 1 of this series for steps on loading a plugin with VSTHost. Also, don't forget to load up the patch you intend to record!
 |
| Maschine, with Drop Kit loaded from the Lucid Mission expansion pack. The Group MIDI settings are set up so that each incoming MIDI note triggers a different Maschine pad. |
- Locate your instrument's/host's MIDI input settings (in Maschine standalone, you go to File > Audio and MIDI Settings > MIDI > Inputs), and make sure that the option for LoopBe Internal MIDI is enabled. In Maschine you do this by setting the port's Status value to On.
- Locate your instrument's/host's audio device settings (in Maschine standalone, it's File > Audio and MIDI Settings > Audio) and make sure to select a Windows Audio driver type (it might be named WASAPI, Wave, WME, Windows Audio, or something similar) and select VB-Audio Virtual Cable as the audio device.
- Depending on how your instrument or host works, you might also have to specify how audio from the instrument gets routed. For example, in Maschine, we have to select the Routing > Outputs tab and make sure the main outputs go to the Cable Input L and R.
- Switch back to SampleBot. Now that your project is all ready to record, click Rec in the Projects window, and then click Start Recording. You probably won't hear anything while recording is in progress. When recording is complete, little waveforms will appear under the virtual keyboard. You can test the recorded samples by clicking (and holding down) the left mouse on individual notes.
- If your samples seem to have completed successfully, go to the Import/Export menu to export the samples into your desired target format. If you're using the default settings, your exported samples will be trimmed down to only contain actual audible audio (which is good!). I like to save my exported files into a new folder called Exports inside my SampleRobot project's Data Path folder. Here's a look at the resulting samples I got after exporting the above project. I am using Resonic Player to preview my samples.
NEXT TUTORIAL


3 comments:
I can't seem to understand what I'm doing wrong :(
My laptop keeps recording the built in microphone, so all the samples I export are just audio recordings of my microphone!
I followed all these steps in order to sample my vsts
I have one audio interface though. I didn't plug it in this time, I worked with the my laptop's ASIO4ALL, so, any advice if I did it with my m audio fast track connected?
Please help!!
It shouldn't matter whether your interface is connected. If you're sampling your mic, I'm guessing that you ether haven't selected the virtual audio cable in ASIO4ALL (step 7) or you have the wrong device selected in SampleRobot (step 9).
I think it's probably step 7, since My virtual audio cable has the "green power" icon active, but it doesn't shows the "Play" icon.
What can I do?
I'm trying to sample a Nexus sound, inside of FL Studio
Post a Comment