Friday, December 28, 2012

Nexus Preset Organizer for reFX Nexus2


While I greatly admire the quality of the Nexus2 sound library and find the plugin very helpful when sketching out new tracks, one of my biggest complaints about it was the way it categorizes its sounds. Instruments in the factory library are categorized by instrument type, but as you install expansions, all expansion files are tucked away into individual folders, separate from the factory sounds, and not categorized by type.

You can set up your own search lists inside Nexus2, but those aren't really ideal for readability. I decided to address this issue by writing a program that creates new instrument category folders and combines instruments from across all expansions and the factory library. This is the Nexus Preset Organizer.

How to get it

You can download the program here. It should work fine on all versions of Windows XP, Vista, Windows 7, and Windows 8. (I have personally tested on XP/32, Win 7/64, and Win 8/64.) The ZIP file includes a PDF with complete instructions.

How to use it

I uploaded a YouTube video describing what the program does, and how to use it:


Check the PDF file in the download for more detailed instructions.

Like the music?

The background music for my video was an original composition I did using Nexus2 as my only instrument. If you liked the music, here it is on my SoundCloud:


Note: If you're unable to play the song, it's probably because you're using Firefox. SoundCloud doesn't work too well on Firefox, I'm afraid. :(

Monday, November 12, 2012

Using the Blofeld Virtual Editor on Live and Cubase

I love my Waldorf Blofeld desktop synthesizer (), but due to how my room’s set up, I can’t reach its controls or read its display when I’m at my computer. I was very pleased to learn about the free Blofeld Virtual Editor for Windows that you can use to edit Blofeld patches from your PC.

The editor runs as a VST plugin in a DAW or VST host, but there’s one major drawback- the editor needs exclusive access to your Blofeld’s MIDI ports; if your DAW is configured to “see” the Blofeld’s ports, you won’t be able to use them in the editor. And an unfortunate side-effect of this limitation is that once you configure your DAW to let the editor control the Blofeld’s MIDI ports, you can no longer send MIDI notes to the device... so unless you’ve got one of the Blofelds that has its own keyboard, you won’t have any way to test out your patches while you’re editing them!

Turns out there is a way to use the editor AND send MIDI notes to the Blofeld at the same time. And here’s how to do it:

Before You Start
1. Download the Blofeld Virtual Editor from here.
2. Copy the DLL file into your 32-bit plugins folder. For example, on my system, I keep all my 32-bit VSTs in: C:\Program Files (x86)\Vstplugins
3. Load up your DAW and make sure you can load the plugin.
4. Make sure you have a USB connection to your Blofeld. Full functionality of the editor is only possible with USB.
5. Plug a 5-pin MIDI cable into an available MIDI OUT port on any MIDI interface or device you may have available, and plug the other end of the cable into the MIDI IN port in the back of your Blofeld. Both the Blofeld’s MIDI and USB ports should now be occupied.

Setting up the Virtual Editor in Ableton Live

1. Create a new Live Set and delete the initial Audio track, leaving just a MIDI track.

2. Go to Options > Preferences > MIDI Sync and make sure the “Waldorf Blofeld” MIDI Input and Output ports are set to Off. (The Blofeld Virtual Editor won’t be able to access the ports if Live is still using them.)

3. Find BlofeldVirtualEditor in your Plug-In Devices browser and drop it on the project’s MIDI track. If the plugin window doesn’t appear, click the little wrench on the BlofeldVirtualEditor device at the bottom of the screen.

4. In the Blofeld Virtual Editor window, select Waldorf Blofeld for both MIDI IN and MIDI OUT.

5. Click Get Patch in the bottom of the editor window. It should load the patch currently active on your Blofeld device into the editor.

6. Back in Live, create a new MIDI track and drag an External Instrument device onto it.

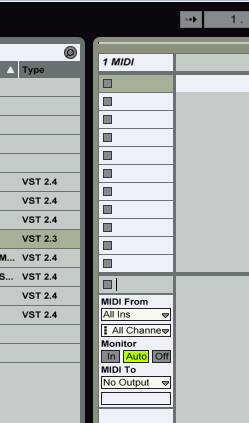
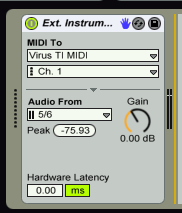
7. In the External Instrument device, set MIDI To to the physical MIDI port that will be sending MIDI notes to your Blofeld (in my example, I'm using the MIDI out from my Virus TI). Next, set Audio From to the audio input ports where your Blofeld sends its audio output. If you don’t see the desired port listed in the MIDI To list, you might need to make sure that port is turned on in the Track column of Options > Preferences > MIDI Sync. The same goes for the Audio ports, which are activated in Options > Preferences > Audio > Input Config.

8. Now, as long as the MIDI track is armed for recording, you can play notes on your keyboard controller while tweaking away at your blofeld patch in the virtual editor! (Be sure to read the PDF manual that comes with the editor, as it covers some things unrelated to getting things working in your DAW.)
Setting up the Virtual Editor in Cubase
1. Launch Cubase and start with a new, empty project.
2. Go to Devices > Device Setup > MIDI Port Setup and uncheck any boxes for the Blofeld MIDI ports so that the State column says Inactive, then click OK. (If you don’t do this, the Blofeld Virtual Editor won’t be able to communicate with your device.)

3. Go to Devices > VST Instruments and load BlofeldVirtualEditor into one of your VST slots. When Cubase asks if you want to create a MIDI track, click Yes.

4. In the MIDI Inspector of the newly-created track, click the Edit Instrument (keyboard) icon to open up the editor window.

5. In the Blofeld Virtual Editor window, select Waldorf Blofeld for both MIDI IN and MIDI OUT.

6. Click Get Patch in the bottom of the editor window. It should load the patch currently active on your Blofeld device into the editor.

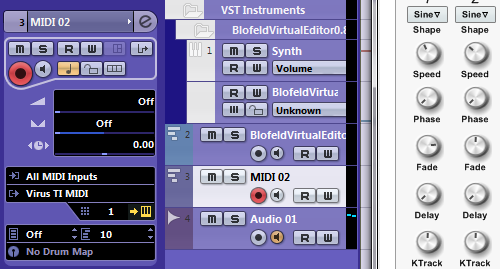
7. Back in Cubase, add a new MIDI track to the project. Set the MIDI “Output Routing” to the MIDI port that’s physically connected to your Blofeld’s MIDI IN port. In my case, it’s the Virus TI MIDI port. Also set the channel to one that your Blofeld will recognize (1 should work). If you play some keys on your controller while this track is armed, you should see the MIDI activity light on your Blofeld blink- you won’t be able to hear anything yet.

8. Add an audio track to your project. For Input Routing in the audio inspector of the track, select the input bus of your Blofeld’s stereo outputs. I named my bus “Blofeld Audio.” If you don’t have a viable choice in the Input Routing menu, you will need to set up a bus for your synth in Devices > VST Connections > Inputs.

9. Click the Monitor (speaker) button on the Audio track, then select the MIDI track and play notes. You should be able to hear notes you play now, and so long as the MIDI track is armed you’ll be able to audition sounds as you tweak them in the editor. Don't forget to read the PDF manual for the Virtual Editor. It will cover the rest.

Sunday, May 13, 2012

Multi Output Kontakt Setup in Ableton Live

Here’s how to configure Ableton Live 8 so you can do the following things with Native Instruments’ Kontakt:
  • Host multiple Kontakt instruments inside a single VST instance of Kontakt.
  • Map each Kontakt instrument to separate Live MIDI channels.
  • Receive stereo audio from each instrument on separate audio tracks in Live.
  • Configure Kontak’ts Aux sends so you can hear them in Live.
  • Save the whole configuration into a preset you can drop into any other Live set later on. You only have to follow these steps once!
I wrote this post using Kontakt 4, but it’s my understanding that the steps are the same for Kontakt 5. Here are some more details you might want to know before we start:
  • If you are a Kontakt owner, you may have noticed the “8out” and “16out” flavors of Kontakt in your VSTPlugins folder. Those are limited versions of the plugin, I presume to conserve memory/CPU. We’ll need the one that’s just called “Kontakt 4,” which exposes up to 32 audio outputs.
  • Even though Kontakt exposes dozens of outputs through the VST interface, Live 8 seems to have a problem displaying all of them, which will prevent us from being able to add support for all four Aux buses and still have stereo support for eight separate Kontakt instruments. We’ll only be able to set up the first 3 aux buses in this tutorial.
  • There are other ways you can route your outputs, depending on what you need to achieve. Just consider this a starting point.
All right, let’s get started.
Create the first MIDI track
  1. Insert a new MIDI track in Live and name it KI 1 for Kontakt Instrument 1.
  2. From the Plug-in Device Browser, drop the “Kontakt 4” device onto your track. (Ignore the 8out and 16out versions; they don’t have enough outputs for what we’re going to do.) After a few seconds, Kontakt should open up. 
The first MIDI track. Click the images in this post for a close-up view.
   
Set up a template multi
  1. In Kontakt, start with a new, empty multi (Files > Reset multi).
  2. Select Files > New Instrument to add an empty instrument to your multi.
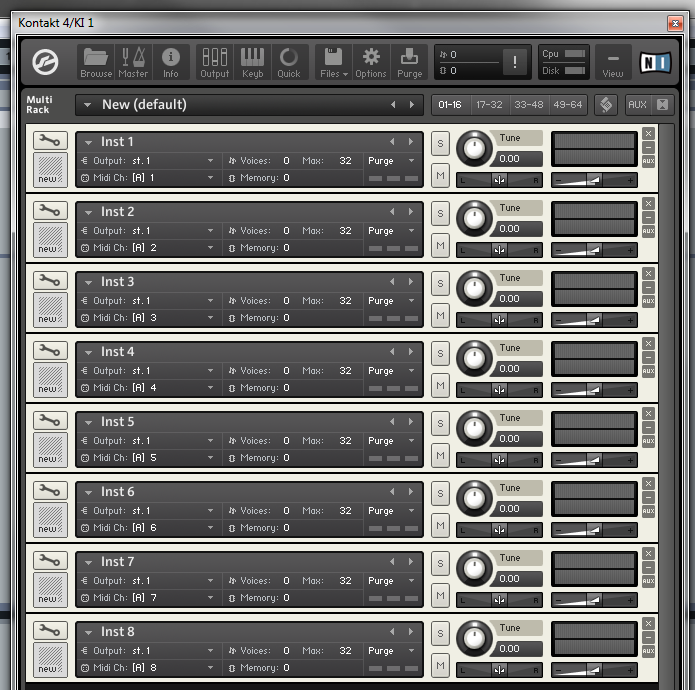
  3. Repeat the previous step seven times, for a total of eight empty instuments. Kontakt automatically assigns them MIDI channels in ascending order, which is what we want. (We can ignore the Output settings for the moment.)
  4. Name the first instrument Inst 1, the second one Inst 2, and so on until all instruments have uniquely numbered names.
    Eight empty instrument slots.

  5. Click Output in the control panel to show the Outputs window if you can’t see it already.
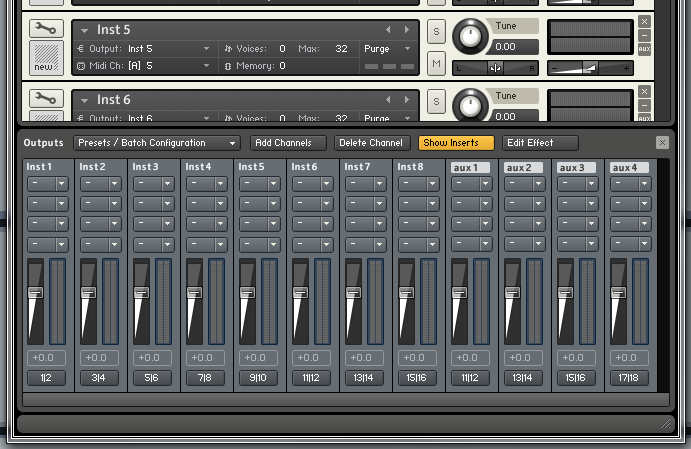
  6. In the Outputs window, click Presets / Batch Configuration > Batch Functions > Clear output section and create one individual channel for each loaded instrument. You now have eight separate stereo outs, with their plugin outputs in consecutive pairs, from 1|2 through 15|16. Also note that each of the instruments you added to the multi has already been assigned to a different output.
    We have to fix the aux outputs next.
  7. As you can see in the above picture, the Aux port assignments now overlap with the instrument outputs. (They’re still mapped to 11|12-17|18.)  Fix this by clicking the button on the bottom of each fader strip and choosing different “physical out” options. NOTE: Things start to get confusing here. The port names you get to choose from are very misleadingly named and numbered. For your aux 1 bus, choose “Kt. unassigned [7]” and “Kt. unassigned [8]” for channels 01 and 02, respectively. For aux2-aux4, do the same thing, assigning two increasingly-numbered “Kt. unassigned” ports to your buses. There is a chart later on that tells you which ports to pick for every bus. Also, if you are prompted to close and re-open Kontakt, just ignore that for now.
    The output names won't make any sense. Just trust me on this.
  8. If you did the last step right, the output pairs along the bottom of the Outputs window should start at “1|2” for Inst 1 and end with “23|24” for aux 4.
    Port assignments when properly configured.
  9. It’s a good idea to now click Presets / Batch Configuration > Save output section preset as and save a copy of your output settings. If you plan on using custom multis a lot, you might also consider picking Presets / Batch Configuration > Save current output section state as default for > VST Plugin.
Set up the External Instrument tracks
  1. Back in Live, insert a new MIDI track and drop an External Instrument device on it from the Live Device Browser.
  2. Name this track KI 2 for Kontakt Instrument 2.
  3. On the new External Instrument device, select the name of your first MIDI track (KI 1) under MIDI To.
  4. Directly beneath that, select 2-Kontakt 4, because this track is for MIDI channel 2.
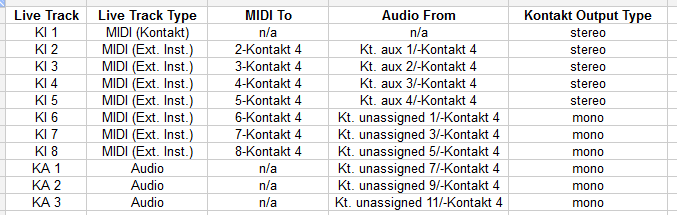
  5. Under Audio From, pick Kt. aux 1/-Kontakt 4 (it should be the first entry in the list). This is just the output name that Kontakt reports to Live, and can’t, as far as I know, be changed.  
    The first External Instrument track, properly configured.
  6. Select your External Instrument track (KI 2) and press CTRL + D six times to create six duplicate tracks.
  7. For each of the new tracks do the following: Rename the track, select the correct MIDI channel, and select the next Kontakt audio output. Follow the chart below to see which Audio From option to select for each track. (You can ignore the bottom three rows of the chart for the moment.) NOTE: As you will notice in the chart, once you get to track KI 6 (exhausing the last of the aux pairs), you have to start skipping audio ports, because the ones labeled “Kt. aux” are stereo pairs, and the ones labeled “Kt. unassigned” are mono outputs.   
    This shows the MIDI and Kontakt audio assignments for each Live track.
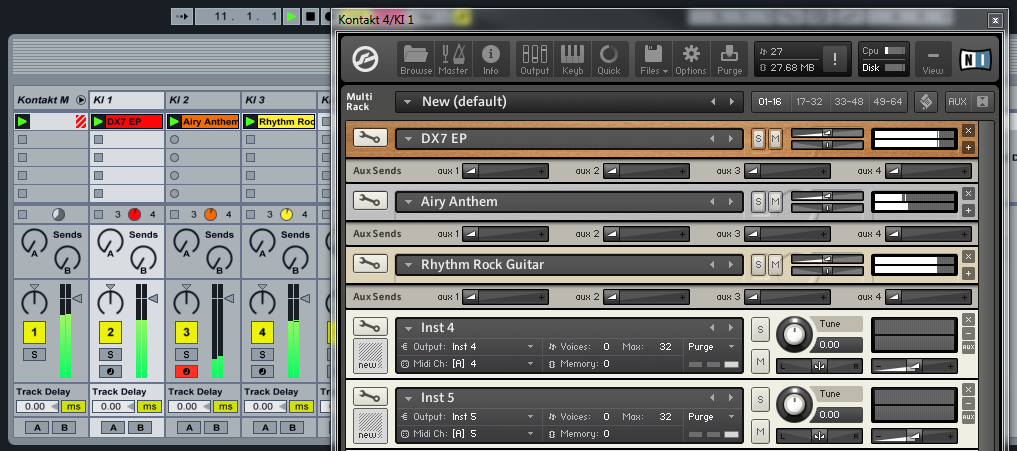
  8. If you’ve done it correctly, your screen should look like this now:
    The Kontakt Instrument tracks, once completed.
Optional - Set up some aux sends
Kontakt has four aux send buses. Unfortunately, due to a limitation (of Live, I think), you will only be able to set up Live tracks for three of them, unless you decide to sacrifice an instrument from your multi.
  1. Insert an Audio track (not a MIDI track) and name it KA 1 (for Kontakt Aux 1).
  2. For Audio From select KI 1, and below that pick Kt. unassigned [7]-Kontakt 4, and then click the In button under Monitor.
  3. Now duplicate this track two times, naming the others KA 2 and KA 3.
  4. Refer to the bottom three rows of chart from the earlier section to see which Kontakt output ports to choose for KA 2 and KA 3. When you’re finished, the audio tracks should look like this:
         
    Don't forget to click the In button under Monitor on the aux tracks!
Group and save
  1. Select track KI 1.
  2. Hold down SHIFT while clicking the last track, KA 3, to select all tracks.
  3. Right-click one of the selected tracks and pick Group Tracks.
  4. Name the track group Kontakt Multi.
  5. Drag the group track into one of your personal Preset folders in one of the File Browsers. This will actually save an ALS file (a Live Set) that you can drop into any existing Live Set to instantly have access to Kontakt with all the MIDI and audio ports mapped and ready.
    The preset is now in my Library, ready for use in other projects.
Testing it out
  1. If you’ve done everything right, you can now drag an instrument into any of your 8 slots on your multi in Kontakt, play MIDI on the corresponding track in Live, and you’ll hear the instrument with audio coming in on that same track.
       
    Three different Kontakt instruments playing audio on three Live tracks!
  2. Also, if you performed the optional Aux steps, you can now send signals to the first three buses in Kontakt and hear them on your KA tracks in Live. Enjoy!
My thanks to Solger on the Ableton forums, and JBlongz & Troll30527 on YouTube.

Wednesday, May 2, 2012

SOLUTION: REVerence Cannot Locate Impulse Response File

Cubase 5 includes a fantastic convolution reverb plugin called REVerence. Unfortunately, in my case, any time I attempted to load an impulse file, I'd just get an error saying something like: "Cannot locate Impulse Response File: Absorptive Stage.wav"

Cause:

So there are two problems here: First off, REVerence doesn't ship with WAV files. Instead it includes a single VSTSOUND file, like the files Groove Agent ONE uses. The next problem was that while Cubase seemed aware of the preset names, it didn't actually install the impulse library.

Solution:

Buried on the Cubase installation DVD (Cubase 5 for Windows > Additional Content > VST Sound), I found an installer called REVerence_Content_01. The installer defaulted to the folder C:\ProgramData\Steinberg\Content\VST Sound. I was skeptical about this, since this is where Groove Agent ONE's sounds were first installed, and that didn't work.

But I left the installer at its defaults and tested it out. Finally I was able to use REVerence!

So that's it; just run the installer from the Additional Content folder. The actual filename of the REVerence library is: FCP_SMT_005_Reverence_ImpulseLibrary_01.vstsound

While I was poking around on the DVD I also noticed an installer called LoopMash_Content. I did a quick check on my system, and sure enough, I didn't have the LoopMash content either. So I ran that one as well, just in case.

Saturday, April 14, 2012

Deleting Files From Old ProgramData Folders

Last year a piece of software corrupted the Windows 7 installation on my primary desktop system, and I had to re-install Windows. I ended up putting Windows on a different hard drive so I could preserve the data that was already on the original drive. I thought I had cleaned out all the remnants of the initial Windows installation, but this morning I discovered there was still a hidden ProgramData folder on the old drive. I knew I didn't need it anymore (all of the files inside were well over a year old), so I attempted to delete it- but was annoyed to get a File Access Denied dialog box with a message that said, "You need permission to perform this action."

It was really two specific files that were causing the problem, MpScanCache-1.bin and MpScanCache-2.bin. They are apparently cache files created by Microsoft Security Essentials. It took about 15 minutes to figure out what to do, but I finally managed to delete the files. Here's how:
  1. First, we have to take ownership of the file. Right-click the file in Explorer and then click Properties.
  2. On Security tab, click Advanced.
  3. On Owner tab, click Edit.
  4. Click Other users or groups.
  5. Type your Windows user account name under Enter the object name to select, and then click Check Names. If the name you entered checks out, click OK.
  6. Click OK again. You will be prompted with a Windows Security dialog that says you need to close the file properties. Click OK, then OK, then OK, then OK to close all properties windows.
  7. Now we have to change the file's permissions. Right-click the file in Explorer again and click Properties.
  8. On the Security tab, click Edit.
  9. Click Add.
  10. Type your user account name under Enter the object name to select, and then click Check Names. If the name you entered checks out, click OK.
  11. Now, select your user account in the Security tab and then click Full control under Allow in the lower window labeled Permissions for (username), then click OK.

    Note
    Do NOT check any options under Deny.
     
  12. Click OK again.
  13. Delete the file and rejoice!

Sunday, April 8, 2012

SOLUTION: HALionOne Could Not Be Found

Note: This post also addresses the "HALionOne: Cannot find or load preset" problem on Cubase 5.5.

Beginning with the 5.5.0 update, Cubase includes a Project Assistant dialog at startup, which helps set you up with some default project settings for specific kinds of productions. For example, there's a preset called "Dance Production" which sets up Cubase tracks for percussion and various musical parts, with pre-selected patches from the HALionOne library.

I was eager to try this feature out, but every time I chose one of the predefined projects, I'd get this error:

The plug-in "HALionOne" could not be found for Instrument Track!

This was on a fresh install of Cubase 5.0 which had been patched up to 5.5.0, and I hadn't changed any settings. Where was my HALionOne? Well, apparently, it's not part of the default install. You have to install it separately from the Cubase install DVD. Here's how:
  1. Browse the contents of your Cubase install DVD and open this folder:

    \Cubase 5 for Windows\Additional Content\HALionOne
  2. If you want a 32-bit installation, launch HALionOne_Setup. If you want a 64-bit installation, run HALionOne_64bit.msi directly.
  3. You're not done yet! The HALionOne setup program doesn't install any of the presets that the default Cubase projects need. If you try to open one of the Project Assistant projects that use HALionOne now, you'll get this error: "HALionOne: Cannot find or load preset." In the same folder where you found the setup program for HALionOne, you will see the following separate MSI installers: Expression_set, GM_Drum_Set, GM_Set, Pro_Set, Studio_Drum_Set, and Studio_Set. Run each of them individually to get the complete HALionOne configuration.
  4. Now launch Cubase and attempt to open one of the default productions that uses HALionOne, like Electro Production. The project should open without any errors, and there will often be a pre-populated drum loop on the percussion track to test that it loaded correctly.
When I was looking for a solution to this problem, I learned that some people who had similar symptoms to mine were actually experiencing a different problem. In their case, HALionOne was installed, but Cubase wasn't detecting it properly. They were able to fix it by using Update Plug-in Information in the Plug-in Information window, performing a Rescan in Media > MediaBay, or by toggling the checkmark for HALionOne in MediaBay, under VST Sound > Factory Content > Track Presets > Instrument.

If you are curious about my hardware and software setup, please see my DAW system specifications.

SOLUTION: Groove Agent ONE Failed to Locate Samples

After installing Steinberg Cubase 5 on my DAW PC and patching it up to version 5.5.0, I discovered a problem with any projects that used the Groove Agent ONE drum VST. Whenever the projects loaded, I'd get an error that said, "Groove Agent ONE failed to locate x samples."

The Cause

For some reason, sometimes the Cubase installer places Groove Agent ONE's vstsound files into the wrong folder. It's possible the folder location was correct for Cubase 5.0, but it isn't for 5.5. (I think it might have to do with whether you decide to install Cubase "for all users" or "only me" at setup, but I can't confirm this for sure, because I don't always pick the same thing when asked that question- and I haven't kept track of which option I chose for various programs.)

Note
It is actually VSTSOUND files that are missing, by the way. Even if you see error messages about specific WAV files that are missing, those WAVs are actually embedded in the various VSTSOUND files that shipped on the Cubase 5 discs.

The Solution
  1. Locate the VST Sound files. You'll find them in your computer's ProgramData folder, which is hidden by default in Windows 7. (You can make it visible by going to Control Panel > Folder Options > View and selecting Show hidden files, folders, and drives.) The actual path depends on your computer, but in my case, the path was:

    C:\ProgramData\Steinberg\Content\VST Sound
  2. Copy any VSTSOUND files you find there into the correct location. This location will vary depending on your computer and your Windows user name. The files are stored in the hidden AppData folder. Again, your exact location will vary, but in my case, it was:

    C:\Users\(my username)\AppData\Roaming\Steinberg\Content\VST Sound

    Note
    Like ProgramData, AppData is another hidden folder. You can display it by enabling Show hidden files, folders, and drives in the Folder Options control panel, but there's a nice shortcut: In Windows 7 or below, click the Start button, type %appdata% in the search box and press Enter. This will open up an Explorer window inside your AppData\Roaming folder. On Windows 8, just open up an Explorer window and type %appdata% in the address bar. When you press Enter, you'll browse into AppData\Roaming.
Bonus Content

When I first discovered the solution, I noticed there were only two VSTSOUND files (Drum Loop Expansion 01.vstsound and Groove Agent ONE 03.vstsound) when I was expecting more. Where were 01 and 02? Turns out you have to run a separate installer to get those files. Here's how:
  1. On the Cubase install DVD, browse into the following folder:

    Cubase 5 for Windows\Additional Content\VST Sound
  2. Inside the folder you'll find the Groove_Agent_ONE_Content installer. Run that, and if given the choice, select the correct folder to install the files (the one under AppData). If you install to the default directory, you'll have to copy those files to the AppData folder after the installation's done.
Please see my DAW System Specifications if you're curious about differences in our setups.