After several weeks of research, I decided on one of the Roland FA series music workstations to serve as my main MIDI keyboard controller. In this post I talk about why I picked the FA-06 over other keyboard options, what accommodations I had to make in order to fit it into my rig, and how the keyboard integrates with Steinberg Cubase and Ableton Live.
IT WAS TIME FOR A CHANGE
After putting up with minimalistic 49-key and 25-key MIDI controllers for the past few years due to limited desk space in my small studio, I finally decided it was time to move on to a bigger keyboard controller with more features. Until the beginning of Summer 2015, the desk where I did all my music work looked like this:
 |
| The old, cramped setup. |
My desktop monitors and clunky computer speakers left me so little room that not only could I not fit a very wide (or deep) keyboard controller on the desk to begin with, but when I actually needed to use the desk for writing, I had to disconnect my
Roland A-49 controller and rest it against the wall until I needed it again. Since getting a bigger desk (or room) wasn't really an option for me, I developed a game plan for transforming my desk into a workspace that could accommodate a bigger controller and hopefully even leave me a little more surface area than I had before.
Here's what I did:
- I bought a couple of these Cheetah monitor wall mounts to float my two side monitors over my desk.
- I bought a Dell S2415H 24-inch monitor to replace my Dell S2440L 24-inch monitor, because my S2440L unfortunately wasn't wall-mountable. Another advantage of the S2415H is that it has built-in speakers, which helped me eliminate the need for desktop speakers.
- I also got a different Cheetah wall mount for the new monitor, since it was in a corner and needed to extend further than the other two. (A note on both models of Cheetah wall mounts: In order to fasten these to my three Dell monitors, I had to pick up some 20mm-long M4 machine screws and matching washers at a local hardware store. My monitors all have recessed mounting slots that required longer screws than were included with these mounts, and I used the washers as spacers to result in a tight fit.)
- I also got some mounting hardware to hang my 7-port USB hub to the wall, hidden behind my right-most monitor, leaving my desk completely empty, except for my MOTU Track 16 audio interface.
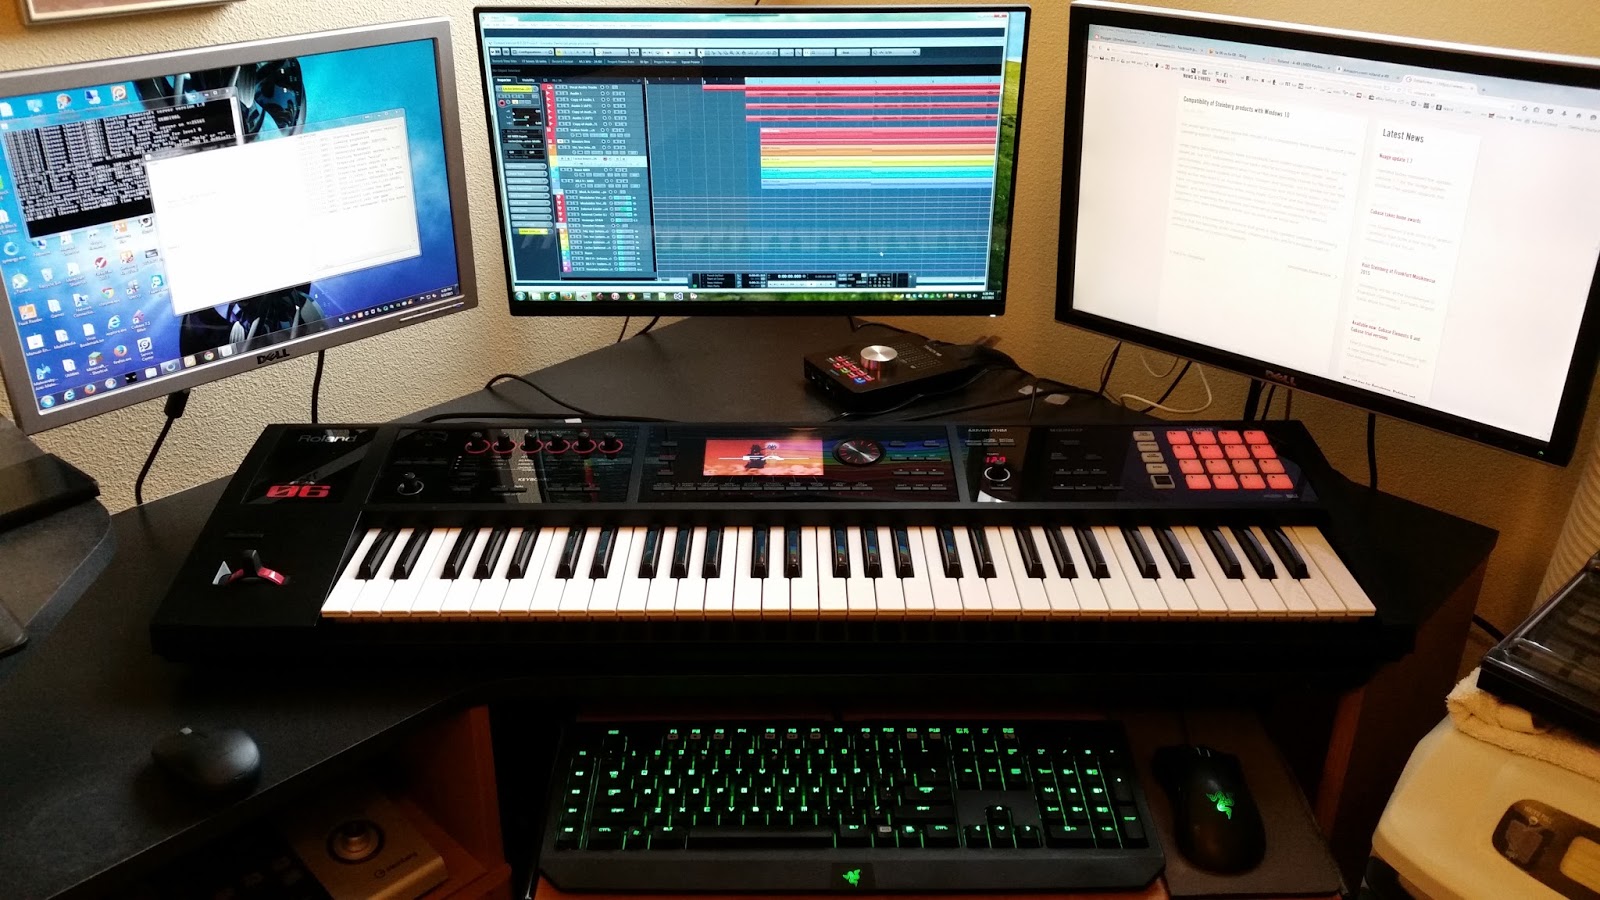
- Of course I immediately filled the new-found space on my desk with a luxurious Roland FA-06 Music Workstation.
Here's what it looks like now:
 |
| The new, spacious setup. |
But, you might ask, why did I choose a full-on workstation instead of just a nice MIDI Controller with Cubase integration, like the
Nektar Panorama or
Roland A-800PRO? Well, that's what the rest of this post hopes to answer.
WHY I CHOSE THE FA-06
My primary reason for wanting to expand from a 49-key to a 61-key controller was to avoid the frequent octave transposing that I had to do on smaller keyboard controllers whenever I used Kontakt instruments or drum samplers that have a
GM drum layout. But the more I looked into existing keyboard controllers, the more I realized there were a number of
other things I was looking for as well:
- Requirement: Something that could make sounds of its own. I wanted to be able to work out melodies or chords quickly without having to fire up Cubase and open a DAW project. Straight-up MIDI controllers don't have on-board sound, so I started to look at synthesizers, stage pianos, and workstation keyboards.
- Requirement: Something that provided some level of DAW control- especially transport controls. When I recorded vocals, I used to put my Steinberg CC121 controller on a TV tray and scoot it next to my microphone stand so I could toggle cycle mode and re-record takes without knocking over the microphone or getting tangled in headphone and mic cables. Transport controls on a MIDI keyboard would put these necessary buttons within much easier reach when I'm set up for tracking vocals. Many hardware synths and stage pianos have some knobs and faders that you can map to different DAW or plugin functions when you're working with a computer, but very few bespoke synths have transport controls. This narrowed my search again to mostly workstation keyboards.
- Requirement: Something with a reasonable pitch and mod solution. Ideally I'd prefer something with good-feeling independent mod and pitch wheels, but a solid and reliable joystick solution was acceptable. The Yamaha MOXF6, Yamaha MX61, and Kurzweil PC3K6 keyboards have independent wheel controls, so they were under serious consideration. The current KORG offerings have very flimsy looking little joysticks, so I had to scratch them off the list. Also, as nice as the keybed and Komplete integration of the Komplete Kontrol S61 was, I am no fan of those weirdo ribbon controllers it has, so that was out of the running as well. Roland has their own solution, a combo pitch/mod joystick, where both pitch and mod return to the center position when you let go of the stick. While I'm not the biggest fan of the stick, the Roland sticks are much more durable than I've seen in Arturia products, or what I fear the KORG sticks are like, so Roland was still a contender.
- Nice-to-have: General MIDI support. Often when I'm laying down the initial MIDI tracks for a new project, I use General MIDI patches just because I know the GM sound set so well. It's super easy for me to dial up an acoustic piano here, fretless bass there, and just get my notes and chords down before I start trying to pick the best possible sounds for the job. All the Yamaha, Roland, and Kurzweil keyboards I was considering offered some level of GM support, in that they responded to the typical program changes with appropriate patches.
- Nice-to-have: Aftertouch support. Of all the keyboards I've owned, I think only one ever actually supported aftertouch- and it was the CME Xkey 25- something just too small and physically shallow for me to do serious work on. I was curious to get a board with aftertouch support just to see what it might add to my work- but this was far from a must-have, since I'd gotten by for so long without it. Neither the FA-06 nor the Yamahas featured aftertouch; only the Kurzweils.
- Nice-to-have: USB streaming/audio interface support. While this started out as a nice-to-have, now that I've got it, I don't know how I lived without it. Both the Yamahas and the Roland FA series have the ability to serve as an audio interface, meaning you can make them the primary audio device in your DAW. You can plug your headphones into the keyboard and hear both the internal sound and all your other instruments. This is great for me on hot summer days when I don't want to power up my entire rig, which generates a lot of heat. I can just pop a pair of headphones into the FA-06 and do everything I normally do (except record vocals), and the only things I need powered on are the keyboard and my DAW PC. This also means that I can record audio from the keyboard directly into the DAW without any audio cables. Everything can go over USB. The Kurzweil workstations have varying levels of USB connectivity, but they lack anything as sophisticated as the Roland and Yamaha offerings, so Kurzweil was kind of out by this point.
- Nice-to-have: I'd like to have some actual "desk space" on my desk.
Even though I'd freed up a lot of room, my actual working area was
still kind of tight. The Yamaha MOXF6 (40.5"x14"x5") was basically the
largest possible keyboard I could fit on my desk, so anything smaller
with a comparable feature set was desirable. This tipped the scale in favor of the slightly shorter,
slightly shallower FA-06 (40"x12"x4").
THE ROLAND FA WORKSTATIONS IN PRACTICE
There are plenty of
good reviews already that cover the sounds and the sequencing/sampling capabilities of the FA-06 and FA-08, but I haven't seen anyone talk in much depth about what it's really like to use them as DAW controllers, or how well they integrate with specific DAWs like Cubase or Ableton Live- so that's what I'm going to focus on here.
There are some basic instructions for configuring the FA-06 and FA-08 for DAW control in both the Reference Manual and the Application Guide (
available here), but they omit some important steps (and they don't cover Ableton Live setup at all), so first let's go over the steps required for Cubase and Live. From here on out, I'm just going to say "FA-0X" since the steps are the same for both the 06 and 08 models.
SETTING UP DAW CONTROL IN CUBASE
The following steps assume you've already installed the
FA-0X driver for your operating system.
- Exit Cubase if it is already running.
- From the STUDIO SET PLAY screen of your FA-0X, press MENU, then select System and press ENTER.
- On the General tab of System Setup, make sure that the USB Driver option is set to VENDOR (MIDI+AUDIO).
Note
If you have to change it, you will be prompted to restart your keyboard after you select WRITE. (Please do that before continuing to the next step.)
- Press the DAW CONTROL button to bring up the DAW Control screen.
- On the DAW tab of DAW Control, navigate to the CONTROL MAP line and use the wheel to select CUBASE.
Important
Press WRITE and then select OK to store your selection. If you don't do this, the FA-0X will forget its DAW Control settings the next time you power up.
- If you want to use the FA-0X like a true MIDI controller, select the Controller tab in DAW CONTROL mode, navigate to the Local Switch option and set it to OFF. Now when you play notes on the keyboard, you will only hear the FA-06's internal synth engine in DAW Control mode if it is selected as an output device in your DAW.
Note
Don't forget to press WRITE to save your settings.
- Launch Cubase and go to Devices > Device Setup.
- Click the + button and select Mackie Control from the list. This adds a "Mackie Control" entry to the Remote Devices list.
- Select the new Mackie Control entry under Remote Devices and set both MIDI Input and MIDI Output to FA-06 08 DAW CTRL.
- In the User Commands section of the dialog, you can set custom commands for pads 1-8 of the FA-0X's Sampler section (F1-F8). I do not believe there's a way to make the FA-0X use the "Shift+F1-8" or "User A/B" user commands, so I just leave those blank.
There are many dozens of commands to choose from.
Note
To customize what your FA-0X's knobs and S1/S2 buttons do, go to the Controller tab of the FA-0X while it's in DAW CONTROL mode, and specify which CC value each physical control should use. The S1/S2 buttons can work in Momentary or Latch mode. In Momentary mode, the button fires a single event of the selected CC with a value of 127 when you first press it, and then fires another event of the same CC with a value of 0 when you release the button. In Latch mode, the button toggles between sending a 127-value or 0-value CC event each time you press it, and only fires the event upon pressing the button- not when releasing.
- Super Important: Select MIDI Port Setup in the Device Setup dialog and uncheck the "In 'All MIDI'" boxes for FA-06 08 DAW CTRL and FA-06 08.
None of the documentation I've seen so far explains the difference
between the three kinds of ports the FA-0X keyboards present, but unchecking In 'All MIDI' for the DAW CTRL port prevents the
assignable sampler pads from transmitting MIDI notes when you're trying
to use the pads to issue DAW control commands, and unchecking the box for FA-06 08 prevents Cubase from recording duplicate notes, as described below.
When your MIDI ports aren't set up right, Cubase will record duplicate notes for anything you play. This has different results depending on which synths or plugins you're using as a sound source, so you may not even realize it's a problem right away. Some plugins will cut notes short when this happens, others will actually leave notes stuck on, just like keys on an old fashioned typewriter get stuck when you press a bunch of them at once.
If you record a MIDI clip without disabling the extra In 'All MIDI' ports and then open that clip in Cubase's List Editor, you'll see the extra notes quite clearly.
 |
| The problem with duplicate MIDI notes is most obvious in the MIDI List Editor. |
- Even in DAW Control mode with Local Switch disabled, your FA-0X keyboard still functions as a 16-part multi-timbral synth when it receives incoming MIDI messages from your DAW. You can choose a default studio set to use for whenever you enter DAW Control mode on the Studio Set tab of the DAW CONTROL screen of the FA-0X. On the same screen you can pick which presets to use on each channel of the studio set. Again, remember to press WRITE to save any changes you make here.
SETTING UP DAW CONTROL IN ABLETON LIVE
The following steps assume you've already installed the
FA-0X driver for your operating system.
- Exit Live if it is already running.
- From the STUDIO SET PLAY screen of your FA-0X, press MENU, then select System and press ENTER.
- On the General tab of System Setup, make sure that the USB Driver option is set to VENDOR (MIDI+AUDIO).
Note
If you have to change it, you will be prompted to restart your keyboard after you select WRITE. (Please do that before continuing to the next step.)
- Press the DAW CONTROL button to bring up the DAW Control screen.
- On the DAW tab of DAW Control, navigate to the CONTROL MAP line and use the wheel to select USER.
Important
Press WRITE and then select OK to store your selection. If you don't do this, the FA-0X will forget its DAW Control settings the next time you power up.
- If you want to use the FA-0X like a true MIDI controller, select the Controller tab in DAW CONTROL mode, navigate to the Local Switch option and set it to OFF. Now when you play notes on the keyboard, you will only hear the FA-06's internal synth engine in DAW Control mode if it is selected as an output device in your DAW.
Note
Don't forget to press WRITE to save your settings.
- Launch Live and go to Options > Preferences.
- On the MIDI Sync tab of Preferences, choose MackieControl as one of the options under Control Surface, and then pick FA-06 08 DAW CTRL for both Input and Output on the same row. You might notice that when you do this, the "DAW CTRL" ports disappear from the MIDI Ports list in the lower part of this dialog.
- In the MIDI Ports section of the MIDI Sync tab, Make sure that the Input port labeled only FA-06 08 is turned Off, but all the other FA-06 ports are turned On.
If you don't disable the FA-06 08 Input port, you will encounter a problem where Live accidentally records duplicate notes when you play parts on the FA-0X keyboard. This can result in strange behavior, such as musical notes "sticking" on the FA-0X (or in virtual instruments you're triggering from MIDI parts you recorded with the FA), or notes being cut short unexpectedly. Unfortunately, Live doesn't provide any way for you to actually see evidence of the problem in the user interface. However, if you export MIDI clips recorded in Live to another DAW or MIDI editor, you can see the duplicated notes that happen as a result of leaving the FA-06 08 Input port enabled. In the below screenshot you can see that Live occasionally created extremely short duplicate notes in two parts of this simple sequence.
 |
| Duplicate notes in MIDI recorded inside Ableton Live when the "FA-06 08" Input port was left enabled. |
- To customize what your FA-0X's knobs and S1/S2 buttons do, go to the Controller tab of the FA-0X while it's in DAW CONTROL mode, and specify which CC value each physical control should use. The S1/S2 buttons can work in Momentary or Latch mode. In Momentary mode, the button fires a single event of the selected CC with a value of 127 when you first press it, and then fires another event of the same CC with a value of 0 when you release the button. In Latch mode, the button toggles between sending a 127-value or 0-value CC event each time you press it, and only fires the event upon pressing the button- not when releasing.
- To customize what the Sampler pads do, go to the DAW tab of DAW Control mode and choose CC values and button modes for the User Pad 1-8 settings. These options only appear in the USER DAW profile of the FA-0X. (In Logic, Sonar, and Cubase, you configure the pad functions inside the respective DAW.) Unlike the Logic, Sonar, and Cubase profiles, where you can actually assign DAW-specific commands to the pads, in the USER profile you are limited to only assigning CCs. You also have the option to configure individual pads to operate in Momentary or Latch mode, like the S1/S2 buttons. And as always, don't forget to WRITE.
THE FA-06/08 AS AN AUDIO INTERFACE
If you put the
USB Driver setting of the FA-0X into
VENDOR (MIDI+AUDIO) mode, the keyboard will appear to your DAW as a 2-in/2-out audio interface.
But the FA-0X is no ordinary audio interface! Here are some things you should know about the interface functionality:
- By default, audio from internal FA-0X instruments and effects, as well as incoming audio from the analog inputs and the USB audio connection all go to the FA-0X's MAIN outputs, and this output signal goes both to the keyboard's physical MAIN OUTPUT jacks as well as the input channels of your DAW. So, unless you change the default input and output routings, any sound your FA-06 generates, or any sound coming into its inputs can be monitored and recorded inside your DAW without anything connected to the analog outputs of the FA-06. To record the FA-06's output over USB, you simply create a stereo audio track in your DAW and set it to record the FA-06 08 IN and IN(R) I/O ports as a stereo pair.
- The FA-06 has two kinds of analog inputs: The LINE jack is a 1/8" stereo constant-level input, and the GUITAR/MIC jack is a 1/4" mono input with adjustable gain. (All inputs are unbalanced.) There's also a GUITAR/MIC switch that boosts the GUITAR/MIC signal by an additional 25-30db when placed in the MIC position (this doesn't affect the LINE input). The signals from these two inputs are automatically mixed, and by default these input signals are further mixed with the FA-06's internal sounds, so despite only appearing as a 2-channel interface to your DAW, you can actually record three different sound sources simultaneously into those two channels, similar to recording the output of a small outboard analog mixer.
- You can change how the various inputs and outputs are routed in various tabs of the System Effects settings.
- You can avoid experiencing phasing effects in Cubase when working with audio tracks that have track monitoring enabled by enabling the Direct Monitoring feature in Device Setup > VST Audio System > FA-06 08.
- On Windows, audio applications generally only let you select one audio device (interface) at a time, so if you're using the FA-0X as your audio interface, you won't have access to any of your other audio interfaces while inside your DAW. If you prefer to use a separate audio interface, just use the FA-0X's analog outputs and use it like a regular hardware synth; there is no native way to route its USB audio to another interface.
- Also, while the FA-0X keyboards are 16-part multi-timbral, they only have two analog output buses (MAIN and SUB), and only one of those buses is available to the audio interface mode at a time, which means that you can't use the USB mode to record separately mixable parts from the FA-06 into your DAW. (If you had a 4-input external interface, you could record two different stereo parts out of the FA-0X's MAIN and SUB outputs if you assigned them appropriately in your performance settings.) The Roland Integra-7 has twice as many analog outs (and even a digital output connector), so that's where to look if you need lots of separate output channels.
- When I'm finished using my computer for the day, I turn off my FA-06 and put the computer to sleep. The only times I ever fully shut down or reboot my PC are when I'm making hardware changes or when I install software or updates that require a restart. I have found that sometimes my FA-06 stops functioning as an interface (Cubase and Live can't access it when I select it as an audio device), and the only way to make it work again is to reboot the PC. (Cycling power on the FA-06 doesn't fix it, and attempting to disable/re-enable the driver in Device Manager causes Device Manager to lock up... it appears to be a driver problem rather than a hardware one.) I don't have this issue with any of my other interfaces (including other Roland units), so I really hope Roland fixes this in a future driver update.
In my day-to-day work, I'm finding myself turning on only my FA-06 and using it as my interface while I compose or do audio editing. I usually only power up the rest of the rig if I need to record vocals or hardware instruments (my RME Fireface UFX has balanced mic and line inputs), and my poor MOTU Track 16 has hardly been getting any use at all. (I might retire it at some point, but am still hanging onto it for its digital I/O, which I sometimes use when
sampling virtual instruments.)
Also, the way I have my patch bays wired, the FA-06 analog outs default to going into the UFX's analog inputs 1 & 2, and the UFX's main outs default to going to my studio monitors. So I can actually turn everything on and hear the FA-06 through my studio monitors without switching which interface my DAW is using or plugging in any additional cables.
 |
| Input from the FA-06 passes directly through the Fireface UFX's main outs, leading to the studio monitors. |
I now only have to power up the minimum amount of gear in order to get a given job done, with a minimum of cord patching and audio device switching.
FA-0X INTERFACE LOW LATENCY PERFORMANCE
In terms of low-latency performance, the FA-06 interface is average. It's much better than the
Focusrite Scarlett 2i2 or the interface mode of the
Access Virus TI2 (both of which I used to own), but not as good as my MOTU and RME interfaces. Like all Roland interfaces I've used, the FA-06's drivers don't use the powers-of-two method for selecting buffer sizes, so in my tests I had to use the closest buffer size I could get: 288 samples.
I tested four different interfaces on
my new DAW PC, running 64-bit Windows 7 at 44.1kHz and 256 samples (or 288 samples in the case of the Rolands). Here are the round-trip latency results, as reported by the
Oblique Audio RTL Utility (lower numbers are better):
SOUND BANKS AND EXPANSION LIBRARIES
The FA-0X keyboards are much more than simple ROMplers. They support a variety of synthesis methods, and are, in some ways, deeply programmable. But with this power comes a fair amount of complexity. It actually took several weeks of actively using my FA-06 before I fully understood the different classes of sounds it supports, and how those sounds are managed.
There are five top-level categories of "tones" (patches) on the FA-0X keyboards, most of which come from the libraries of other Roland instruments, including the Integra and Fantom lines:
- SuperNATURAL acoustic tones (SN-A): These are realistic, expressive acoustic instruments that can be customized in the Tone Edit menu.
- SuperNATURAL synth tones (SN-S): These are more more traditional synthesizer patches that can also be deeply customized in the Tone Edit screen. These tones can comprise up to three oscillators, which can be either PCMs (samples) or traditional synthesizer waveforms.
- SuperNATURAL drum kits (SN-A): These are high-quality, multi-sampled drum kits with a GM layout. These are fully customizable as well.
- PCM Synth Tones (PCMS): This bank contains PCM/sample-based sounds. These tones comprise up to 4 layers of PCM sounds. There are several subcategories of PCM Synth Tones:
- Presets (PRST): Built-in PCM tones, apparently imported from the Roland XV series of synthesizers. These are user-editable.
- General MIDI (GM2): This is a full bank of small-footprint General MIDI patches. To my understanding, this is different from the Integra-7's HQ GM sound set. The FA-series GM2 set sounds very similar to that of my Roland SC-88 Sound Canvas. None of these tones are editable.
- Expansion slots 1 & 2 (SLOT1, SLOT2): These are virtual expansion slots where you can install special expansion sets made specifically for the FA-06 and FA-08, which are available at the Axial site. These patches are also freely editable.
- PCM Drum Kits (PCMD): Drum kits from any of the aforementioned PCM subcategories show up here, and conform to the General MIDI drum layout. Any kits specifically associated with the FA-0X GM2 set are not editable, but non-GM2 presets and downloaded PCMD kits are editable.
Aside from the five types of tones, you can also record or import samples for use on the FA-0X Sampler pads. These samples are stored in a different part of memory from the PCM waveforms used in the various tone categories, and are thus ONLY available for use when triggered by the pads or the built-in sequencer. (As a disappointing side note, the pads do not transmit MIDI note data, so they can't be used to trigger external synths or drum samplers.)
The FA-0X keyboards offer a number of ways to import samples and patches:
- For samples to use as loops or one-shots on the FA-0X pads, you can either record your own samples or import them from an SD card.
- You can download sounds for the Roland Integra-7 from the Roland Axial site, and import them as user presets via a complicated process that uses the included SD card. Sounds you import from downloaded Integra-7 libraries are imported as user presets in the SuperNATURAL synth tones (SN-S) bank.
- You can download third-party sample packs for the Roland FA series at the FA-06 / FA-08 section of the Axial site. Importing these is an unusually complicated procedure which involves the SD card.
- Also available at the Axial site are expansion sets designed explicitly for the FA-06 and FA-08 workstations. Instead of installing these via SD Card, you actually import these via USB thumb drive (using the special "FOR UPDATE" USB slot on the back of the unit). In order to import these sounds, you boot the FA-0X into a special mode, and then indicate which expansions to install in which of the two of the keyboard's virtual expansion slots. Sounds imported this way will appear in the PCMS category of sounds, grouped by expansion.
 |
FA-series libraries labeled "EXP-xx" are real expansion sets that go into the virtual expansion slots.
The others are just mini sample packs. |
The process for importing expansion packs is very similar to the steps for applying system updates for the FA-0X keyboards.
FINAL THOUGHTS
After a couple of months of using my FA-06 on a pretty regular basis, I am still happy with my decision. The only other keyboard I know of that's really in the same league as the FA-06 in terms of features I was looking for is the Yamaha MOXF6, and while I'm sure it's a fine workstation, I doubt I would be more pleased with it than I am with the Roland. I'll wrap this up with a quick list of pros and cons.
WHAT I LIKE
- Large and broad selection of high-quality usable sounds.
- Much more programmable and customizable than I expected. This is no simple ROMpler.
- Nice-feeling keybed.
- Lovely, informative display.
- Good set of physical controls.
- DAW integration gives me quick access to transport controls and up to eight frequently-used Cubase features at a time.
- Built-in audio interface enables me to compose and mix without having to power on my whole rig.
- Axial library provides me access to a surprisingly large number of free new sounds.
- General MIDI support. (I actually use GM when sketching out ideas!)
WHAT I DON'T CARE FOR
- Keyboard doesn't support aftertouch (but neither did the competing Yamaha models).
- Disappointing implementation of the sampler/pads. I don't care too much about not being able to use my own samples in patches, but I wish I could at least assign MIDI note values to the pads so I could trigger an external drum sampler.
- Need to use USB thumb drives and SD cards to import different kinds of material, when the keyboard has a USB connection to your PC already. Why not use the connection we already have?
- Interface mode performs well when it works, but does not seem stable across multiple sleep/wake cycles. Sometimes have to reboot PC in order for DAWs to use the interface again.
- I wish it had the Integra-7's "HQ GM2" General MIDI bank!