Vin Curigliano's DAW Bench is the standard toolset for measuring digital audio workstation hardware and software performance. While the current DAW Bench suite includes projects for several different DAWs, Ableton Live isn't one of them- which was a problem for me, since I was planning to investigate the performance differences between Live and Cubase for an upcoming post. Rather than ditch DAW Bench and go to the effort of developing my own test suite from the ground up, I chose to port the DAW Bench Cubase sessions to Ableton Live. What follows is a detailed analysis of the original DAW Bench projects, and my account of the surprises and challenges I encountered when porting those projects to Live.
When I first began this effort I thought I was the first person to do such a thing, but I eventually discovered user on a music forum who did his own attempt at a Live port a few months back. His goal was different from mine, and his projects weren't direct ports (he only replicated DAW Bench's "DSP" tests, and he chose a different set of plugins for his projects from the ones used in the official tests), so I continued with my own effort.
It is October 2017 as I'm writing this, so my observations here are based on the 2017 edition of the DAW Bench DSP and VI projects.
Analyzing the DSP Projects
Each DAW Bench DSP project contains hundreds of instances of a given CPU-intensive effects plugin, simulating a very complex mix. The "score" of a DSP test is the number of plugin instances you can enable without encountering any glitches in the audible audio.
There are four audible tracks of pre-recorded audio, comprising the loop that plays while you enable FX plugins, listening for pops and drops. There are no effects plugins on these tracks.
There is another "monitor" track which is just a recording of a sine wave. I don't know its purpose, but its track volume is turned all the way down.
Next there are 40 more tracks of sine wave recordings, each with eight instances of the plugin under test filling the track's insert slots. Each instance is disabled when you first load the project. Track volume for each of these tracks is also turned down all the way.
All tracks are routed to the main stereo outs, but only the first four audio tracks are audible due to their volume settings.
While the DSP projects are all about effects plugins, the VI tests only use instances of a virtual instrument plugin: Native Instruments Kontakt 5. The "score" of a VI test is the number of individual Kontakt "voices" you can have playing simultaneously before encountering audio glitches.
The project contains one "Multi1Orchband" instance of the Kontakt plugin that contains a 16-part multi (one part per MIDI channel) of different Kontakt instruments that comprise most of the audible content in the project.
Next there are ten "Multi2Poly" instances of Kontakt, each with 16 instances of the same instrument: A layered pad patch named "Light Breaks Through." Due to the patch's two sample layers, a single MIDI note played with this patch uses two Kontakt voices/oscillators. As with the sine tracks in the DSP projects, each instrument part in the Multi2Poly multis is turned down all the way. More on this later.
The project also contains 16 MIDI tracks, each routed to a different MIDI channel in the Multi1Orchband Kontakt instance.
Finally there are ten folders containing 16 MIDI tracks each, each one routed to its respective MIDI channel in one of the ten Multi2Poly instances. The MIDI tracks are simple clips that play a 16-bar sustained 10-note chord. So at play time, a single Multi2Poly instance can have up to 320 voices going at a time (16 parts of a 2-voice patch playing 10 notes each).
There are two flavors of VI projects, "CV" and "NCV." In the CV project. many of the instruments in the "Multi1Orchband" multi have convolution reverb enabled as an insert effect, while that effect is bypassed in the NCV project. Both projects use convolution reverb as a send effect on a few channels. Importantly, the Multi2Poly multi is identical between the CV and NCV versions of the project (no reverb effect actively enabled as an insert or a send), so the results between CV and NCV tests are generally not very significant.
The VI projects in DAW Bench were initially developed using Kontakt 4, whose factory library had a different layout from the library in Kontakt 5. While the current generation of the DAW Bench projects uses the Kontakt 5 plugin, the multis still use samples from the Kontakt 4 library. I am a licensed owner of Kontakt 4 but I do not currently have that version of the plugin installed anywhere, so I keep a folder containing all the necessary samples on my hard drive for when I need to do tests.
The VI CV project on Cubase 9.
Porting the DSP Projects
Session view vs Arrangement view: Cubase is a traditional "piano roll" DAW while Live offers both a piano-roll style Arrangement view and the clip/loop-based Session view. I chose to build my projects in Session view because of the looping nature of the tests (it's just a few measures of repeating audio, after all), and because this view offers better access to the plugin slots for every track (after some UI resizing, at least).
Audio tracks: The DAWBench DSP 2017 folder includes an "Audio" folder that contains the pre-recorded audio content (including sampled sine waves) used by these projects, which I easily imported into Live as stems. I grouped the tracks in the same order as the folders used in the Cubase projects.
Plugin presets: All instances of the effects plugins in these projects use identical
settings, which is important, because some plugin presets can be more
CPU-intensive than others. Since plugin settings are embedded in the DAW project, I didn't have preset files I could import into Live, so I noted all of the plugin values used in the Cubase projects and created presets matching those settings for each of the plugins in Live.
Plugin inserts: Just like with the Cubase projects, I inserted 8 instances of the desired effects plugin on each of the sine tracks. I enabled display of the insert slots in Session view and resized it so all 8 slots were visible at all times.
Levels and routing: All tracks are routed to Live's Master outs, but all of the "Sine" tracks are set at -inf volume.
The DSP-1566 project on Live 9.
Porting the VI Projects
MIDI tracks: For the MIDI parts that play into the "Multi1Orchband" instance of Kontakt, I dragged all of the MIDI clips out of Cubase and imported them into Live as MIDI clips. There were 16 MIDI clips for the Orchband multi, and another 16-bar MIDI clip for the polyphonic Sine tracks. This clip simply played a 10-note chord for a full 16 measures. Note: Due to an issue I discovered while performing benchmark testing, I discovered that the original 16-bar Poly tracks could not be used for reliable testing. (I will go into more detail on this in my next post.) Because of this I also created a 1-bar version of the Poly track that plays a sustained chord for the first seven 8ths of the measure. Session view allows me to add both the 1-bar clip and the 16-bar clip to every poly track and switch between them at will. Because of this I also edited separate copies of the original Cubase VI projects to use the same 1-bar loop.
Audio tracks: The VI projects include one audible pre-recorded audio track (a 2-bar drum loop to accompany the Orchband parts), and 16 sine wave tracks whose volume is turned to -inf/silent. I presume these additional tracks are to help simulate a real music project that is handling both virtual instruments and audio tracks.
EQ: In Cubase, each of the Sine audio tracks had channel EQ enabled, although it wasn't applying any boosts or cuts. This is not a default track setting, however, so I figured it was intentional. Since Live doesn't have built-in track effects, I instantiated an EQ Eight effect on each of the Sine tracks in Live, and only enabled the first four filter activators, setting them to the same frequencies as those in the Cubase projects, to simulate an equivalent processing load.
Levels and routing: All audio outputs are routed to the Master outs. The Cubase VI projects use the MIDI volume fader in the inspector to set the volume of each part in the Orchband multi. Live uses envelopes for this sort of thing, so I used the pink noise mixing method to set the MIDI levels of each of the audible MIDI parts. As mentioned before, all Sine audio tracks were set to -inf, and most importantly, all parts in the Multi2Poly instances of Kontakt were also turned down to -inf- which proved to be a problem during testing.
Kontakt multis:
I didn't want to have to go through the laborious process of browsing for the correct samples for each of the VI projects when loading them into Live, so in Cubase, I opened both the CV and NCV versions of the DAW Bench projects and saved the Kontakt multis as "monoliths," which include samples. I saved only one copy of the Multi2Poly multi (since it is identical in both flavors of the DAW Bench VI projects), and separate CV/NCV versions of the Multi1Orchband multi. To ensure that my choice of monolith vs. traditional NKI did not adversely affect my tests, I did do a project built that used the traditional sample loading method. I found that RAM consumption was identical whether you used a monolith or not (Kontakt appears to load all samples for all parts when it is able to do so).
Upon my first playback of my imported MIDI clips and multis, I discovered something very strange. One of the parts in the audible potion of the project was clearly out of tune, and not playing in the same way that it sounded when playing under Cubase. It took a while to debug, but I determined that the problem was ocurring in part 13 of the Orchband multi. It was a patch named "Mini Lead 2." This Kontakt patch is explicitly designed to be monophonic (to only play one note at a time). Strangely, the original Cubase DAW Bench projects play chords into this track and they are audible as chords. I don't know why this works under Cubase (because it's not supposed to). But basically, the patch's monophonic design was affecting how it interpreted the chords being sent to it under Live, resulting in strange and unexpected behavior. In order to make the project sound the same in Live as it does in Cubase, I had to bypass the Unisono behavior on Mini Lead 2.
Here's a demonstration of the Unisono issue with the Mini Lead 2 part. It's a 16-bar track divided into four 4-bar sections: 1) The track as it's supposed to sound, 2) The Mini Lead 2 part correctly playing, soloed, 3) The track when the Mini Lead 2 part is not working correctly, and 4) The out-of-tune Mini Lead 2 part, soloed.
The VI CV project on Live 9.
The results
See my upcoming post about the DAW Bench results when I compared Live 9 to Cubase 9. I may also publish these project files at some point so others can do their own tests in Live.
I recently had a terribly frustrating problem with the Kontakt 5 sampler incorrectly loading Native Instruments and third-party commercial libraries which took many combined hours of my time to investigate, experiment with, and ultimately fix. I couldn't find any information on the internet that pointed to a solution (or even a cause) for this problem; I was completely on my own. I am documenting the ordeal here for any unlucky travelers who run into the same issue. Please note: I am a Windows user, and I don't know if this problem or its solution translate to Mac OS.
SYMPTOMS
I discovered the problem after applying a patch to Soniccouture's excellent drum library, Electro-Acoustic. Installing the patch is a manual process which requires copying some files into the instrument's Library folder. To test the changes, I launched Kontakt in stand-alone mode and opened Electro-Acoustic, and was greeted by this horrific result:
As shown in the image, all controls from all of the plugin's built-in tabs are visible all at once, rendering the user interface (UI) unreadable. Additionally the highlighted keyswitches shown on the virtual keyboard are all wrong.
Thinking I had perhaps done something wrong when applying the instrument patch files, I tried out a few other libraries. And unfortunately, I discovered that the same issue was occurring in many of them now. Here's Native Instruments Emotive Strings:
Again, all UI elements of the instrument were displayed on-screen at once, and none of them were usable.
I then tested Kontakt in my two DAWs to see if results were any different. Here's what I found:
When launched as a plugin in Ableton Live 9, Kontakt behaved just the same as in stand-alone mode.
It was even worse in Steinberg Cubase 9, though. In Cubase, after opening a new instance of Kontakt and selecting a library, Kontakt would spend some time loading samples, but then would eventually freeze, locking up Cubase entirely. It wouldn't display the instrument UI at all, and since Cubase was unusable, the only way to exit it was to kill the process in Task Manager.
OBSERVATIONS
Here's a quick list of things I observed over the next several days in my quest to solve the problem.
The problem only affected stand-alone mode and new instances of the Kontakt plugin in a DAW, not plugin instances that had already been saved in existing Cubase projects. I even had a couple of projects that used Soniccouture Electro-Acoustic (the instrument I was using when I discovered the whole problem) which loaded and played fine. It was only when I added a new instance of Kontakt to a new or pre-existing project that the issue occurred.
Updating to the latest Kontakt version didn't help. I don't know exactly which version I had installed when I first hit the issue, but I checked Native Access and saw that there was an update available (5.6.8). I installed the update but found that it did not fix my issue.
Uninstalling/re-installing Kontakt didn't work- even if I manually cleaned up left-over registry and file traces that the uninstaller doesn't remove. (Spoiler alert- there was ONE post-uninstall trace of the program that I was overlooking when doing this clean-up. More about this in the "solution" section.)
I normally use Windows 7, but I have another boot partition with Windows 10, that also has Cubase and Native Instruments Komplete 11 installed. When I switched over to Windows 10 and tried loading some of the same libraries that were giving me problems on Windows 7, I found that they worked fine. I also ran Native Access to make sure all my plugins were the same version I was running in Windows 7, so this ruled out the specific version of Kontakt. Version 5.6.8 was not the problem.
Here was the real breakthrough, though: After I switched back to Windows 7 I logged into a different user profile that I hardly ever use. I launched Kontakt in stand-alone mode, and loaded Electro-acoustic... and this time it worked! Both the UI and keyswitches were now working properly! This told me it wasn't an installation problem, but rather something specific to my Windows user account.
On this working user profile, I ran Sysinternals Process Monitor while launching Kontakt and loading the Soniccouture instrument again, watching exactly what Kontakt 5.exe was doing- and this is when I saw it: Kontakt was using a registry subkey that I had overlooked previously, when I was doing manual post-uninstall cleanup of Kontakt. I had already been deleting the Kontakt-related keys under HKEY_LOCAL_MACHINE, but I had forgotten to check for anything under the user-specific portion of the registry: HKEY_CURRENT_USER!
SOLUTION
So here's what I did to finally fix the problem:
Make sure no instances of Kontakt are currently running, either as a stand-alone program or a plugin.
Launch regedit.exe and browse to this location in the registry: HKEY_CURRENT_USER\Software\Native Instruments\Kontakt 5
With the Kontakt 5 node selected in the left pane of the window, select File > Export and save a backup copy of the registry contents.
Now right-click the Kontakt 5 node and click Delete on the shortcut menu.
When you are asked if you are sure you want to permanently delete the key, click Yes. (Kontakt will re-create this key with the default program settings the next time it's launched.)
Quit Regedit and re-launch Kontakt.
Load a library that was exhibiting the problem with the UI and/or keyswitches previously. It should now work.
And here was the glorious result:
Good as new!
This also fixed the problem with new instances of the plugin in Live and Cubase. I really hope this post saves someone the time and frustration this problem caused me.
UVI Falcon has taken the soft synth world by storm since its release, but there's not a whole lot of information out there yet on how to do certain things with this powerful instrument.
This tutorial walks you through the following aspects of building your own sample-based drum kit in Falcon:
Using layers in Falcon to send different drum sounds to separate audio output channels that you can mix and process individually in your DAW.
Setting up an exclusive group (or "choke group") to simulate real hi-hat behavior.
Using Falcon's "custom drop" feature to import multiple samples into a single keygroup.
Using the round robin trigger mode to add variety to individual percussion sounds.
And finally, we'll see how to apply some of this knowledge to modifying kits in UVI's excellent Beat Box Anthology collection of classic drum machine samples.
To help you get up to speed quickly I've put together a free mini sample pack for this tutorial, which you can download from the Ultimate Outsider Software page. We'll start off by building the kit's layers and importing samples, and then complete the kit by setting up the multi-channel audio routing in a DAW. As an added bonus, I'll show you how to create or modify your own kits using samples from UVI's Beat Box Anthology. I'm using Ableton Live 9 in my examples, but most of what's covered here applies regardless of what DAW you're using. (Part 5 of the written tutorial also includes configuration steps for Steinberg Cubase.)
TUTORIAL VIDEO
I produced a YouTube companion video that covers everything in this written tutorial except for Cubase configuration.
If you prefer written tutorials, read on!
PART 1: ADDING THE KICK LAYER
Open up a new DAW project and create an instance of Falcon. Make sure your left and right panels are both visible. You toggle the panels on or off using the Show/Hide Panel buttons at the top of the Falcon window. Also make sure all the sections of the Edit tab (Program, Layer, Keygroup, Oscillator, Mapping, etc.) are visible by enabling their respective icons. Falcon automatically creates a new, empty program (patch) when you start a new instance.
Download the Falcon tutorial sample pack from the Ultimate Outsider Software page. Extract the samples to a local folder and then browse to them in the file browser tab of Falcon. I've added my copy of the folder to the Favorite Places section of the browser.
Click the wrench icon near the top of the Falcon window to open Falcon Preferences. On the General tab, enable the One Shot option next to Sample drag'n'drop mode. This will ensure that our drum samples automatically play all the way through when triggered.
You'll notice that each of the samples includes the intended MIDI note value in its name. Drag the Kick C1 sample to the C1 key on Falcon's virtual keyboard. This creates a new layer ("Layer 1"), a new keygroup ("Kick C1.wav"), and a new oscillator that contains your sample. You should be able to trigger the sample with your MIDI controller or by clicking its note on the virtual keyboard. If you select the List pane in the left tab of Falcon, you can see the new layer and keygroup.
Tip: The lower you click on the virtual keyboard, the higher the velocity of the auditioned sound. This velocity sensitivity happens by default, and is the result of velocity modulation to the amp envelope, as shown in the above screenshot (bottom of the window). If you disable or delete the Amp. Env modulator, you will disable velocity sensitivity for this keygroup.
Note: If you didn't set your drag'n'drop preferences to One Shot in step 3, you can apply one-shot mode to an individual sample oscillator by right-clicking inside the waveform and choosing Set as One Shot on the shortcut menu.
In the List tab of Falcon's left pane, rename the current layer by double-clicking the layer name and typing: Kick
PART 2: ADDING THE SNARE LAYER
Click the + sign in the Layer(s) row to add a new layer.
Double click the new layer's name and rename it to Snare. Leave this layer selected (so that it's highlighted.) The Keygroup(s) pane should appear empty.
Drag the Snare D1 sample from the file browser to the D1 key of the virtual keyboard.
PART 3: PUTTING HI HATS IN AN EXCLUSIVE GROUP
In the List tab, click + in the Layer(s) row to add another layer, and rename the new layer to Hi Hats.
Making sure that only the Hi Hats layer is selected, drag the Closed Hat F#1 and Open Hat A#1 samples to their respective places on the virtual keyboard. Your single Hi Hats layer should now have two keygroups, each containing a single sample oscillator.
In order to make the hi hats behave more like real cymbals, we're going to put them in an "exclusive group," where one hi hat sample cuts the other one short when playing. With the Hi Hats layer selected, scroll the Keygroup(s) view all the way over to the right so you can see the ex. group column.
Note: If you can't find ex. group, right-click any of the column headers in the Keygroup(s) pane and make sure to check ex. group in the list.
For each of the keygroups under Hi Hats, set the ex. group field to 1. (You can change the values by dragging your left mouse up or down on the fields, or by double-clicking them and entering a new value.) This puts the hi hats into the same exclusive group. Now when you play the two hi hat samples very quickly, triggering one of them will cut the other one short.
PART 4: IMPORTING ROUND-ROBIN SHAKER SAMPLES
Add a new layer in the List tab and name it Shaker.
Make sure that only the Shaker layer is selected, and then SHIFT-select all of the Shaker A3 samples in the file browser. Notice how all of these samples end with something like "rr1?" Falcon recognizes this as an indication that these are intended for a round-robin keygroup.
Hold down ALT on Windows (or OPTION on Mac) while dragging the shaker samples to the A3 key. This brings up the Sample Drag'n'Drop dialog. Select NoteName RoundRobin under Mapping method and make sure Destination points to your Shaker layer, and then click OK.
You should now find that your Shaker layer has a single keygroup that contains all eight shaker samples. Each time you press A3 on your keyboard you will hear a slightly different shaker sample.
At this point we have a basic drum kit that sends all audio to the plugin's "Main Out" bus. Save your work now by clicking the wrench icon and selecting Save Program and Samples. In addition to saving your program as a UVIP file, this command is supposed to create a folder in the same directory containing all samples used in that program.
Note: On version 1.0.1 of Falcon, Save Program and Samples doesn't appear to actually save the samples (not on my Windows DAW PC anyway). I have found that the Save Program and Samples as command, however, does correctly export the samples. Something to keep an eye on.
PART 5: PREPARE YOUR DAW FOR MULTIPLE PLUGIN OUTPUTS
Before we start setting up our Falcon kit to use multiple outputs, we
should make sure our DAW is ready to receive audio from the plugin's
various outputs.
Ableton Live
The easiest way to do this in Ableton Live is to make use of the External Instrument device (only available in the Standard and Suite versions of Live).
The MIDI track hosting our Falcon instance receives audio from Falcon's "Main Out" master stereo output. When you're working with multiple outputs, it's best not to assign any parts to Main Out, since that bus is also shared by Falcon's four Aux buses. What this means for our DAW setup is that we'll need four additional MIDI tracks to receive audio from the four layers in our drum kit. I've named my additional tracks Kick, Snare, Hi Hats, and Shaker.
Drag an External Instrument device to the Kick track. Point its MIDI To to the Falcon track, channel 1. Under Audio From, select the Falcon 2 output.
Repeat this for the Snare, Hi Hats, and Shaker tracks, only set their Audio From entries to Falcon 3, Falcon 4, and Falcon 5, respectively.
Select the Falcon track and make sure that it's armed for MIDI input.
Steinberg Cubase
Since all the screenshots up to this point use Ableton Live, we'll take the Cubase setup from the top. I'm going to use the "Rack Instruments" approach (versus the "Track Instruments" approach), because you can use the rack method in all versions of Cubase from 5.0 on. These steps will definitely work in the Pro and Artist editions of Cubase, but probably apply to the limited editions as well.
In a Cubase project, go to Devices > VST Instruments an add Rack Instrument instance of Falcon.
When Cubase asks if you want to create a MIDI track assigned to Falcon, click Create.
Back in the VST Instruments window, click the Activate Outputs icon on the Falcon instance.
In the menu that appears, make sure to enable outputs Falcon 1-Falcon 5. The plugin's Main Out goes to Falcon 1, and the other four outputs are for the individual drum layers.
If you expand the Falcon folder under VST Instruments in your arrangement view you should now see five separate VST channels, one for each output pair enabled on the plugin. You can set up inserts and sends on these channels just like regular audio tracks. In my example, I renamed the VST channels to represent which drum parts they would receive. I also renamed the MIDI track that's routed to the Falcon instance.
The Cubase project, after renaming the VST channels and MIDI track and importing a MIDI loop.
PART 6: ASSIGN LAYERS TO SEPARATE OUTPUTS
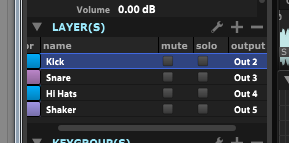
Back in Falcon, locate the output column in the Layer(s) tab of the left pane (you may have to scroll right to see it). This column is actually hidden by default, so if you cannot find it, right-click one of the column headers in the Layer(s) list and then click output on the shortcut menu.
For each layer in your kit, select a different individual output to match the Audio From selections you picked in the previous section. (Kick = Out 2, Snare = Out 3, Hi Hats = Out 4, Shaker = Out 5.)
Now when you play the appropriate notes on your MIDI controller you should see audio coming in on separate tracks in your DAW. Use Save Program and Samples as to save the multi-output version of your kit if you like.
The sample pack I put together for this tutorial includes a MIDI drum loop that you can import in your DAW to test the kit out. Drag the clip onto the MIDI track where your Falcon plugin instance is hosted. You can now apply your own effects and EQ to each drum part in your Falcon drum kit!
At default track volume, the shaker layer is pretty loud in relation to the rest of the kit. If you'd like to adjust the volume of a specific layer, go back into Falcon and locate the volume column in the Layer(s) pane of the List view. You might have to scroll to see it. Also, the volume column is hidden by default, so right-click one of the other column headers and then click volume on the pop-up menu if it's not currently shown. Make sure that only the layer (or layers) you wish to adjust is selected and then adjust the volume field for that layer by dragging down or up.
PART 7: MODIFYING KITS IN BEAT BOX ANTHOLOGY
UVI's Beat Box Anthology is a great collection of kits and samples of dozens of classic drum machines. All of the kits in the collection are set up to send all sounds to the instrument's Main Out. Users of the free UVI Workstation are stuck with this limitation, but Falcon gives you the ability to tweak these kits to suit your needs. Beat Box Anthology is included in UVI's Vintage Vault bundle, and the following steps assume you have both Falcon and Beat Box Anthology installed.
Let's start with a new instance of Falcon, and expand the Soundbanks category to locate the GM Kits under Beat Box Anthology. (The General MIDI kits will work with the MIDI loop included with my Falcon tutorial sample pack.)
Double-click one of the kits to load it into the currently selected Falcon part. I've selected the DR Tracks kit, which is based on the Sequential Circuits Drumtraks unit from 1984.
On the List tab of the left panel we can see that this kit contains two layers. One layer is for the hi hat choke group, while all other sounds in the kit reside on the other. We can assign the hi hats to their own output the same way we did in Part 6 earlier. First, make sure that only the HH layer is selected in the List view, and then scroll over to locate the output column in the Layer(s) section. If you don't see it, right-click one of the column headers and then click output in the shortcut menu to add it to the Layer(s) view.
Change the output setting for this layer to Out 4 (to match the assignments we used in part 6).
For the rest of the drum sounds, we'll need to edit the keygroups assigned to individual samples in the kit. First, make sure that only the Drums layer is selected, and then ensure that you can see the output column in the Keygroup(s) view. Like with the Layer(s) view, the output column is hidden by default.
Now assign the outputs of the individual keygroups to your desired output channels. You might want to hide some columns in your Keygroup(s) view for this step so you can see the keygroup names and outputs without scrolling. You might also find it easier to work in this view by sorting it in root key order, and you can SHIFT-select and CTRL-select multiple keygroups to change their output settings at the same time. Here are output assignments that match what we did when building our own kit in the previous sections, in order of root key note value:
B0 & C1 (kicks): Out 2 D1 & E1 (snares): Out 3 (The HH layer should already be on Out 4) A3 & A#3 (shaker): Out 5
Next set up your DAW to accept multiple plugin outputs just like we did in section 5 above, and don't forget to arm the Falcon track to intercept your MIDI if you're planning to test your setup out with your keyboard controller.
If you have my Falcon tutorial sample pack, drag the Falcon Drum Loop MIDI clip onto your Falcon plugin track and loop it.
Important: Don't forget to save the modified versions of your kits! Click the wrench icon and use Save Programas or Save Program and Samples as to back up your work.
Unlike most of the UVI libraries, Beat Box Anthology includes individual drum samples that you can access in the file browser to create or modify your own kits. If you have the auto preview button activated, you can audition the samples while you browse by selecting them with your mouse or the arrow keys.
You can drag these samples from the file browser right into your kit.
This is part 4 of a multi-part series on how to use General MIDI files with Ableton Live. The first part covers the basics of General MIDI and how Live handles MIDI files. These subsequent posts are step-by-step walkthroughs for a variety of instruments.
ABOUT THE INSTRUMENT
In this post we're going to use a hardware GM-compatible sound module, a Roland Sound Canvas SC-88. The instructions we follow for this are virtually the same for any GM-compatible hardware synth as far as Ableton Live is concerned. Some instruments might need to be put into a special GM mode in order to load the right patches, though. Consult your hardware manual if you're using a different synth.
USING THE INSTRUMENT WITH LIVE
Create a new, empty Live set and press TAB to enter Arrangement view. (Session view technically works, but if your MIDI file contains time signature or tempo changes, Arrangement view is more appropriate.) Drag your General MIDI file from the Live browser into your Live set. If it's a Type 1 file, all the tracks in the file should end up on separate MIDI tracks in separate MIDI clips in the Live set.
If it's a Type 0 file, Live will only import a single MIDI clip/track, regardless of how many musical parts the song contains. You will have to convert the file to Type 1 and start over. See the first article in this series to learn how to convert MIDI files.
For each new MIDI clip that Live created, select the MIDI clip and look at its Pgm Change settings in the Notes panel of the clip view. Each imported track (except for maybe the drum track) should at least have a Program Change value selected.
If the current clip is not a drum channel, and you see no Pgm Change setting, Live might not have properly detected program change events for that track. See the first article in this series to learn how to locate program change numbers in MIDI files.
Note: If your MIDI file contains program changes that occur within the song (if a single musical part changes tones as the song progresses) you will have to split those MIDI clips into separate clips so you can set the correct program change value on each clip individually. MidiYodi tells you where in the song the program change events occur, so they should be relatively easy to locate in your Live set.
Since we're working with hardware, there are a couple more things we need to check out before proceeding. First, go to Options > Preferences > MIDI Sync and make sure that the MIDI Output port that leads to your hardware synth is enabled. My Sound Canvas gets its MIDI from Port 8 of my MOTU Midi Express 128, and I can see that the Track box for that port is set to On, so I know this is set up properly.
Now look at the Audio tab of Preferences and click Input Config to confirm that the audio inputs that receive sound from your hardware synth are configured. My Sound Canvas is connected to input ports 9 and 10 on my interface, and I'm going to use them as a stereo pair, and I see that "9/10 (stereo)" is enabled, so we're all set.
Go to Create > Insert MIDI Track to add a new empty track in your project, and then drag the External Audio Effect device from the Audio Effects category of the Live browser into the track's Device View area. (Don't use a track that already has a MIDI clip on it; doing so will cause headaches if you ever want to mute or solo individual tracks.)
Important: Leave the Audio To field set to "No Output", but set the Audio From field to the interface inputs that your synth is connected to. In my case, that's inputs 9/10.
Now, you might ask, "Why are we using a MIDI track instead of an audio track for this?" Well, you can use an audio track, but when you do that you have to worry about track monitoring, and how Live compensates for delays when recording at various monitor settings. I prefer to use Live's External Instrument and External Audio Effect devices instead, because they behave more like plugins and they automatically compensate for latency.
Next, you might ask, "Why use the External Audio Effect device instead of the External Instrument device?" Well, that's because the External Instrument device requires to to select a MIDI output in order to be able to select an audio input. Since we're putting this device on a track that intentionally has no MIDI, the External Audio Device makes more sense here. Setting Audio To to No Output basically turns the device into a live audio input.
One further note: Since the External Audio Effect device is only available in Live Standard or Live Suite, if you're using Live Intro, you WILL have to use an audio track for this instead, and make sure that track monitoring is set to IN to hear incoming audio, or (better yet) use your interface's direct monitor ability instead.
For each MIDI track in your Live set that has a MIDI clip on it, change the Output Type setting to point to the track where you loaded your virtual instrument plugin, and change the Output Channel setting to the MIDI channel you want to use for that part. For the most part the actual channels you choose don't matter (so long as they're different from each other), however, you should only use channel 10 for your drum parts (parts that actually use the multi-sample GM drum layout).
Now try playing your song!
If you find that the Sound Canvas isn't loading the correct patches, or something just doesn't sound right, check these things:
Each MIDI clip (except perhaps the drum track) has a Program Change setting.
You are using the correct Program Change values (remember, they should
be the MidiYodi value plus 1 because of how Live numbers program
changes).
Make sure your drum track is routed to MIDI channel 10, and that you have a GM drum kit loaded on that channel in your plugin.
Your MIDI output ports and audio input ports are enabled in Preferences, and the correct ones are being used in your tracks.
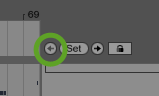
You started playback from the very beginning of the song, since the program change events only fire at clip start. Click the Previous Locator button several times to make sure you're playing from the beginning.
The Previous Locator button.
That's it for now. Go back to part one for links to the rest of the series, in case you missed anything.
This is part 3 of a multi-part series on how to use General MIDI files with Ableton Live. The first part covers the basics of General MIDI and how Live handles MIDI files. These subsequent posts are step-by-step walkthroughs for a variety of instruments.
ABOUT THE INSTRUMENT
Sonic Cat's Purity is a good-sounding multi-timbral ROMpler plugin for Mac and PC. It includes a large library of sounds, in addition to a full GM implementation. (Purity was originally released by a company named Luxonix. I don't know if the property shifted hands or whatever, but Sonic Cat sells it now.)
There is a concerning note on the Purity product page that says: "Not compatible with some systems. Especially Logic Pro X, Ableton Live and NI Maschine." I really don't know what to make of it, since I'm obviously able to use it just fine in Live (although I'm a Windows user, so I don't know if it's any different on Mac OS). Anyway, there is a free demo available at the product page, and I do recommend you test that out before paying for it. The download is a single ZIP file but it contains both EXE (Windows) and DMG (Mac) installers.
Note that Purity is 32-bit only. If you are running a 64-bit version of Live, you'll have to use a bit-bridging product like jBridge or 32 Lives to get it to work in your DAW. I wrote some instructions for doing exactly this with jBridge for Windows.
USING THE INSTRUMENT WITH LIVE
Create a new, empty Live set and press TAB to enter Arrangement view. (Session view technically works, but if your MIDI file contains time signature or tempo changes, Arrangement view is more appropriate.) Drag your General MIDI file from the Live browser into your Live set. If it's a Type 1 file, all the tracks in the file should end up on separate MIDI tracks in separate MIDI clips in the Live set.
If it's a Type 0 file, Live will only import a single MIDI clip/track, regardless of how many musical parts the song contains. You will have to convert the file to Type 1 and start over. See the first article in this series to learn how to convert MIDI files.
For each new MIDI clip that Live created, select the MIDI clip and look at its Pgm Change settings in the Notes panel of the clip view. Each imported track (except for maybe the drum track) should at least have a Program Change value selected.
If the current clip is not a drum channel, and you see no Pgm Change setting, Live might not have properly detected program change events for that track. See the first article in this series to learn how to locate program change numbers in MIDI files.
Note: If your MIDI file contains program changes that occur within the song (if a single musical part changes tones as the song progresses) you will have to split those MIDI clips into separate clips so you can set the correct program change value on each clip individually. MidiYodi tells you where in the song the program change events occur, so they should be relatively easy to locate in your Live set.
Go to Create > Insert MIDI Track to add a new empty track in your project, and then drag the Purity plugin into the track's Device View area. (Don't use a track that already has a MIDI clip on it; doing so will cause headaches if you ever want to mute or solo individual tracks.)
In Purity, click the Preset button above the virtual keyboard and then select the GM Normal category to place Purity in GM mode.
For each MIDI track in your Live set that has a MIDI clip on it, change the Output Type setting to point to the track where you loaded your virtual instrument plugin, and change the Output Channel setting to the MIDI channel you want to use for that part. For the most part the actual channels you choose don't matter (so long as they're different from each other), however, you should only use channel 10 for your drum parts (parts that actually use the multi-sample GM drum layout).
Now try playing your song!
If you find that Purity isn't loading the correct patches, or something just doesn't sound right, check these things:
Each MIDI clip (except perhaps the drum track) has a Program Change setting.
You are using the correct Program Change values (remember, they should
be the MidiYodi value plus 1 because of how Live numbers program
changes).
Make sure your drum track is routed to MIDI channel 10, and that you have a GM drum kit loaded on that channel in your plugin.
You started playback from the very beginning of the song, since the program change events only fire at clip start. Click the Previous Locator button several times to make sure you're playing from the beginning.
The Previous Locator button.
In the next post, we'll take a look at using a hardware Roland Sound Canvas.