Showing posts with label machfive. Show all posts

Sunday, December 6, 2015

Tutorial: Making a Multi-output Drum Kit in UVI Falcon

UVI Falcon has taken the soft synth world by storm since its release, but there's not a whole lot of information out there yet on how to do certain things with this powerful instrument.


This tutorial walks you through the following aspects of building your own sample-based drum kit in Falcon:
  • Using layers in Falcon to send different drum sounds to separate audio output channels that you can mix and process individually in your DAW.
  • Setting up an exclusive group (or "choke group") to simulate real hi-hat behavior.
  • Using Falcon's "custom drop" feature to import multiple samples into a single keygroup.
  • Using the round robin trigger mode to add variety to individual percussion sounds.
  • And finally, we'll see how to apply some of this knowledge to modifying kits in UVI's excellent Beat Box Anthology collection of classic drum machine samples.
To help you get up to speed quickly I've put together a free mini sample pack for this tutorial, which you can download from the Ultimate Outsider Software page. We'll start off by building the kit's layers and importing samples, and then complete the kit by setting up the multi-channel audio routing in a DAW. As an added bonus, I'll show you how to create or modify your own kits using samples from UVI's Beat Box Anthology. I'm using Ableton Live 9 in my examples, but most of what's covered here applies regardless of what DAW you're using. (Part 5 of the written tutorial also includes configuration steps for Steinberg Cubase.)

TUTORIAL VIDEO

I produced a YouTube companion video that covers everything in this written tutorial except for Cubase configuration.


If you prefer written tutorials, read on!

PART 1: ADDING THE KICK LAYER

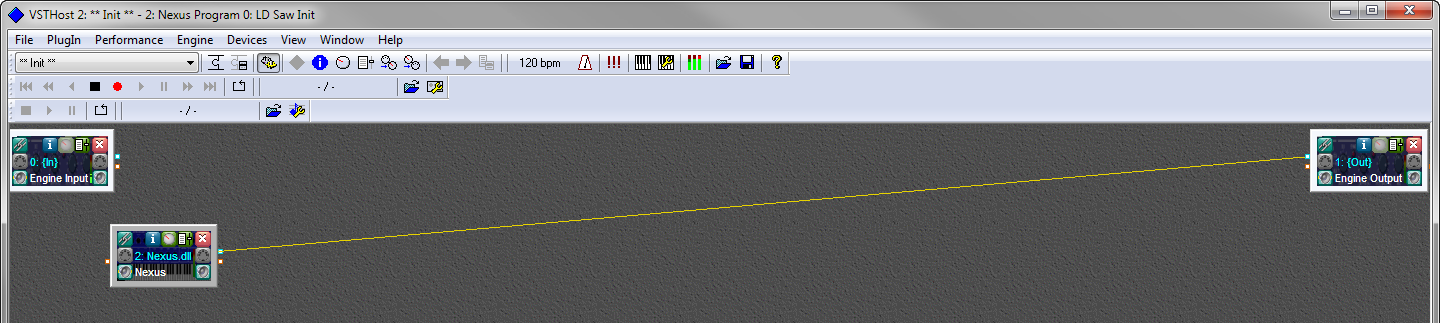
  1. Open up a new DAW project and create an instance of Falcon. Make sure your left and right panels are both visible. You toggle the panels on or off using the Show/Hide Panel buttons at the top of the Falcon window. Also make sure all the sections of the Edit tab (Program, Layer, Keygroup, Oscillator, Mapping, etc.) are visible by enabling their respective icons. Falcon automatically creates a new, empty program (patch) when you start a new instance.

  2. Download the Falcon tutorial sample pack from the Ultimate Outsider Software page. Extract the samples to a local folder and then browse to them in the file browser tab of Falcon. I've added my copy of the folder to the Favorite Places section of the browser.
  3. Click the wrench icon near the top of the Falcon window to open Falcon Preferences. On the General tab, enable the One Shot option next to Sample drag'n'drop mode. This will ensure that our drum samples automatically play all the way through when triggered.
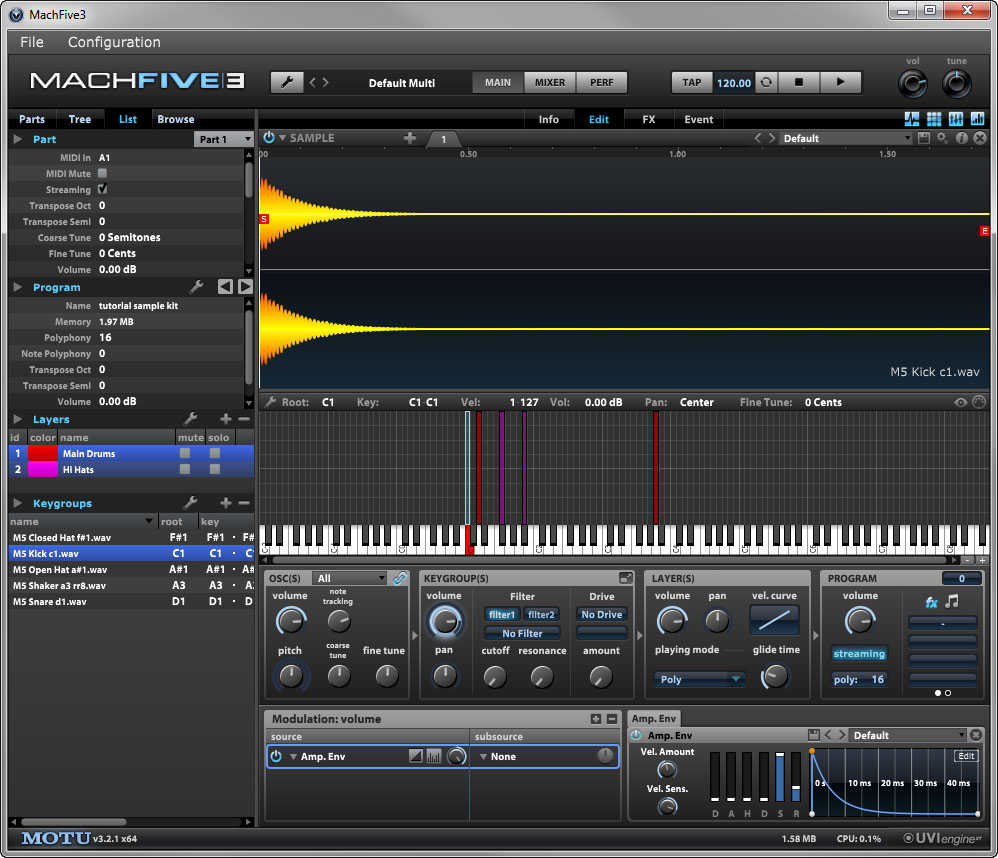
  4. You'll notice that each of the samples includes the intended MIDI note value in its name. Drag the Kick C1 sample to the C1 key on Falcon's virtual keyboard. This creates a new layer ("Layer 1"), a new keygroup ("Kick C1.wav"), and a new oscillator that contains your sample. You should be able to trigger the sample with your MIDI controller or by clicking its note on the virtual keyboard. If you select the List pane in the left tab of Falcon, you can see the new layer and keygroup.

    Tip: The lower you click on the virtual keyboard, the higher the velocity of the auditioned sound. This velocity sensitivity happens by default, and is the result of velocity modulation to the amp envelope, as shown in the above screenshot (bottom of the window). If you disable or delete the Amp. Env modulator, you will disable velocity sensitivity for this keygroup.

    Note: If you didn't set your drag'n'drop preferences to One Shot in step 3, you can apply one-shot mode to an individual sample oscillator by right-clicking inside the waveform and choosing Set as One Shot on the shortcut menu.
  5. In the List tab of Falcon's left pane, rename the current layer by double-clicking the layer name and typing: Kick

PART 2: ADDING THE SNARE LAYER

  1. Click the + sign in the Layer(s) row to add a new layer.
  2. Double click the new layer's name and rename it to Snare. Leave this layer selected (so that it's highlighted.) The Keygroup(s) pane should appear empty.
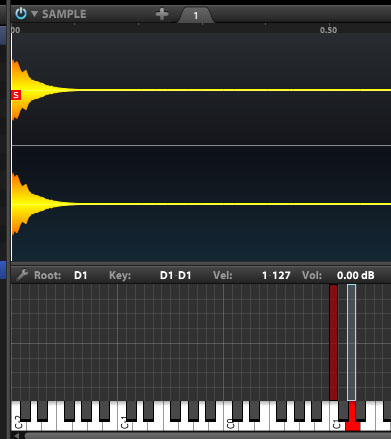
  3. Drag the Snare D1 sample from the file browser to the D1 key of the virtual keyboard.

PART 3: PUTTING HI HATS IN AN EXCLUSIVE GROUP

  1. In the List tab, click + in the Layer(s) row to add another layer, and rename the new layer to Hi Hats.
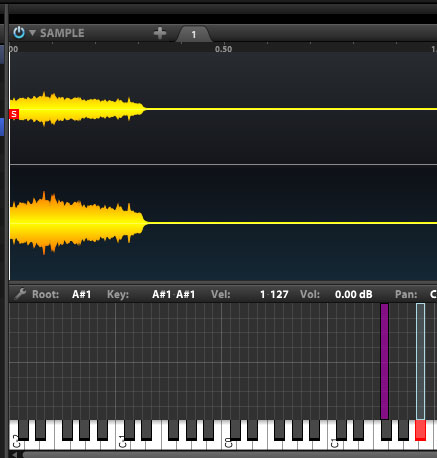
  2. Making sure that only the Hi Hats layer is selected, drag the Closed Hat F#1 and Open Hat A#1 samples to their respective places on the virtual keyboard. Your single Hi Hats layer should now have two keygroups, each containing a single sample oscillator.
  3. In order to make the hi hats behave more like real cymbals, we're going to put them in an "exclusive group," where one hi hat sample cuts the other one short when playing. With the Hi Hats layer selected, scroll the Keygroup(s) view all the way over to the right so you can see the ex. group column.

    Note: If you can't find ex. group, right-click any of the column headers in the Keygroup(s) pane and make sure to check ex. group in the list.
  4. For each of the keygroups under Hi Hats, set the ex. group field to 1. (You can change the values by dragging your left mouse up or down on the fields, or by double-clicking them and entering a new value.) This puts the hi hats into the same exclusive group. Now when you play the two hi hat samples very quickly, triggering one of them will cut the other one short.

PART 4: IMPORTING ROUND-ROBIN SHAKER SAMPLES

  1. Add a new layer in the List tab and name it Shaker.
  2. Make sure that only the Shaker layer is selected, and then SHIFT-select all of the Shaker A3 samples in the file browser. Notice how all of these samples end with something like "rr1?" Falcon recognizes this as an indication that these are intended for a round-robin keygroup.
  3. Hold down ALT on Windows (or OPTION on Mac) while dragging the shaker samples to the A3 key. This brings up the Sample Drag'n'Drop dialog. Select NoteName RoundRobin under Mapping method and make sure Destination points to your Shaker layer, and then click OK.
  4. You should now find that your Shaker layer has a single keygroup that contains all eight shaker samples. Each time you press A3 on your keyboard you will hear a slightly different shaker sample.
  5. At this point we have a basic drum kit that sends all audio to the plugin's "Main Out" bus. Save your work now by clicking the wrench icon and selecting Save Program and Samples. In addition to saving your program as a UVIP file, this command is supposed to create a folder in the same directory containing all samples used in that program.

    Note: On version 1.0.1 of Falcon, Save Program and Samples doesn't appear to actually save the samples (not on my Windows DAW PC anyway). I have found that the Save Program and Samples as command, however, does correctly export the samples. Something to keep an eye on.

PART 5: PREPARE YOUR DAW FOR MULTIPLE PLUGIN OUTPUTS

Before we start setting up our Falcon kit to use multiple outputs, we should make sure our DAW is ready to receive audio from the plugin's various outputs.

Ableton Live

The easiest way to do this in Ableton Live is to make use of the External Instrument device (only available in the Standard and Suite versions of Live).
  1. The MIDI track hosting our Falcon instance receives audio from Falcon's "Main Out" master stereo output. When you're working with multiple outputs, it's best not to assign any parts to Main Out, since that bus is also shared by Falcon's four Aux buses. What this means for our DAW setup is that we'll need four additional MIDI tracks to receive audio from the four layers in our drum kit. I've named my additional tracks Kick, Snare, Hi Hats, and Shaker.
  2. Drag an External Instrument device to the Kick track. Point its MIDI To to the Falcon track, channel 1. Under Audio From, select the Falcon 2 output.
  3. Repeat this for the Snare, Hi Hats, and Shaker tracks, only set their Audio From entries to Falcon 3, Falcon 4, and Falcon 5, respectively.
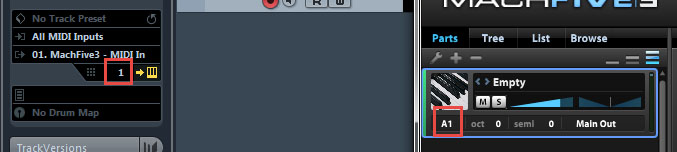
  4. Select the Falcon track and make sure that it's armed for MIDI input.

Steinberg Cubase

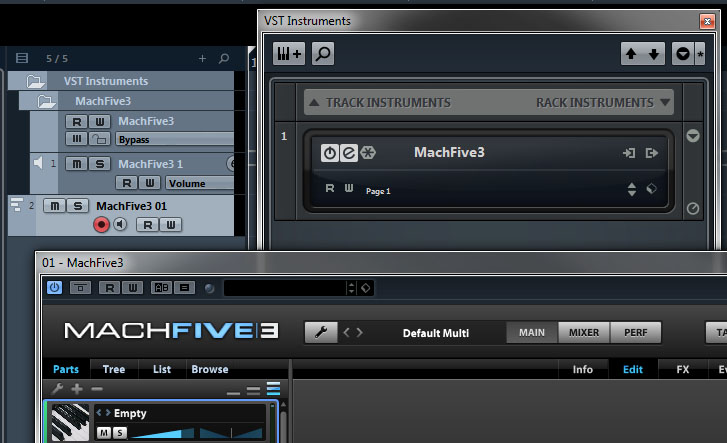
Since all the screenshots up to this point use Ableton Live, we'll take the Cubase setup from the top. I'm going to use the "Rack Instruments" approach (versus the "Track Instruments" approach), because you can use the rack method in all versions of Cubase from 5.0 on. These steps will definitely work in the Pro and Artist editions of Cubase, but probably apply to the limited editions as well.
  1. In a Cubase project, go to Devices > VST Instruments an add Rack Instrument instance of Falcon.
  2. When Cubase asks if you want to create a MIDI track assigned to Falcon, click Create.
  3. Back in the VST Instruments window, click the Activate Outputs icon on the Falcon instance.
  4. In the menu that appears, make sure to enable outputs Falcon 1-Falcon 5. The plugin's Main Out goes to Falcon 1, and the other four outputs are for the individual drum layers.
  5. If you expand the Falcon folder under VST Instruments in your arrangement view you should now see five separate VST channels, one for each output pair enabled on the plugin. You can set up inserts and sends on these channels just like regular audio tracks. In my example, I renamed the VST channels to represent which drum parts they would receive. I also renamed the MIDI track that's routed to the Falcon instance.
    The Cubase project, after renaming the VST channels and MIDI track and importing a MIDI loop.

PART 6: ASSIGN LAYERS TO SEPARATE OUTPUTS

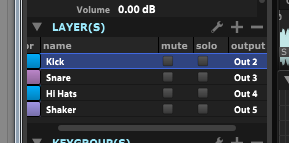
  1. Back in Falcon, locate the output column in the Layer(s) tab of the left pane (you may have to scroll right to see it). This column is actually hidden by default, so if you cannot find it, right-click one of the column headers in the Layer(s) list and then click output on the shortcut menu. 
  2. For each layer in your kit, select a different individual output to match the Audio From selections you picked in the previous section. (Kick = Out 2, Snare = Out 3, Hi Hats = Out 4, Shaker = Out 5.)
  3. Now when you play the appropriate notes on your MIDI controller you should see audio coming in on separate tracks in your DAW. Use Save Program and Samples as to save the multi-output version of your kit if you like.
  4. The sample pack I put together for this tutorial includes a MIDI drum loop that you can import in your DAW to test the kit out. Drag the clip onto the MIDI track where your Falcon plugin instance is hosted. You can now apply your own effects and EQ to each drum part in your Falcon drum kit!
  5. At default track volume, the shaker layer is pretty loud in relation to the rest of the kit. If you'd like to adjust the volume of a specific layer, go back into Falcon and locate the volume column in the Layer(s) pane of the List view. You might have to scroll to see it. Also, the volume column is hidden by default, so right-click one of the other column headers and then click volume on the pop-up menu if it's not currently shown. Make sure that only the layer (or layers) you wish to adjust is selected and then adjust the volume field for that layer by dragging down or up.

PART 7: MODIFYING KITS IN BEAT BOX ANTHOLOGY

UVI's Beat Box Anthology is a great collection of kits and samples of dozens of classic drum machines. All of the kits in the collection are set up to send all sounds to the instrument's Main Out. Users of the free UVI Workstation are stuck with this limitation, but Falcon gives you the ability to tweak these kits to suit your needs. Beat Box Anthology is included in UVI's Vintage Vault bundle, and the following steps assume you have both Falcon and Beat Box Anthology installed.
  1. Let's start with a new instance of Falcon, and expand the Soundbanks category to locate the GM Kits under Beat Box Anthology. (The General MIDI kits will work with the MIDI loop included with my Falcon tutorial sample pack.)
  2. Double-click one of the kits to load it into the currently selected Falcon part. I've selected the DR Tracks kit, which is based on the Sequential Circuits Drumtraks unit from 1984.
  3. On the List tab of the left panel we can see that this kit contains two layers. One layer is for the hi hat choke group, while all other sounds in the kit reside on the other. We can assign the hi hats to their own output the same way we did in Part 6 earlier. First, make sure that only the HH layer is selected in the List view, and then scroll over to locate the output column in the Layer(s) section. If you don't see it, right-click one of the column headers and then click output in the shortcut menu to add it to the Layer(s) view.
  4. Change the output setting for this layer to Out 4 (to match the assignments we used in part 6).
  5. For the rest of the drum sounds, we'll need to edit the keygroups assigned to individual samples in the kit. First, make sure that only the Drums layer is selected, and then ensure that you can see the output column in the Keygroup(s) view. Like with the Layer(s) view, the output column is hidden by default.
  6. Now assign the outputs of the individual keygroups to your desired output channels. You might want to hide some columns in your Keygroup(s) view for this step so you can see the keygroup names and outputs without scrolling. You might also find it easier to work in this view by sorting it in root key order, and you can SHIFT-select and CTRL-select multiple keygroups to change their output settings at the same time. Here are output assignments that match what we did when building our own kit in the previous sections, in order of root key note value:

    B0 & C1 (kicks): Out 2
    D1 & E1 (snares): Out 3
    (The HH layer should already be on Out 4)
    A3 & A#3 (shaker): Out 5
     
  7. Next set up your DAW to accept multiple plugin outputs just like we did in section 5 above, and don't forget to arm the Falcon track to intercept your MIDI if you're planning to test your setup out with your keyboard controller.
  8. If you have my Falcon tutorial sample pack, drag the Falcon Drum Loop MIDI clip onto your Falcon plugin track and loop it.
  9. Important: Don't forget to save the modified versions of your kits! Click the wrench icon and use Save Program as or Save Program and Samples as to back up your work.
  10. Unlike most of the UVI libraries, Beat Box Anthology includes individual drum samples that you can access in the file browser to create or modify your own kits. If you have the auto preview button activated, you can audition the samples while you browse by selecting them with your mouse or the arrow keys.
  11. You can drag these samples from the file browser right into your kit.
Well, that's it for now. Check out the Ultimate Outsider YouTube channel or the blog at UltimateOutsider.com for more production tips. Enjoy!

Sunday, March 22, 2015

Recording Virtual Instruments with SampleRobot Part 1: Getting Started

SKYLIFE's SampleRobot is an excellent tool for recording hardware MIDI instruments, but did you know that it can make multi-sample recordings of your softsynths as well? I've experimented with four different ways to use SampleRobot to record virtual instruments, whether they're VST plugins or standalone applications. Each different method has its own advantages and disadvantages, and some methods are more difficult than others. I'll walk you through all of them in the following articles.


Here's a quick index to the different tutorials:

WHY SAMPLE A VIRTUAL INSTRUMENT?

The benefits of sampling a hardware instrument are pretty obvious: You can build a compact and portable library of your not-so-compact, not-so-portable hardware synth's patches to take on the road. Or perhaps you could record patches designed on an extremely rare and expensive instrument to share with people who don't have access to such exotic hardware.

But virtual instruments are cheap, and you can fit literally thousands of them on a hard drive. Why bother sampling them? Well, I can think of plenty of reasons!
  • If you use libraries or plugins that are protected by iLok or eLicenser dongles and you fear losing your dongles while on the road, you can multi-sample the sounds you need for your live sets and leave the dongles at home.
  • If you like to build your own instruments in tools like MachFive, HALion , or Kontakt, you can mix and match patches you design with your arsenal of soft synths to create rich, layered soundscapes.
  • Perhaps you're switching platforms (going from Windows to Mac, for example) and some of the plugins you rely on only have Windows versions. You could use SampleRobot to bring your favorite PC-only sounds with you into the Mac realm.
  • Similarly if you're trying to switch plugin types (like going from 32-bit to 64-bit), and the instruments you use aren't available in the latest format, you can record the sounds you need with SampleRobot and then retire the plugins.
  • And one reason that I personally have for recording my soft synths is that sometimes I really like the way a particular instrument sounds, but I don't like how it works. Maybe it's buggy or has a difficult workflow. By making sample-based versions of the sounds I like, I can use them in a tool and workflow that suits me best.

(MOSTLY) FREE SOFTWARE USED IN THESE TUTORIALS

Depending on which recording method you plan to use, you might need to download and install some additional software. The good news is that most of it is free! I'll tell you which specific tools you in the sections that follow, but here are the download links and some quick descriptions of the various tools I used.

Please note: While SampleRobot works on both Windows and Mac OS, this is a Windows-specific tutorial, and not all of this software is available (or perhaps even necessary) on Mac. Also, this tutorial is specifically on how to get virtual instruments to work with SampleRobot. It is not an all-purpose SampleRobot guide by any stretch; if you've never used SampleRobot before, I strongly recommend you get familiar with using the tool to record some hardware instruments first so you know how to navigate its interface and export your samples.
  • SampleRobot (SKYLIFE). You'll need some version of SampleRobot for all methods, obviously. I use SampleRobot 4 Pro, but you can accomplish most of what I describe below with the Multi-X or Single-X versions. Just note that only the Pro and Sampling Suite versions of SampleRobot can record bit depths higher than 16-bits. This is the only piece of required software listed here that isn't free or donationware.
  • LoopBe1 (Nerds.de). This is a virtual MIDI cable. It can send MIDI information from one music app on your computer to another.
  • ASIO4ALL (Michael Tippach). This is a tool that translates Windows audio streams using the ASIO format that many professional Windows recording programs use. It offers some advantages over strict Windows audio, including the potential to record at bit depths greater than 16-bit.
  • VB-CABLE (VB-Audio). This is a virtual audio cable that can send Windows audio streams from one audio application to another application that supports recording Windows audio. Note: Get the version just called VB-CABLE Driver, not the "hi-fi" version.
  • VSTHost (Hermann Seib). If the virtual instrument you wish to sample is a VST plugin that doesn't come with its own "standalone" version, you will need to load the plugin into a DAW or plugin host in able to record it. VSTHost is small and reliable, and it comes in both 32-bit and 64-bit flavors. But you can use any plugin host you're comfortable with. All you need is something that can load plugins, receive MIDI, and output audio.

    Note
    VSTHost can seem a little daunting at first, but I've written some quick, easy steps for loading a plugin with it for use with SampleRobot in the next section.

SETTING UP VSTHOST


You can skip this section if the virtual instrument you're planning to record has a standalone mode, or if you already have a VST plugin host that you're comfortable with.
  1. Download the appropriate version of VSTHost for your operating system and plugin type. (Get vsthostx86.zip if you're running on 32-bit Windows, or if you're on 64-bit Windows but need to host a 32-bit-only plugin. Get vsthostx64.zip if you are on 64-bit Windows and you need to host a 64-bit plugin.)
  2. Extract the ZIP contents to your local drive and then launch vsthost.exe. This is what you'll see:
  3. The first time you run VSTHost you'll have to tell it where to locate your plugins. Go to File > Set PlugIn Path and click the ... button, then browse to the folder containing your plugins. Remember to choose the right location depending on whether you're running the 32-bit or 64-bit version of VSTHost. You can add multiple folders if you need to. Here I've selected my 64-bit plugin folder location.
  4. When you've added the necessary paths to this list, click OK to trigger VSTHost to scan your plugin folders. Note: It may take VSTHost a couple of minutes to do this, but it won't show any alerts or dialog boxes that this is what is happening. The program will probably seem unresponsive until the scan is complete.
  5. After the plugin scan is finished, you should now be able to go to File > Plugins and see a list of your installed plugins.
  6. Select the plugin you would like to load. I chose to load reFX Nexus, and this is what it looks like:
  7. Click the little knob icon in the plugin node to see the plugin's interface.
  8. To set the MIDI input device, you first have to go to Device > MIDI > MIDI Input Devices and make sure that the MIDI device you want to listen to is both listed and selected. The tutorials that follow will indicate exactly which devices to select, but this is where you do it.
  9. Next, click the MIDI port icon on the left side of your plugin node and choose the desired MIDI port in the list of MIDI Input Devices. Again, the port you need to select here will vary depending on which tutorial you're following.
  10. To set the audio output device, go to Devices > Wave and choose the appropriate device for Output Port. The exact device you select depends on which tutorial you're following.

    Tip
    I strongly recommend using a high sample buffer setting. I have found that the default buffer of 4410 samples isn't always high enough to prevent glitching while recording. Here I have 6300 samples selected for Buffer, and this setting has worked well for me at 44.1kHz sample rate. Don't worry about latency times or whatever; SampleRobot takes care of all that in the recording and exporting process.

  11.  If you'd like to save the current VSTHost configuration for future use, go to Performance > Save As and select an empty entry in the performance list. Enter a descriptive name in the Name field, and click OK.
  12. Now that you've created a custom performance, you can select it any time from the drop-down menu.

NEXT STEPS

Ready to start recording? Move on to the tutorials about different recording methods.

Sunday, November 16, 2014

How to Build a Multi-output Drum Kit in MOTU MachFive 3

Building a drum kit in a traditional sampler like MOTU MachFive 3 is a bit different from building a more typical sample-based instrument (like a sampled synthesizer) in a number of ways:
  • Drum sounds are usually "one-shots," where the whole sample plays all the way through instead of stopping the moment you release the key.
  • Drum kits often have "choke groups," where some of the sounds are mutually exclusive. This is most common with hi-hat sounds, where a closed-hat hit cuts short a longer open-hat sound.
  • To avoid the telltale "machine gun effect" with programmed drums, many kits use multiple recordings of the same instruments and play them back in a "round robin" fashion, so each hit sounds a little different from the last.
  • Since drums and other percussion sounds have very different tonal qualities and are frequently processed and EQed in very different ways, it's common to route individual drum sounds to their own audio channels for unique processing.
While MachFive is a very capable and powerful instrument, its deeply-layered interface and lack of electronic documentation or other online resources can make it difficult for a new user to figure out how to pull all of the above elements together to make a full-featured drum kit. I'm going to walk you through the process of building a kit that meets all of the stated requirements.

As an added bonus, you'll be able to use this knowledge to get the most out of third-party drum-based instuments, such as UVI's excellent BeatBox Anthology.

The kit we are going to build.
For the purposes of illustration, I recorded some drum samples and uploaded them for you to use as you work through the tutorial. I also included a short MIDI clip that you can use to check your work.

At the very bottom of this post you'll also find the video tutorial I recorded to supplement this walkthrough.

I've broken this process into two parts. First we'll build a new kit from scratch, and once that's all done we'll set the kit up for multi-output use.

PART 1: BUILDING THE KIT


  1. Download the sample pack I put together for this tutorial and unzip it.
  2. Launch MachFive. I like to run it as a standalone for this part (just because it's quicker than loading your DAW first), but you can open it as a plugin if you like.
  3. Click the Wrench icon in the top section of the MachFive interface and go to Preferences > General. Make sure One Shot is checked for Sample drag’n’drop mode, then close the preferences box.
  4. Select an Empty part in the Parts tab of the sidebar.
  5. Use the Browse tab of the sidebar to locate the tutorial samples that you unzipped earlier.
  6. In the main MachFive window, select the Edit view and make sure that at least the Oscillators, Keygroup Editor, and Edit sections are displayed.
  7. Drag the M5 Kick sample to the C1 key on the virtual keyboard in the Keygroup Editor. This will create your program’s first layer, keygroup, and oscillator. Your keygroup will have a 1-note range and contain a single SAMPLE oscillator that contains the kick sample.

    You should be able to play the C1 note on your MIDI controller (or touch it on the virtual keyboard) and hear the kick drum play back.
  8. Next drag the M5 Snare sample onto the D1 note of the virtual keyboard. This will add a new keygroup and oscillator for the snare sample to your existing program layer.
  9. In the Layers section of the List tab of the sidebar, click the + sign to add a new layer.
  10. Rename the layers by double-clicking their names and then entering a new one. I named the first layer Main Drums and the second layer Hi Hats.
  11. Click the layer that you just created so that it is the only one highlighted in the Layers list. You’ll notice that your Kick and Snare keygroups are temporarily hidden in the Keygroups section of the main window.

    Note
    You can highlight all layers at once by clicking the gray area underneath the last layer. If you click the gray area again, all layers will be deselected/hidden. Just select a layer and then click the gray area again to display all layers again.

    Only the empty Hi Hats layer is selected.
  12. Back on the Browse tab of the sidebar, drag the M5 Closed Hat sample to F#1 and the M5 Open Hat sample to A#1. Your Hi Hats layer now has two keygroups, one for each sample.

    Try playing the samples with your MIDI controller. You’ll find that you can play both hi hat sounds at the same time, which usually isn’t desirable for hi hat sounds. We’re going to fix that next.
  13. Back on the List tab, with the Hi Hats layer selected, locate the ex. group column in the Keygroups section of the sidebar. You might have to scroll to see it. If you can’t find the column, right-click any one of the column headers and then check ex. group in the shortcut menu that appears.

    Once you can see the ex. group column, set the ex. group value for both of the hi-hat keygroups to 1. (You can change the value by dragging your mouse vertically over the numbers, or double-clicking the numbers and entering the value from the keyboard.) Setting ex. group to a non-zero value creates a “choke group” for the hi-hats, where playing one keygroup will cut the other short, just like a real hi-hat.


    After setting the ex. group values to 1, try playing the Hi Hat sounds again. You should find that the two Hi Hat samples now cut each other off when triggered.

    Note
    We put the hi-hats on their own layer so that it is clear when you’re looking at the keygroup layout which keygroups are set up for exclusivity (since layers can have different colors). It is not required to put them on separate layers, since exclusivity groups are a keygroup option.
  14. Back in the List view, select the Main Drums layer so that only it is visible, and then switch to the Browse tab.
  15. Click the first M5 Shaker sample in Browse tab, and then SHIFT+CLICK the last M5 Shaker sample, so that all eight samples are selected.
  16. While the files are selected hold down the ALT key while dropping them onto the A3 key of the virtual keyboard. This opens the Sample Drag’n’Drop menu.
  17. Because my shaker sample files are named a certain way, we can make use of MachFive’s built-in mapping methods when importing them into the program. Select NoteName RoundRobin under Mapping method, and Main Drums under Destination.

    When you click OK, MachFive creates a single keygroup, and adds a new Sample oscillator for each sample, automatically setting them up for round-robin play. (Try playing the A3 key on your MIDI controller. You should hear a different shaker sound each time you hit it.)

    If you select any of the newly-created oscillators, you can see that Cycle is selected in the OSC(S) portion of the Edit section. The other oscillators for the Kick and Snare keygroups are set to All, which means that all samples in that keygroup play at once (which is fine, since there's only one sample per kegroup for those sounds in this kit).
  18. At this point, if you look in the List tab of the sidebar, you should see that there are two layers and five keygroups.
  19. To save your kit, click the Wrench icon in the main section of MachFive and select Save Program and Samples. This will save an M5P file and all the imported samples into the selected location. The samples will be stored in a subfolder inside the folder where the M5P is saved.

PART 2: SETTING UP MULTIPLE OUTPUTS

In this section we’re going to use MachFive in multi-output mode and assign different drum sounds to different audio tracks in a DAW for individual processing. I’m going to use Steinberg Cubase 7.5 here, but the general steps should work in most DAWs.
  1. Start up your DAW and load MachFive3 as a plugin. In Cubase 7.5, I like to add it as a “rack instrument” in the VST Instruments dialog.

    Note
    On some platforms and plugin formats, the MachFive plugin might come in different versions. If you have more than one choice, make sure to load the “Multi-output” version. On 64-bit Windows, there is only one MachFive plugin, and it does support multi-output.
  2. Add a MIDI track to your DAW that points to your MachFive instance. In Cubase you have the option to create a new MIDI track when you load a plugin. If you haven’t done that already just add the new MIDI track and direct its output to MachFive’s MIDI in. Take note of the channel you set here.
  3. Configure your DAW so that it can receive four additional stereo outputs from MachFive. In Cubase you do this by clicking MachFive3’s Activate Output button in the VST Instruments dialog and then clicking on the outputs you wish to receive. As you can see here, I have enabled four additional stereo channels in addition to the plugin’s main stereo out.
  4. Inside MachFive, select the part with the same MIDI channel as the MIDI track you created in your DAW. (In this case, A1.) If you don’t already have an appropriate part here, you can add one with the + button, and select the correct channel from the drop-down list.
  5. Double-click the “Empty” program name to open up the MachFive browser and locate the M5P program you saved in PART 1 above.

    Click Close in the Browse dialog once the program is loaded. Try triggering some notes in the kit with your MIDI controller to make sure everything’s working so far.

  6. In the List tab on the sidebar, make sure all layers are selected so you can see all of the keygroups listed.
  7. Locate the output column in the keygroups section. You will probably have to scroll to see it.

    Important
    If you can’t find the output column, it may be hidden. To show it, right-click one of the column headers under Keygroups and then check output in the shortcut menu that appears. You should now be able to scroll and see that column.
  8. Click the gray area beneath the keygroups to deselect them. (If you don’t do this, changing any field in the Keygroups section will apply to all keygroups in the program.) With the groups deselected, right-click the Output value for each keygroup, and set it accordingly:

    Kick: Out 2, Snare: Out 3, Hi Hats (both keygroups): Out 4, Shaker: Out 5

    Note
    In MachFive, only part outputs can be assigned to anything other than Main Out. MachFive’s Aux buses, which are typically used for send effects, always go to Main Out, and can’t be reassigned. For this reason, when you’re building a multi-output program, you should only use the individual output channels, not the one labeled Main Out. Otherwise you might end up mixing that keygroup’s output signal with effects playing through MachFive’s main outs.
  9. You might want to use wrench > Save Program And Samples As to save a separate multi-output version of your kit.
  10. Back in your DAW, if you have your MachFive MIDI track armed, you should be able to trigger different notes in your kit and hear them play back through different input channels in your DAW. In Cubase, you can expand MachFive3’s folder under VST Instruments to see the different channels. I have renamed my channels here to indicate which instrument and MachFive output they represent.
  11. Now that all instruments are coming in via their own audio channels, you can add insert effects and apply EQ to each incoming channel independently. I took this snapshot while playing a MIDI clip on my kit. You can see that each sound group is coming in on its own channel and I have processing plugins on each channel.

VIDEO WALKTHROUGH


VIDEO BED MUSIC

I wrote this little track to serve as intro and bed music for my tutorial video. It's not really a full-on completed composition, but you can hear what I've got so far here: