
Here's a quick index to the different tutorials:
- Part 1: Getting Started
- Part 2: Virtual Audio Cable with Windows Audio
- Part 3: Virtual Audio Cable with ASIO
- Part 4: Interface to Interface (Analog)
- Part 5: Interface to Interface (Digital)
- Part 6: Tips and Troubleshooting
WHY SAMPLE A VIRTUAL INSTRUMENT?
The benefits of sampling a hardware instrument are pretty obvious: You can build a compact and portable library of your not-so-compact, not-so-portable hardware synth's patches to take on the road. Or perhaps you could record patches designed on an extremely rare and expensive instrument to share with people who don't have access to such exotic hardware.But virtual instruments are cheap, and you can fit literally thousands of them on a hard drive. Why bother sampling them? Well, I can think of plenty of reasons!
- If you use libraries or plugins that are protected by iLok or eLicenser dongles and you fear losing your dongles while on the road, you can multi-sample the sounds you need for your live sets and leave the dongles at home.
- If you like to build your own instruments in tools like MachFive, HALion
, or Kontakt, you can mix and match patches you design with your arsenal of soft synths to create rich, layered soundscapes.
- Perhaps you're switching platforms (going from Windows to Mac, for example) and some of the plugins you rely on only have Windows versions. You could use SampleRobot to bring your favorite PC-only sounds with you into the Mac realm.
- Similarly if you're trying to switch plugin types (like going from 32-bit to 64-bit), and the instruments you use aren't available in the latest format, you can record the sounds you need with SampleRobot and then retire the plugins.
- And one reason that I personally have for recording my soft synths is that sometimes I really like the way a particular instrument sounds, but I don't like how it works. Maybe it's buggy or has a difficult workflow. By making sample-based versions of the sounds I like, I can use them in a tool and workflow that suits me best.
(MOSTLY) FREE SOFTWARE USED IN THESE TUTORIALS
Depending on which recording method you plan to use, you might need to download and install some additional software. The good news is that most of it is free! I'll tell you which specific tools you in the sections that follow, but here are the download links and some quick descriptions of the various tools I used.Please note: While SampleRobot works on both Windows and Mac OS, this is a Windows-specific tutorial, and not all of this software is available (or perhaps even necessary) on Mac. Also, this tutorial is specifically on how to get virtual instruments to work with SampleRobot. It is not an all-purpose SampleRobot guide by any stretch; if you've never used SampleRobot before, I strongly recommend you get familiar with using the tool to record some hardware instruments first so you know how to navigate its interface and export your samples.
- SampleRobot (SKYLIFE). You'll need some version of SampleRobot for all methods, obviously. I use SampleRobot 4 Pro, but you can accomplish most of what I describe below with the Multi-X or Single-X versions. Just note that only the Pro and Sampling Suite versions of SampleRobot can record bit depths higher than 16-bits. This is the only piece of required software listed here that isn't free or donationware.
- LoopBe1 (Nerds.de). This is a virtual MIDI cable. It can send MIDI information from one music app on your computer to another.
- ASIO4ALL (Michael Tippach). This is a tool that translates Windows audio streams using the ASIO format that many professional Windows recording programs use. It offers some advantages over strict Windows audio, including the potential to record at bit depths greater than 16-bit.
- VB-CABLE (VB-Audio). This is a virtual audio cable that can send Windows audio streams from one audio application to another application that supports recording Windows audio. Note: Get the version just called VB-CABLE Driver, not the "hi-fi" version.
- VSTHost (Hermann Seib). If the virtual instrument you wish to sample is a VST plugin that doesn't come with its own "standalone" version, you will need to load the plugin into a DAW or plugin host in able to record it. VSTHost is small and reliable, and it comes in both 32-bit and 64-bit flavors. But you can use any plugin host you're comfortable with. All you need is something that can load plugins, receive MIDI, and output audio.
Note
VSTHost can seem a little daunting at first, but I've written some quick, easy steps for loading a plugin with it for use with SampleRobot in the next section.
SETTING UP VSTHOST
You can skip this section if the virtual instrument you're planning to record has a standalone mode, or if you already have a VST plugin host that you're comfortable with.
- Download the appropriate version of VSTHost for your operating system and plugin type. (Get vsthostx86.zip if you're running on 32-bit Windows, or if you're on 64-bit Windows but need to host a 32-bit-only plugin. Get vsthostx64.zip if you are on 64-bit Windows and you need to host a 64-bit plugin.)
- Extract the ZIP contents to your local drive and then launch vsthost.exe. This is what you'll see:

- The first time you run VSTHost you'll have to tell it where to locate your plugins. Go to File > Set PlugIn Path and click the ... button, then browse to the folder containing your plugins. Remember to choose the right location depending on whether you're running the 32-bit or 64-bit version of VSTHost. You can add multiple folders if you need to. Here I've selected my 64-bit plugin folder location.

- When you've added the necessary paths to this list, click OK to trigger VSTHost to scan your plugin folders. Note: It may take VSTHost a couple of minutes to do this, but it won't show any alerts or dialog boxes that this is what is happening. The program will probably seem unresponsive until the scan is complete.
- After the plugin scan is finished, you should now be able to go to File > Plugins and see a list of your installed plugins.

- Select the plugin you would like to load. I chose to load reFX Nexus, and this is what it looks like:
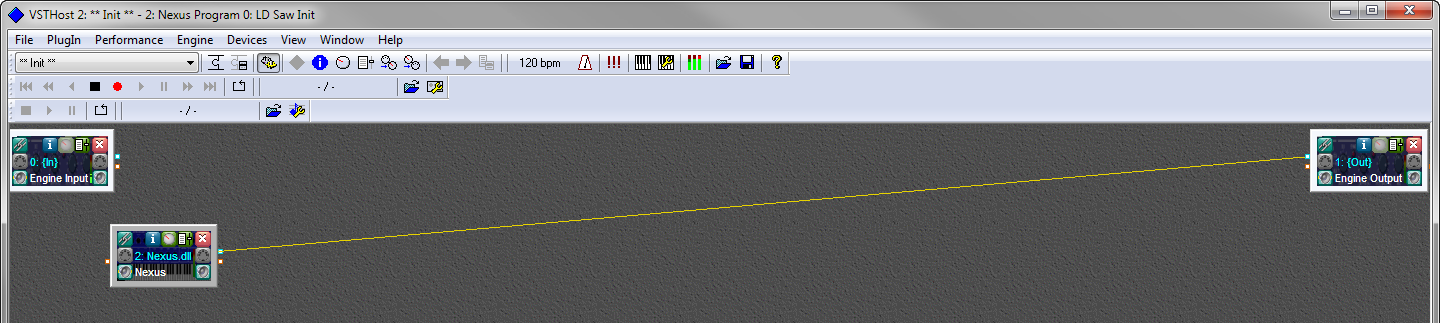
- Click the little knob icon in the plugin node to see the plugin's interface.

- To set the MIDI input device, you first have to go to Device > MIDI > MIDI Input Devices and make sure that the MIDI device you want to listen to is both listed and selected. The tutorials that follow will indicate exactly which devices to select, but this is where you do it.

- Next, click the MIDI port icon on the left side of your plugin node and choose the desired MIDI port in the list of MIDI Input Devices. Again, the port you need to select here will vary depending on which tutorial you're following.

- To set the audio output device, go to Devices > Wave and choose the appropriate device for Output Port. The exact device you select depends on which tutorial you're following.
Tip
I strongly recommend using a high sample buffer setting. I have found that the default buffer of 4410 samples isn't always high enough to prevent glitching while recording. Here I have 6300 samples selected for Buffer, and this setting has worked well for me at 44.1kHz sample rate. Don't worry about latency times or whatever; SampleRobot takes care of all that in the recording and exporting process.
- If you'd like to save the current VSTHost configuration for future use, go to Performance > Save As and select an empty entry in the performance list. Enter a descriptive name in the Name field, and click OK.

- Now that you've created a custom performance, you can select it any time from the drop-down menu.


No comments:
Post a Comment