While these are Oculus's "recommendations" rather than strict requirements, developers writing software for the Rift are targeting hardware at least as powerful as the components listed by Oculus, and if your hardware falls short your VR gaming experience can be sub-par (or even literally sickening, due to lag-induced motion sickness)- and in my case, both my graphics and CPU were fairly below-spec.
Thus began my upgrade journey.
IS THE ALPHA IDEAL FOR VR?
While I love the Alienware Alpha for what it is- a small, powerful-for-its-size living room gaming PC, it is definitely not the first thing I'd recommend to someone who mainly wanted to play virtual reality games and didn't care about the form factor. There are several reasons for this:- The on-board graphics in all Alpha models released to-date fall short of current VR minimum recommendations. The recommended GeForce GTX 970 is around 32% more powerful than my Alpha's GeForce GTX 960 graphics, for example. (Note: The recommended specs for the competing HTC Vive are a little strange here: They recommend the NVIDIA GeForce 1060- which is ~8% faster than the GTX 970 or the AMD Radeon RX 480- which is ~13% slower!)
- Only the i7 models have CPUs that meet minimum VR recommendations. The recommended Intel i5-4590 processor is around 25% more powerful than the low-wattage i5-6400T in my Alpha, based on Passmark CPU scores. (Note: The same Intel CPU is recommended for the HTC Vive, but they also recommend the AMD Radeon RX 480, which is ~20% faster than the i5-4590.)
- The Alpha only has one video output. Whichever headset you end up going with (Vive or Rift) is going to require an HDMI port, and you will need at least one other video output to drive a regular monitor. While there are solutions (like this special bi-directional HDMI switch) that let you share a single video output, depending on what you need to do and the specific games/apps you work with, sometimes that's just not going to be enough. Trust me, you want multiple independent video outputs.
- While Alienware offers the ability to use higher-end graphics via the very cool Alienware Graphics Amplifier (AGA), this kind of cancels out the primary appeal of the Alpha: its small and sleek design. The AGA is huge and it adds noise.
- The Graphics Amplifier introduces some other problems that I'll discuss later, which make the computer less-than-ideal for general use.
CLONING AND REPLACING THE HARD DRIVE
When ordering a computer online, I always pick the cheapest storage solution available so I can replace it with the drive of my choosing (you can usually find better after-market storage solutions cheaper than what OEMs charge). In this case, my Alpha arrived with a 500GB Seagate Laptop Thin HDD. The "thin" in the name is accurate, by the way- it is the slimmest 2.5" hard drive I've ever seen, more like an SSD drive in physical size. I replaced it with a Crucial MX200 500GB SATA SSD. Crucial's MX models come with a serial number for Acronis True Image HD, which is a handy tool that I used in the replacement process.Cloning the factory drive was a bit more of a hassle than I had anticipated, thanks to the computer's UEFI setup and how it affected Windows 10. Here's the whole procedure:
Next I connected my new SSD drive to one of the Alpha's front USB ports using a StarTech USB 3.0 to 2.5" SATA Hard Drive Adapter Cable. Next I connected my LG Ultra Slim Portable DVD external drive to another one of the Alpha's USB ports and popped in the True Image disc and rebooted the Alpha, expecting to be able to press F12 in order to select the DVD drive at startup...
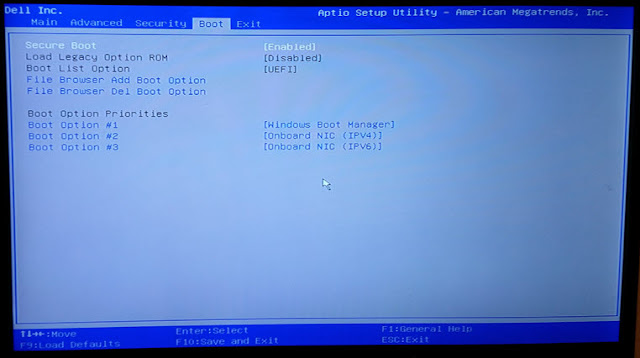
The thing is, the Alpha's factory configuration does not appear to allow booting from a connected USB device. Users of Windows 8 and Windows 10 are probably familiar with UEFI by now, and how it's increasingly rare to see "Press F2 for system settings" and "Press F12 to select a boot device" options when you first power on a computer. For better or worse, the way this is supposed to work under Windows 10 now is this: Click Start > Settings, search for "Recovery options" and then click Restart now under Advanced Setup, and then click Use a device on the "Choose an option" screen, which should then bring up a "Use a device" screen where you can choose the device to boot from. However, the only boot devices my Alpha reveals are "Onboard NIC (IPV4)" and "Onboard NIC (IPV6)." My connected DVD drive was nowhere to be found.
Here's what I had to do: Click Start > Settings, search for "Recovery options" and then click Restart now under Advanced Setup. In the "Choose an option" screen, click Troubleshoot > Advanced Options > UEFI Firmware Settings > Restart. This got me into the Alpha's setup utility, where I could see where the problem was:
The Alpha's default UEFI configuration for whatever reason doesn't honor connected USB devices. The "Onboard NIC" devices (for LAN booting) were the only internal devices the Alpha exposes (other than "Windows Boot Manager," which is just the option that loads Windows). In order to use my USB disc drive to load Acronis True Image, I had to do the following:
- On the Boot tab, choose Disabled for Secure Boot. The setup utility won't let you modify the Boot List Option setting until you do this.
Note
You'll see a warning that changing this setting may prevent your operating system from booting. (And it will, but we will reverse the situation later.) - Next, change Boot List Option from UEFI to Legacy. (You'll also probably get another warning when you change this setting.) This changes the "Boot Option Priorities" list to a longer list named "Set Boot Priority."
- For 1st Boot Priority I chose USB Storage Device.
- For 2nd Boot Priority I chose CD/DVD/CD-RW Device.
- And for 3rd Boot Priority I chose Hard Drive. (I don't have any M.2 PCIe drives installed.)
- I pressed F10 to save and exit.
- Now when the computer restarted I saw the old F2 and F12 options, and I was able to boot from the DVD drive.
- Inside True Image, I used the Clone Disk operation to copy my entire internal hard disk image to my attached SSD drive.
- Reboot the computer after the clone operation is complete.
- Press F2 when you see the prompt to enter the BIOS setup utility.
- Back at the Boot tab, change Boot List Option back to UEFI.
- Now change Secure Boot back to Enabled.
- Press F10 to save and exit, and allow Windows 10 to boot up from the original drive just to make sure your computer's still configured correctly. If it still works, you can now safely replace the drive.
UPGRADING THE CPU
If you have one of the i7-based Alphas, don't worry- you're already set. The i7-6700T processor that ships with R2 models is around 24% more powerful than the i5-4950 that Oculus recommends. (Even the i7-4785T that shipped with the R1 Alphas qualifies, surpassing the i5-4950 by about 5% in raw CPU benchmarks.)But anyone with an i3 or i5-based model will need to upgrade. Of course this is easier said than done. For one thing, when shopping for replacement CPUs you must make sure to get something that uses the correct socket type:
- R1 Alphas have the LGA1150 ("H3") socket, used by Intel's Haswell and Broadwell processors.
- R2 Alphas have the LGA1151 socket, used by Skylake and Kaby Lake.
The good news is that you can safely install non-T-series CPUs in the Alphas, but this comes with some caveats:
- To avoid melting your computer, the Alpha powers your replacement CPU at T-series levels, more or less delivering T-series performance, regardless of your CPU's stated clock speed.
- The only processors powerful enough for VR that Alienware has officially approved for use in the Alpha are hard-to-get T-series models. (For the R1s it's the i7-4765T and i7-4785T, and for the R2s it's the i7-6700T.) While non-T processors have been proven to work by Alpha owners like me, using them in your Alpha might void your Dell warranty.
The CPU replacement procedure was quite simple:
- Disconnect all cables and place the unit on a clean, flat surface in a static-free environment.
- Remove the bottom plate of the Alpha (4 screws).
- Flip the unit over and slide off the top cover.
- Pop the fan housing off of the CPU and set it aside.
- Before removing the heat sink, take note of how it's installed (there's a little gap in one side that has to be in a certain position in order for you to re-assemble the PC later; it's possible to install the heat sink in the wrong direction before you realize what you've done). Then remove the heat sink (4 screws) and set it aside.
- Replace the old CPU with your new one. The i7 processors are easy to line up correctly, since they have a marked corner that lines up with the marked corner on the socket.
- Apply some thermal compound to the new CPU. I used a slightly-less-than-pea-sized drop of Arctic Silver 5, which has worked out just fine, but I've since read that Arctic MX-2 or Arctic MX-4 might perform even better. (Arctic and Arctic Silver are different companies.)
- Clean the old compound off of the heat sink then screw it back into place, making sure it's positioned the same way it was before you removed it.
- Replace the CPU fan (and re-connect it if you disconnected it earlier).
- Replace the top cover.
- Flip the unit back over and replace the bottom plate before plugging everything back in.
UPGRADING THE GRAPHICS
With the R2 generation of Alphas, Alienware introduced the ability for some models to offload graphics capabilities to an external desktop graphics card via the Alienware Graphics Amplifier.Important: At this time, the only Alienware Alpha models that work with the Graphics Amplifier are those that:
- Belong to the R2 generation (ASM200 models, not ASM100).
- Have NVIDIA GeForce GTX960 graphics. (Therefore, the models with AMD graphics are not compatible, even though their motherboards have an AGA connector.)
Which graphics card should you use?
Before selecting a graphics card to use in you Graphics Amplifier, you should first check this mini technical support FAQ to see which graphics chipsets have been approved for use with the AGA. Next you have to narrow your selection down to a specific model. While shopping, keep a few things in mind:- The AGA was designed with NVIDIA "reference cards" in mind, which are around 1.5 inches wide, 4.6 inches tall, and 10.5 inches long. Some very long cards might not fit.
- The AGA was also designed for blower-cooled cards, which push air along the card's body and out the back of a computer instead of blowing air sideways inside the computer chassis. Here's an example of a blower style card that works in the AGA.
- If you're shopping for good cards for VR, remember that you'll want something with enough of the right video ports on it. Most (possibly all?) cards supported by the AGA have at least two ports, but you want to make sure they're the right connectors for your video hardware (monitors, VR headsets): For example, do you need HDMI, DisplayPort, DVI, etc?
Setting up the Graphics Amplifier
You should read the Alienware Graphics Amplifier FAQ before setting yours up. Alienware updates it with the details on the latest supported graphics cards over time, which is important because sometimes brand-new cards have special driver installation requirements that aren't obvious to most users.The process was pretty painless for me.
- First I checked Dell's Product Support site to make sure I had the latest version of the "Alienware External Graphic Amplifier Software" installed. In my case, I found that I already had the latest version.
- Next I used the Check for updates feature on the Drivers tab of NVIDIA GeForce Experience program to check for the latest graphics drivers. There were some updates available, so I downloaded and installed the new drivers.
- Next I powered off the Alpha.
- I installed my GTX 1070 card in the AGA and connected my television's HDMI In connection directly to the GTX 1070 (via the DisplayPort-to-HDMI cable I mentioned earlier) instead of to the Alpha's video out.
- Next I connected the Graphics Amplifier to the Alpha using the special AGA cable.
- Finally I powered the Alpha back on and logged into Windows. After I signed on it took several minutes for Windows 10 to reconfigure itself to use the correct driver for the Alpha (the Device Manager said I was just using a generic Microsoft display driver until the drivers were fully configured), but once the driver fully kicked in I was all set.
AGA-related Complications
We'll get to the benchmarks in a bit, but first I wanted to mention a few AGA-related issues I've experienced.The Alpha cannot enter Sleep mode while connected to the AGA.
The only time I ever actually fully shut a PC down is if I'm about to take it apart (or put it in storage). Instead I configure all my computers that don't have to remain on 24/7 to enter S3 (Sleep) mode when I press the power button, or after a period of inactivity. Sleep mode's much better for me than Hibernation (S4), because a PC can enter and wake from Sleep mode nearly instantly while Hibernation usually takes a fair bit more time.
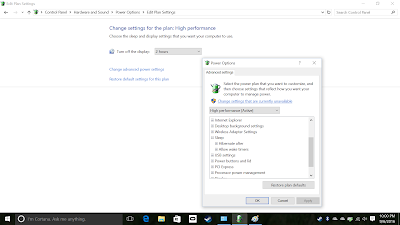
Anyway, after setting my Alpha up for use with the Rift, I went crazy for a couple of days trying to figure out why I couldn't put my Alpha to sleep. No matter which power scheme I chose in the Windows Power Options control panel, there wasn't even a "Put the computer to sleep" option to set a sleep time-out.
I posted about my problem to the Dell support forum, and unfortunately it turns out that as long as the Alpha is connected to the Alienware Graphics Amplifier, Windows Sleep mode is disabled. I'm pretty unhappy about this, but that's the current state of things. Currently I just shut my Alpha off when I don't need to use it. It's literally the only computer I own or use that I actually have to turn off.
Wake-from-USB is disabled by default (and doesn't work correctly when enabled)
Another thing I like to be able to do is wake my computers by wiggling a mouse or touching a keyboard. I have a number of computers in physically inconvenient locations, but I can wake them up via wireless keyboards/mice because their wireless dongles are USB devices.
Although the keyboard and mouse that ship with the Alpha are wired, the computer comes with a hidden USB 2 port on the underside of the unit explicitly intended for wireless keyboard/mouse dongles. Great, right?
Well, let us for a moment put aside the fact that as long as your AGA is connected to the Alpha, you can't even put your computer to sleep, so there's no point in being able to wake from USB. During the days when I was trying to troubleshoot the sleep problem, I ran across another pretty ridiculous problem.
The Alpha ships with the USB Wake Support option disabled in BIOS. (To enable the feature, you must first disable the "Deep Sleep Control" feature in the Advanced tab, and then change USB Wake Support to Enabled. Note that you probably won't be able to Hibernate after doing this.)
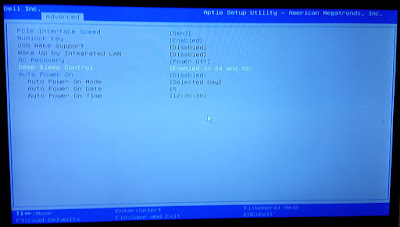 |
| You must disable Deep Sleep Control in order to enable USB Wake Support. |
The USB ports on the Alienware Graphics Adapter are not reliable.
One really cool-on-paper thing about the AGA is that in addition to housing a desktop graphics card, it also serves as a 4-port USB 3 hub. This would be an excellent feature for VR purposes (the Rift, for example, needs 3 USB ports, when you consider the headset, sensor, and game controller), but unfortunately it just doesn't work that well. I'm currently only able to use a single USB port on the AGA reliably; the one for the Rift headset itself. When I have anything else connected to the AGA USB ports, those devices just randomly disconnect and reconnect. The Rift's sensor couldn't even maintain a USB connection long enough for me to get through the initial Oculus setup wizard. Both my Xbox One controller dongle and my Rift sensor are plugged directly into the Alpha's rear USB ports. I've heard other AGA owners complain of this same limitation. It's a real shame.
PERFORMANCE BENCHMARKS
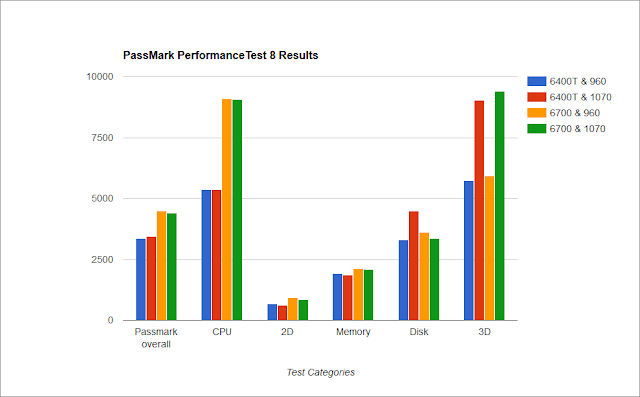
I performed benchmark tests at every step of the way in the upgrade process so I could measure the impact of upgrading the graphics and processor. For reasons I can't explain, I somehow lost the 3DMark scores from the baseline 6400T/GTX960 configuration, however I have Passmark scores from all four CPU/GPU combinations, so I'll do those first:PassMark PerformanceTest
Here are the raw scores for PassMark PerformanceTest 8, for each of the four configurations I tested:As you can see, upgrading from the i5-6400T to the i5-6700 alone delivered a 41% gain in raw CPU performance while upgrading from the on-board GTX 960 to the AGA-hosted GTX 1070 resulted in a 36% jump in graphics performance. Passmark doesn't weight 3D graphics too heavily in its overall score, explaining why the final PassMark score is only 23% higher than the base configuration.
The Alpha throttles non-T CPUs.
According to the PassMark site, a standard i7-6700 running under normal circumstances should get a CPU score of 9967. As you can see in my test results on the alpha, my 6700 scored 9069.8 on the 6700/1070 test, which is closer to PassMark's rating of the 6700T, which is 8918. So my Core i7-6700 seems to perform a little better than a 6700T would in the same system- but not by much. I did not try putting my 6700K in the Alpha. I was worried that the Alpha might not be able to rein that one in. I'd like to hear from anyone who's tried it.
Futuremark 3DMark 11
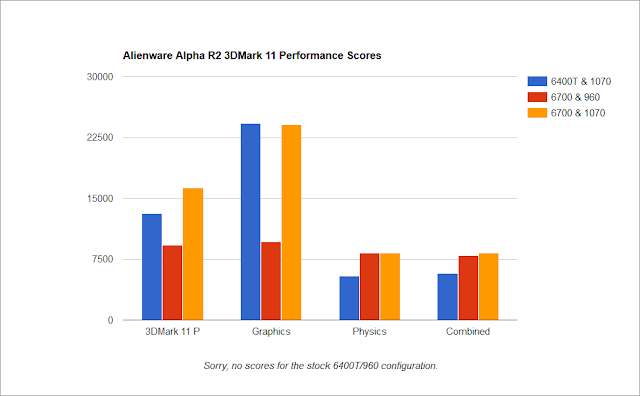
And here are the results from the 3DMark 11 "Performance" suite of tests (these tests run at 1280x720 resolution). Again, sorry I lost the scores for the i7-6400T/GTX 960 combo.From these scores we can see that as far as gaming goes, the CPU makes the biggest difference in physics computations (34% boost in Physics when upgrading to the i7-6700) while the graphics card upgrade resulted in huge pure graphics gains (60% increase in Graphics score when switching from GTX 960 to the GTX 1070).
Temperatures
A big concern I had before replacing my CPU was TDP- the amount of heat generated by the CPU during normal use. The tiny Alienware Alpha was designed for low-wattage processors for a reason: They generate less heat, and thus don't need huge and complicated cooling systems. I was worried that the higher clockspeeds of the i7-6700 (whose TDP is twice the 6700T) or i7-6700K (whose TDP is 3x the 6700T!) would drive the Alpha beyond its cooling thresholds, resulting in (at best) poor performance or (at worst) physical damage to the CPU and motherboard.I was pleased to find that the Alpha managed to keep the temperatures in a safe range:
- Idle: Average ~44 degrees (C) Recorded range: 39-57
- No Man's Sky at 1920x1080 fullscreen: 63 degrees (C) max
- Elite Dangerous in VR mode on the Rift: 62 degrees (C) max
VR Compatibility Tests
After all the upgrades, here are the results of the Oculus Rift Compatibility Tool:And here are the results of the SteamVR Performance Test:
The actual VR performance of the Alpha has been excellent so far. All native VR titles I've tried with it have worked without a hitch. Here's the whole setup, to give you an idea of scale and space required for both the Alpha and the Graphics Amplifier. At the bottom is the Logitech K830 Illuminated Living-Room Wireless Touchpad Keyboard I got for the setup, so I can use the Alpha from the couch. The wireless dongle is connected to the Alpha's hidden USB 2 port.

