This user guide covers all features of the current version of the program and highlights some of the new capabilities and improvements in version 1.7. Head to the download page to pick up the latest version of the program.
UPDATE (January 24, 2016): This user guide might not be as up-to-date as the original GWX Control Panel announcement page. I apologize for the confusion over having different "user guide" posts, but you wouldn't believe how archaic and brittle this blogging platform is. Version 1.7 was such a big update that it was easier for me to just write a new user guide for it from scratch and then import it into the main post once I was finished. Anyway, please check the announcement page for the latest information. There isn't anything in this post that's not covered there.
WHAT'S NEW IN VERSION 1.7
- (Note this post is only current up to version 1.7.0.2; please check the announcement page for newer information.)
- The new Delete Windows 10 Programs feature gives you the ability to delete some hard-to-remove Windows 10-related applications with just a couple of mouse clicks.
- GWX Control Panel now monitors your Windows Update preferences and alerts you if your settings switch to "install updates automatically" mode from one of the other settings that give you more control over your updates. Also, you can now check and change your Windows Update preferences with the new Change Windows Update Settings feature.
- The program no longer prompts you for restarts after you perform certain operations, due to improved handling of certain system settings.
- Much more detailed "Save diagnostic info" reports tell you exactly which settings GWX Control Panel detected on your system.
- Much better user experience for computers with multiple Windows profiles and Standard/Child user accounts.
- There's a lot more! For a complete breakdown of all updates and features in version 1.7, check out the GWX Control Panel Release Notes section of the announcement page.
WHAT IT DOES AND HOW IT WORKS
The goal of GWX Control Panel is to protect you from unwanted Windows 10 upgrades and notifications without disabling important or popular operating system features, and without requiring you to change the way you work with Windows. Here are some specific ways GWX Control Panel helps you:- The Disable 'Get Windows 10' App feature removes Microsoft's "Get Windows 10" nagware app from your notification area.

This is the 'Get Windows 10' icon app. - The Prevent Automatic Windows 10 Upgrades feature checks for system settings that leave you vulnerable to unwanted Windows 10 upgrades and gives you the ability to fix them.
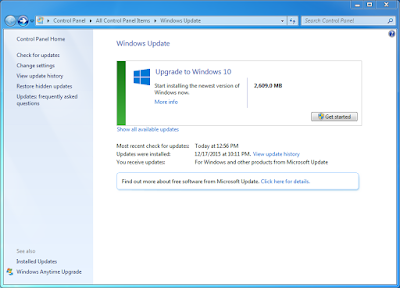
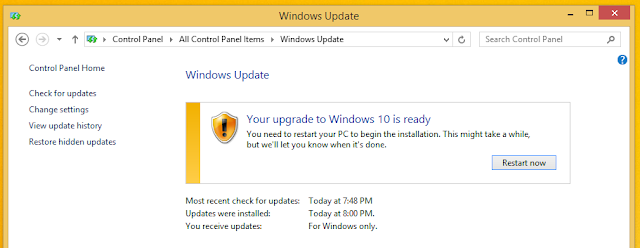
- The Prevent Automatic Windows 10 Upgrades feature also restores your Windows Update control panel to its normal behavior if it gets hijacked by Windows 10 advertisements or installers. Here are some specific symptoms it fixes:
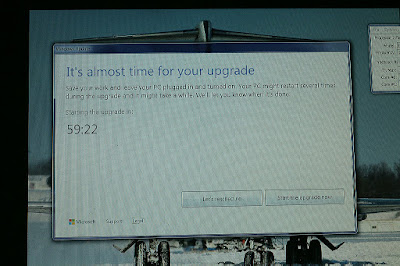
The Prevent Automatic Windows 10 Upgrades feature can even rescue your PC from impending Windows 10 installs that display the "It's almost time for your upgrade" window. - The Delete Windows 10 Download Folders feature locates and deletes hidden Windows 10 installer files that Microsoft secretly downloads to your computer.
- The Delete Windows 10 Programs feature easily deletes hard-to-remove program files that are known to prepare your computer for Windows 10 upgrades.
- The program alerts you if your Windows Update settings change from one of the safer "download only" or "check only" options to "automatically install" behind your back and gives you the chance to fix it with the Change Windows Update Settings feature.
- The optional Save Diagnostic Info feature (in the right-click pop-up menu of the title bar) generates enhanced diagnostic reports that give you detailed information on any settings GWX Control Panel finds that leave you open to unwanted Windows 10 behavior.
- The optional "Monitor Mode" feature runs quietly in the background watching for unexpected system changes, and alerts you as soon as any new Windows 10 settings or files are detected.
- Doesn't interfere with any Windows features such as Windows Update or OneDrive; the goal is to keep you safe from Windows 10 without having to change the way you work with your computer. (Note: You can optionally choose to disable automatic Windows updates with the Change Windows Update Settings feature if you prefer, but all update-related settings you can change in GWX Control Panel are safe and reversible.)
- Doesn't block or hide any specific Windows Update patches. (Although it can detect and optionally delete problematic Windows 10 files that Windows Update installs.)
- Doesn't include any advertising.
- Doesn't include any additional third-party software (you can even download it as a stand-alone executable).
- Doesn't collect any personal data or "phone home" in any way.
- Doesn't do any specific checking or disabling of Windows "telemetry" features, although this may appear as an optional capability in a future release.
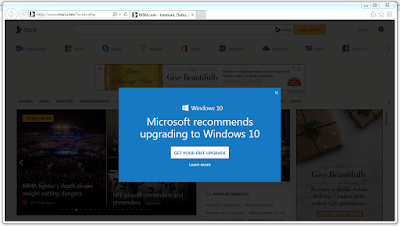
- Doesn't (yet) prevent the Windows 10 advertisement that Microsoft displays in Internet Explorer. I am currently investigating whether there's a safe way to stop this. (But for now I recommend just using a different browser like Firefox or Chrome if you don't want to see these ads.)

GWX Control Panel is not yet able to inhibit the "Microsoft recommends upgrading to Windows 10" banner ads in Internet Explorer, but this ability might appear in a future release.
DOWNLOADING AND INSTALLING GWX CONTROL PANEL
You can always download the latest version of GWX Control Panel at the Ultimate Outsider Downloads page. The program is available for download either as an installer or as a standalone executable, but I recommend using the installer for the following reasons:- The installer gives you some handy Start menu and desktop shortcuts for GWX Control Panel, documentation, and the uninstaller.
- The installer can provide a better experience for computers with multiple user profiles. (The program's Monitor Mode might not work properly for all users unless you run it from an appropriate location, and the installer takes care of this for you.)
- Using the installer allows for a more streamlined experience when updating to newer versions of GWX Control Panel, for a number of reasons.
Important
If you maintain a computer with multiple user profiles, please follow these simple tips to ensure the most streamlined and predictable installation and configuration experience:
- Use an administrator account when installing or uninstalling GWX Control Panel. (Standard and Child accounts actually run software installers using an administrator account's credentials, and this can result in a confusing experience for non-technical Windows users.) The troubleshooting guide has more information about how to use GWX Control Panel with Standard and Child user accounts.
- If your computer has multiple user profiles, log out of all profiles except your primary administrator user account before installing or uninstalling the program. The installer closes running instances of the program before upgrading or removing GWX Control Panel, but it cannot "see" instances of the process running under other user accounts. The fail-safe thing to handle this is to restart Windows, log in to an administrator account of your preference, then install, upgrade, or uninstall as desired.
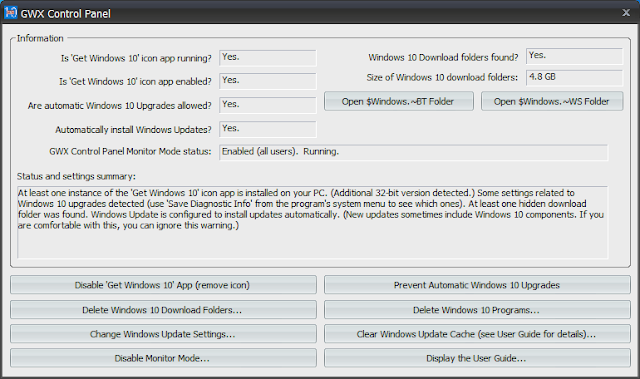 |
| The main GWX Control Panel window in version 1.7. |
I posted a quick video tutorial for GWX Control Panel 1.1 at YouTube. There's also another tutorial that covers the new features in versions 1.2 and 1.3. Many features have been added since those videos were produced, however.
THE INFORMATION SECTION
The upper portion of the main GWX Control Panel window is enclosed in a box labeled Information. This is where you can learn how protected your PC is from Windows 10 upgrades and notifications.Here is a summary of the bits of information available here:
- Is 'Get Windows 10' icon app running? This indicates whether the Microsoft program that creates the "Get Windows 10" icon in your notification area is currently running. If the program doesn't exist on your computer, it will say, "(App not found)".
- Is 'Get Windows 10' icon app enabled? This indicates whether Microsoft's "Get Windows 10" is configured to run on your PC. It is possible for this field to say Yes, even if the first field says No, because Microsoft uses a series of scheduled tasks to determine when to run the program. If the program doesn't exist on your computer, it will say, "(App not found)".
- Are automatic Windows 10 Upgrades allowed? This field indicates whether your computer is vulnerable to unwanted Windows 10 upgrades and related side-effects that can appear in your Windows Update control panel. If this field says Yes, it means that one or more critical system settings are set in such a way that you might experience unexpected Windows 10 upgrades or other upgrade-related behaviors in certain parts of the operating system (such as messages in the Windows Update control panel encouraging you to upgrade to Windows 10). If you would like to know exactly which settings GWX Control Panel discovered, you can find this information in the output file generated by the Save diagnostic info command in the program's system menu. (See "The System Menu" section for more info.)
- Automatically install Windows Updates? If this field says Yes, it means that you currently have Windows Update configured to automatically install new updates on a regular schedule. This is not recommended if you truly wish to avoid Windows 10, since Microsoft routinely pushes new Windows 10-related updates, and you could easily get an unpleasant surprise by installing all new updates without reviewing them first. This field is new in version 1.7, in response to a number of reports I've heard from Windows users who claimed their Windows Update preferences changed from "download only" or "check only" to "automatically install" without their consent. GWX Control Panel checks for this now so you can catch any unexpected changes.
- Windows 10 Download folders found? Microsoft pushes the Windows 10 installer files into secret, hidden directories on unsuspecting users' computers through a couple of different methods. This field indicates whether GWX Control Panel detects one or more of the locations where these files are known to reside.
- Size of Windows 10 download folders: If one or more of the hidden download folders are found, this field indicates the total amount of storage space occupied by the files they contain.
- Open BT Folder: When the hidden $Windows.~BT download folder is found, you can click this button to open the folder in Windows File Explorer.
- Open WS Folder: When the hidden $Windows.~WS download folder is found, you can click this button to open the folder in Windows File Explorer. This folder is less common, and is usually the result of running Microsoft's Windows 10 Media Creation Tool.
- GWX Control Panel Monitor Mode Status: This indicates whether you have enabled the Monitor Mode feature of GWX Control Panel, and also whether a Monitor Mode instance of the program is currently running. Depending on how you've set up your computer, you might have monitor mode enabled for a specific user account or for all users on the PC, and that is reflected in this field as well. (Please see the section on Monitor Mode for more information.)
- Status and settings summary. Most of the time, this little box gives you a quick summary of your PC's current status as far as Windows 10 files and settings go. This box can also display the current status of operations that take some time to complete.
THE BUTTONS
The lower portion of the main GWX Control Panel window contains a number of buttons for configuring and troubleshooting your PC. This is what they do:- Enable/Disable 'Get Windows 10' App: This enables or disables Microsoft's Get Windows 10 icon app, either removing or restoring the icon in your notification area, as desired. This button is only available if GWX Control Panel detects the app on your PC.
- Prevent/Allow Automatic Windows 10 Upgrades: This changes a number of settings that determine whether Microsoft is able to upgrade your PC to Windows 10 or change the behavior of your Windows Update control panel to deliver Windows 10 advertisements and updates. This does NOT disable Windows Update and does not block or hide any Windows Update patches.
- Delete Windows 10 Download Folders: If any of the hidden Windows 10 installer folders are detected on your computer, you can use this button to delete those files and free up storage space. This button is not available if no download folders are detected. Note that this procedure can take some time (once it starts actually deleting files, you should see the "Size of Windows 10 download folders" field report gradually decreasing sizes. If you have trouble deleting all of the files, you can use the "Save diagnostic info" option in the program's system menu to see if there were any telling error messages.
- Change Windows Update Settings: This new button in version 1.7 opens a dialog box where you can change how Windows update behaves. These are some of the same options available in the "Change settings" screen of the Windows Update control panel. For the best balance of security and protection from Windows 10, it's recommended that you choose one of the options that lets you choose which updates you wish to install, rather than installing all updates automatically or disabling updates entirely.
- Clear Windows Update Cache: While not directly related to Windows 10, this step is sometimes necessary to remove some lingering Windows 10 notifications from your Windows Update control panel after using the "Prevent Automatic Windows 10 Upgrades" feature. While this feature isn't harmful, it really isn't necessary in most cases, and it does result in some one-time changes in Windows Update that some users might find annoying. GWX Control Panel lists all known one-time effects when you choose this option and gives you a chance to decide whether to proceed before clearing your update cache.
- Enable/Disable Monitor Mode: Use this button to manage the Monitor Mode feature of GWX Control Panel. Monitor Mode places an icon in your notification area that alerts you if it detects any changes to your PC that might leave you vulnerable to Windows 10. Please see the "Using Monitor Mode" section below for more info.
Note: This button configures Monitor Mode for all user profiles on the PC. If you'd like to manage Monitor Mode for just a single user profile, you can use the Enable/disable Monitor Mode for current user command on the system menu.
- Display the User Guide: This launches your default browser to the GWX Control Panel user guide.
THE SYSTEM MENU
If you click the icon in the upper-left of the main GWX Control Panel window, you will see the system menu: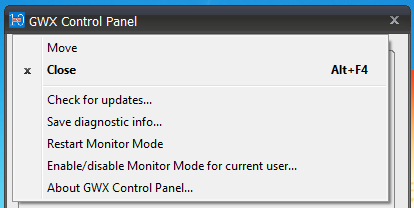 |
| The version 1.7 system menu. |
- Check for updates: This opens a dialog box that displays the version of GWX Control Panel you're currently running and links you to the Ultimate Outsider Downloads page to see if a newer version is available.
- Save diagnostic info: This saves a file called GwxControlPanelLog.txt to your desktop that contains relevant information about your computer and your Windows 10-related settings and files. Beginning with version 1.7 this report explains exactly what system settings it detected on your PC, which will help you understand what's going on behind the scenes when Monitor Mode detects new changes, for example.
- Restart Monitor Mode: You can use this to launch a Monitor Mode instance if you have Monitor Mode enabled, but it's not currently running.
- Enable/disable Monitor Mode for current user: Use this to manage monitor mode configuration for a specific user account on the computer. This replicates the behavior of the Enable/Disable Monitor Mode button from version 1.6 whereas in 1.7 that button now manages the feature for all user accounts on the computer.
- About GWX Control Panel: Just displays a dialog box with the current version and author information.
USING MONITOR MODE
When you enable GWX Control Panel's optional Monitor Mode, a new icon will appear in your notification area that will alert you if GWX Control Panel detects any unexpected files or settings that leave you vulnerable to Windows 10. Once enabled, GWX Control Panel will start and quietly monitor your computer whenever you log in to Windows.Enabling/Disabling Monitor Mode for all users (recommended):
If your computer has multiple user profiles- and especially if some of those profiles are Standard or Child accounts- the best way to use Monitor Mode is to enable it for all users. To do this, just click the Enable Monitor Mode button in the main GWX Control Panel window. The notification icon will appear in the currently logged-on session of Windows, and will also appear for other user accounts who later sign in to Windows.
To disable Monitor Mode, just click the Disable Monitor Mode button. If you do this from a Standard or Child user account, you will have to enter the password of an administrator user account in order to proceed. Please see the troubleshooting guide for more information about the limitations of Standard and Child user accounts.
Note
Version 1.6 of GWX Control Panel only enabled Monitor Mode on a per-user basis, which resulted in some confusing behavior for users running on Standard or Child accounts. As a result, if you upgrade from version 1.6 to 1.7 of GWX Control Panel, you might find that Monitor Mode is enabled for both the current user and for all users. While this is harmless (only one Monitor Mode instance ever runs per-user at a time), you can fix it by disabling Monitor Mode for the current user. (See below.)
Enabling/disabling Monitor Mode for a single user:
If you'd prefer to only have the Monitor Mode icon active on a per-user basis, or if you'd like to disable the single-user Monitor Mode from a previous version of GWX Control Panel, just choose the Enable/disable Monitor Mode for current user option in the program's system menu (accessible by clicking the icon in the upper-left corner of the program window).
Responding to Monitor Mode alerts:
When Monitor Mode detects a Windows 10-related change to your computer, its notification icon flashes with an exclamation mark, and a balloon notification normally appears to draw your attention. (The operating system decides whether or not you see these balloon notifications and how long they appear. Don't worry if you don't see one.)
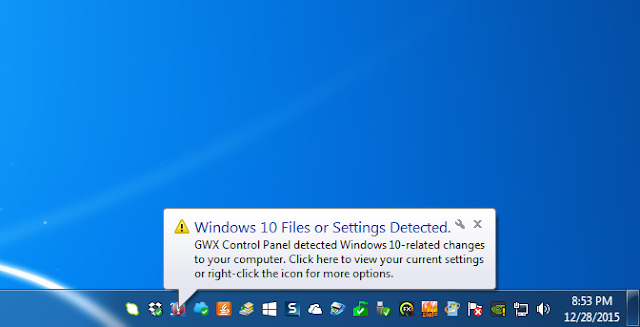 |
| The Monitor Mode balloon notification. |
To see what specific settings or files were detected, open up the main GWX Control Panel window. You can do this in several ways:
- Click the balloon notification.
- Double-click the Monitor Mode icon in your notification area.
- Right-click the Monitor Mode icon and then click Display GWX Control Panel from the shortcut menu.
Once you have a visible instance of GWX Control Panel open, check the various fields in the program's Information section to see what files or settings may have triggered the alert. If you'd like a more detailed report, you can use the Save diagnostic info option from the shortcut menus of either the Monitor Mode icon or the main GWX Control Panel window.
When alerts are triggered:
Monitor Mode keeps track of which Windows 10 settings or files it discovered, and if you choose not to remedy a specific new finding, it will not alert you again until something else changes. This alerting is done on a per-user basis. Consider this scenario:
- User A receives a Monitor Mode alert because some Windows 10 files were detected on the computer. The user dismisses the alert but decides not to do anything about it.
- User B logs in to Windows and also receives the alert, but likewise doesn't do anything to fix the problem.
- When user A logs back into Windows, Monitor Mode does not alert that user about the same problem again.
The Monitor Mode pop-up menu:
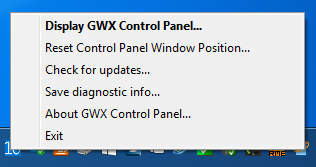
If you right-click the Monitor Mode icon, you'll see this pop-up menu:
Several of the menu options are also available from the system menu of the main GWX Control Panel window, but some are unique to Monitor Mode:
- Display GWX Control Panel: Opens a visible instance of GWX Control Panel if one isn't already opened. Also dismisses any alerts if the Monitor Mode icon is currently flashing.
- Reset Control Panel Window Position: If you ever find the main GWX Control Panel window in a strange location such that it is not visible or cannot be moved due to the title bar being out of reach, this option re-centers the program in the middle of your main display.
- Check for updates: This opens a dialog box that displays the version of GWX Control Panel you're currently running and links you to the Ultimate Outsider Downloads page to see if a newer version is available.
- Save diagnostic info: This saves a file called
GwxControlPanelLog.txt to your desktop that contains relevant
information about your computer and your Windows 10-related settings and
files. Beginning with version 1.7 this report explains exactly what
system settings it detected on your PC, which will help you understand
what's going on behind the scenes when Monitor Mode detects new changes,
for example.
Note
Doing Save diagnostic info from Monitor Mode does not include any potential error messages that might occur when attempting to delete Windows 10 download files. Please use the option from the main GWX Control Panel instance if trying to troubleshoot file delete problems. - About GWX Control Panel: Just displays a dialog box with the current version and author information.
WORKING WITH STANDARD AND CHILD USER ACCOUNTS
If you have multiple user accounts set up on your Windows PC and some of them are Standard or Child accounts, there are some important things you should know about how GWX Control Panel works when running under these limited account types.Under normal circumstances (when launching GWX Control Panel from one of the desktop or Start menu shortcuts, or when it loads in Monitor Mode), GWX Control Panel behaves the same for all Windows user account types: It doesn't need administrator permissions when it's just checking your current settings (Monitor Mode never needs administrator permissions). Things get a little more complicated once you attempt to use GWX Control Panel for a system-level change that requires administrator permissions.
If you are using an administrator account and User Account Control (UAC) is enabled, Windows will ask if you want to grant GWX Control Panel permission to make settings to your computer the first time you attempt to perform an action that requires administrator permissions:
 |
| The User Account Control prompt when an administrator account attempts a system change in GWX Control Panel. |
If you are using a Standard or Child account and try to use a GWX Control Panel feature that requires administrator access, Windows prompts you to enter the password of an administrator account. Important: After you enter the password, GWX Control Panel runs under the user profile of the administrator account until you quit the program!
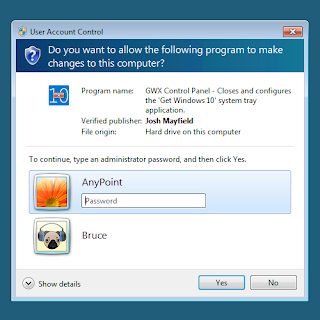 |
| Windows requires an administrator password if a Standard or Child account tries to make any system-level changes. |
In all three of the above cases, GWX Control Panel continues running at elevated permissions until you quit the program. For Standard and Child account users, this can have some confusing side-effects!
- User-specific settings, like Enable/disable Monitor Mode for current user, will happen under the administrator user's account.
- The Display the User Guide feature launches the administrator account's default browser with that account's browser settings, bookmarks, etc.
- The Save Diagnostic Info report will say "User is Administrator=Yes" because Windows is running it under the account of an administrator.
Please see the troubleshooting guide for some more information on weird things that Standard/Child user accounts can experience.
REMOVING GWX CONTROL PANEL
How you remove GWX Control Panel depends on which version you downloaded:If you downloaded the stand-alone version: If GWX Control Panel's Monitor Mode is enabled, use the Disable Monitor Mode button to shut it off. Next, simply locate the GWX_control_panel.exe file you downloaded and delete it.
If you downloaded the installer: Open your Programs and Features control panel in Windows. Locate the GWX Control Panel entry and select it. Next, click Uninstall. Optionally, you can browse directly to the install folder (the default location is C:\Program Files (x86)\UltimateOutsider\GWX Control Panel) and launch Uninstall.exe. Beginning in version 1.7 there is also an Uninstall GWX Control Panel shortcut in the Start menu, under the GWX Control Panel folder.
SUPPORT GWX CONTROL PANEL
I develop and maintain free software on my own time. I don't charge a fee because I want everyone to have equal access to my programs- and unlike a lot of developers of "free" software, I don't bundle any annoying third-party programs, spyware, or advertising with my tools. However, if something I wrote helped you and you'd like to express your thanks in a concrete way, you can send a donation of any amount via PayPal. Support from my visitors covers my hosting and licensing costs, and gives me incentive to keep putting out cool new utilities.If you wish to help out, you can enter a donation amount below and then click on the Donate button. You do not need a PayPal account in order to donate! Just click the "Don't have a PayPal account" option on the page that comes up after you click the Donate button. The donation amount is in U.S. Dollars (USD).
Note: You might receive a personal "thank you" from me in response, but I won't sign you up for any mailing lists and you won't hear from me again unless you contact me first. Thanks for your consideration!
 |
| Click here on the PayPal page if you don't have a PayPal account. |
CONTACTING THE AUTHOR
If you have problems that don't sync up with your expectations or with the user documentation, please let me know. User feedback has been important in helping me decide where to focus for future updates. There are three easy ways to get in touch with me:- Leave a comment here on the blog.
- Visit the Ultimate Outsider page on Facebook and use the Message feature to send me a private message.
- If you ever decide to send a PayPal donation (see the "Support GWX Control Panel" section above), you
can use the "add special instructions to recipient" field to include a
personal note. I read and respond to all of those.
ISSUES FIXED IN VERSION 1.7.0.2
The version of GWX Control Panel that's currently posted fixes the following issues that users reported with version 1.7.0.1:- If you used GWX Control Panel's Monitor Mode and you use the installer to upgrade from an earlier version of the program, the installer didn't automatically restart Monitor Mode after the upgrade is complete. The installer now restores Monitor Mode if you had it enabled previously. GWX Control Panel will also now start Monitor Mode if it detects that you have it enabled but for some reason it isn't running.
- The new buttons and information fields in version 1.7.0.1 made the program too tall to fit on very low resolution screens. The minimum screen size I tested with internally was 1360x768, but many netbooks have 800x600 screens, which can't display the whole GWX Control Panel program window. Version 1.7.0.2 has been re-arranged so that it doesn't take up so much vertical space.
- If you already had your Windows Update settings configured to
"automatically install updates" this would trigger an alert in Monitor
Mode the first time it ran, even if you WANT to have Windows Updates at
that setting. The real purpose of this alert is to let you know if
Microsoft changes your Windows Update settings without your
consent. Version 1.7.0.2 will now only trigger an alert if it detects
that Windows Update changed from one of the other three options to
"automatically install," which might indicate that a Windows Update
patch reverted your Windows Update preferences.
FOR MORE INFORMATION
There's a lot more information about the program at these other posts:- GWX Control Panel FAQ (Frequently Asked Questions). A lot of information that used to be in this post has moved here.
- GWX Control Panel Troubleshooting Guide. Go here if GWX Control Panel is not working as expected, or if you believe it is causing problems with other programs or your computer.
- The original GWX Control Panel announcement page has late-breaking news, usage information, and release notes for all versions of GWX Control Panel.
- Check out the GWX Control Panel tag to see a historical list of all posts on this blog about the program.


