Wednesday, May 11, 2022

Arturia V Collection - All Versions Compared


In May of 2005, French music software developer Arturia announced a limited-time bundle they called the Vintage Collection pack. It featured four emulations of classic synthesizers: Moog Modular V, CS-80V, ARP 2600 V, and minimoog V- all for the low, low price of $649USD (€555). This collection was only available for purchase during the month of June that year. Five years later, they released another bundle, the newly-dubbed V Collection 2.0; adding two new instruments that emulated three vintage synthesizers (Jupiter-8V emulated the Roland Jupiter-8 and Prophet V emulated both the Prophet 5 and the Prophet VS). Ever since then, Arturia has blessed us with a new V Collection about every two years.


I collected all the information I could gather on the various iterations of Arturia's trademark series to build a worksheet that compares the contents of every version. There's also a tab with quick details on each version of the collection (release date, intro price, total # of products), etc.


Some random Arturia V Collection trivia

  • V Collection 2.0 and 3.0 used the Syncrosoft USB licenser for copy protection (the same thing as the Steinberg USB eLicenser), while V Collection 4 was the first version distributed with and activated by the Arturia Software Center (ASC). (They originally called it the Arturia Software Centre.)

  • Arturia's drum sampler plugin, Spark 2, was included in V Collection 4, but it was dropped from subsequent V Collection releases, although it's still an actively supported product.

  • V Collection 7 was the first to include a sound bank (a collection of presets called Synthopedia) in addition to the variety of virtual instruments. V Collection 8 added the PatchWorks sound bank. Owners of these bundles could install the sound banks from their respective collections in the Arturia Software Center.

  • V Collection 9 introduced 14 new sound banks to the collection, but instead of installing these from ASC, the banks are now available on the Store tab of Analog Lab V. (You can click the "Owned Banks" control to display only the sound banks included with your collections.) NOTE: As of this writing I am unsure whether PatchWorks and Synthopedia are still included with V Collection 9; the details page currently up says there are "14 exclusive sound banks" but if PatchWorks and Synthopedia were included I think the number would be 16.

  • Not every version of every Arturia emulation is included in a V Collection release. For example Modular V was already at 2.0 by the time of the original Vintage Collection pack, and Jupiter-8 had already seen two releases before its introduction in V Collection 2.0.

  • Some of the instrument names have changed over the years. To keep my chart readable, I opted for the more recent/modern names of these plugins. Some examples of changed names: Jupiter-8 V to Jup-8 V, Moog Modular V to Modular V, minimoog V to MiniMg to Mini V, Wurlitzer V to Wurli V, OB-Xa V to OP-Xa V.

  • Spark Vintage Drum Machine was included in the original release of V Collection 3, however that product is not listed as an installable option under V Collection 3 in the Arturia Software Center.


Wednesday, May 4, 2022

How to Recover Missing Presets in HALion Sonic and Groove Agent


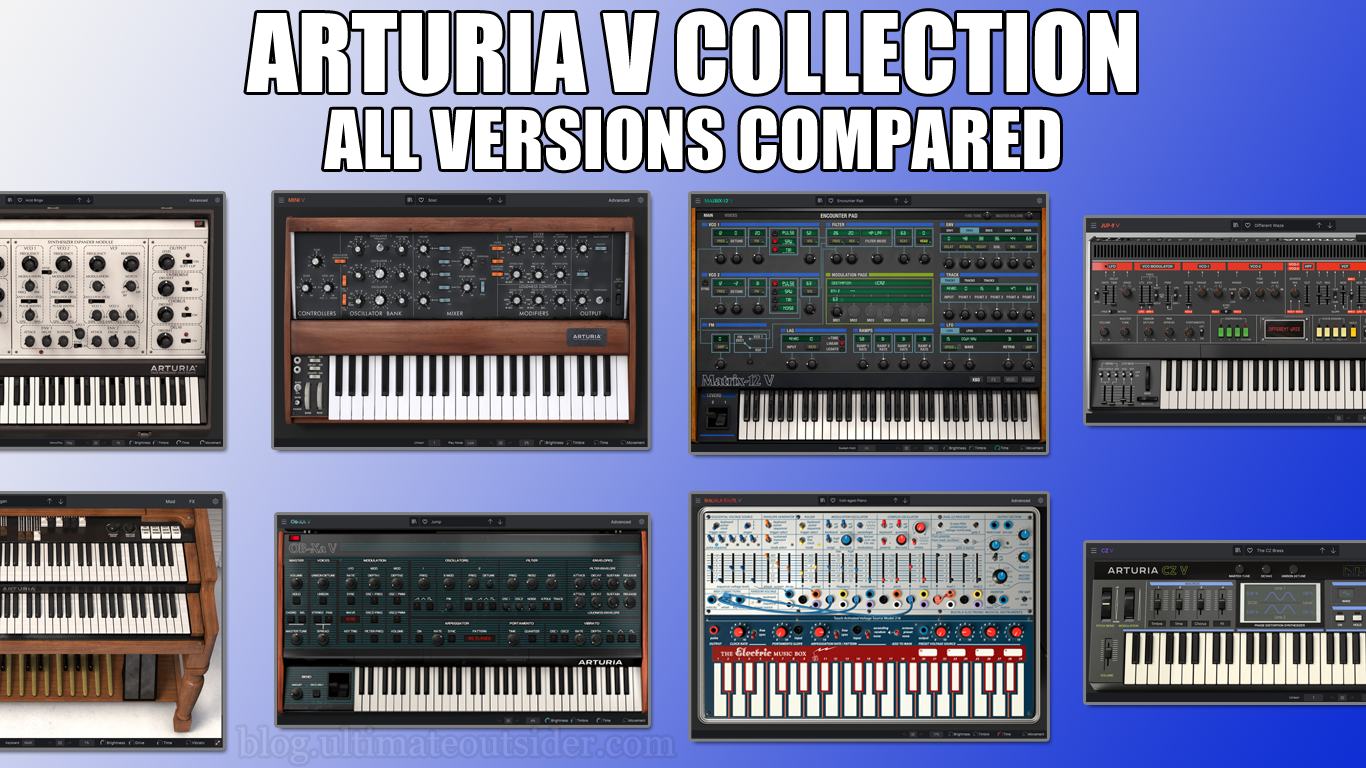
I've experienced problems with missing plugin presets on nearly every version of Cubase I've used since 2010, and I know I'm not alone. Over the years I've published several articles on how to recover presets in various Steinberg instrument and effect plugins, and they're among some of my most viewed posts. Due to the recent epidemic of Cubase 12 users unable to locate presets for the HALion Sonic SE and Groove Agent SE plugins bundled with Cubase 12, I am back at it again with a brand new guide.

Products covered in this post

This post covers preset issues with the following product versions:

  • The versions of HALion Sonic SE, Groove Agent SE, Padshop, and Retrologue included with any flavor of Cubase 10, 11, or 12 (or Nuendo 10, 11, or 12).

  • The full versions of HALion Sonic 3, HALion 6, and Groove Agent 5.


If you are having trouble with older versions of these plugins, you might find my earlier articles helpful:


Also, please note that I'm a Windows user, and some of the information here is Windows-specific. Most of the information here should be valid for MacOS too, though.

Before you start (important!)

The steps in this article all assume that your Steinberg products are all properly licensed and activated. I have confirmed with other Cubase users that some plugin preset problems are the result of improperly activated products, and the steps in the following sections won't help you in that case. So before you go any further, please check the following:

If you are using any Steinberg product released after December 2021 (Cubase 12, Nuendo 12, Dorico 4, etc):

Launch the Steinberg Activation Manager and confirm that your installed Steinberg product is both listed and activated. It should look like this:


If you see the product listed, but it's in the "Not Activated" state, just click the Activate button. If you instead see a "Verification Pending" status, that is probably because you purchased an update/upgrade/crossgrade license and you have not yet completed the license upgrade process. Please see this Steinberg support article to learn how to properly activate your newly purchased product, and then come back here if you still have problems!

If you are using any Steinberg product released before December 2021

At the time I'm writing this (May 2022), most of Steinberg's products still use the eLicenser system, whether it's the USB eLicenser dongle or the "soft eLicenser" that's stored on your computer. Even if you own one of the new Steinberg Licensing products, if you wish to use any products that still use eLicenser, that license has to be available on the PC where you're currently trying to solve your problems. Launch the eLicenser Control Center now and confirm your pre-existing licenses are available. (If they're not, any eLicenser-based product, including plugin preset content, will not be available for you to use.) For example, even though I'm using Cubase 12, I also use the full versions of Groove Agent 5 and HALion 6, which are included in Absolute VST Collection 5- which is eLicenser based. So I still need to use my USB eLicenser:


Once you're sure ALL your installed Steinberg products are licensed/activated, you can safely proceed to the next section.

1. Check the Steinberg Library Manager

Most Steinberg instruments have separate installers for the instruments and presets/library content. If HALion Sonic or Groove Agent aren't displaying any preset patches or kits, you should first check whether any of that content is currently installed. Also, even if the content is installed, sometimes you still need to run the Library Manager after installation to register the content with other Steinberg applications and plugins. If you 've never heard of this program, don't worry- you probably already have it installed.

  • Launch the Steinberg Library Manager (the Steinberg Download Assistant installs and updates this application on your computer automatically). If Windows asks whether to allow the app to make changes to your device, click Yes.

  • Check the HALION and GROOVE AGENT tabs in the library manager to see what packages are currently installed on your system. If these lists are empty, or if one or more content packages you're expecting to see aren't displayed here (or if you don't see these tabs at all) then proceed to the section about installing/re-installing plugins and content.

HALION tab in Steinberg Library Manager (Cubase Elements 12 libraries)


GROOVE AGENT tab in Steinberg Library Manager (Cubase Elements 12 libraries)


Some notes about Steinberg content libraries

Most sample and preset content for Steinberg plugins is delivered in the form of VSTSound files, which can be installed in a number of locations on your computer. Depending on the specific plugin, you'll generally find the VSTsound files buried somewhere in one of these locations:

The ProgramData Steinberg Content Directory

ProgramData is usually a hidden directory. You can always access it by opening up a File Explorer window and entering the following at the address bar: %ProgramData%


Under ProgramData, you should find a Steinberg folder, which contains a folder named Content. Inside here there are a number of directories containing VSTSound files.


On my computer, there are Groove Agent files in both these locations:

  • C:\ProgramData\Steinberg\Content\Groove Agent\VST Sound

  • C:\ProgramData\Steinberg\Content\VST Sound

The AppData Steinberg Content Directory

Each user profile on a Windows computer contains a hidden AppData folder. Unlike ProgramData, which is the same location on almost every Windows PC, the exact path of your AppData directory depends on your username. You can always access it by opening up a File Explorer window and entering the following at the address bar: %AppData%


Under AppData\Roaming, you should find a Steinberg folder, which contains a folder named Content. Inside here there are a number of directories containing VSTSound files.


On my computer, there are Groove Agent files in both these locations:

  • C:\Users\joshm\AppData\Roaming\Steinberg\Content\Groove Agent\VST Sound

  • C:\Users\joshm\AppData\Roaming\Steinberg\Content\VST Sound

Choosing other locations

The Steinberg content installers rarely (if ever) ask where you would like these large files installed. If you ever need to relocate the files, it's recommended you use the Steinberg Library Manager to do this, as this program serves as a sort of preset database to many Steinberg applications and plugins. If you manually move the VSTSound files to another location outside the normal Steinberg Content directories, your plugins won't know where to look for them.


2. Install or re-install the latest plugins and content for your version of Cubase/Nuendo

If you already had a prior version of Cubase installed before upgrading to the latest version, you might have been tempted to install only the updated version of Cubase and any brand-new components it came with, rather than re-installing the plugins you already had. It doesn't help that the Download Assistant doesn't always show you all the content you have access to (you can't always trust the "My product downloads" section, for example), and each individual Cubase distribution includes dozens of separate installers. But hear me out…

Always run all plugin/content installers when you update/upgrade Cubase or Nuendo

If you update/upgrade to a new version of Cubase, you should always run the installers of the included plugins and content that shipped with the new version, even if you already have some version of them installed. Here's why:

  • Re-installing can fix issues with missing presets.

  • Newer versions of Cubase can come with newer versions of the plugins.

  • Newer versions of Cubase can also include updated content libraries, with more presets.

  • It can fix licensing issues. Even if they come "free" with your purchase of Cubase, all plugins and libraries included with Cubase are licensed for that Cubase version. If you don't run the new installers, for example, you might have the Cubase 11 versions of HALion Sonic SE and Groove Agent SE installed (which might require a USB eLicenser) running on Cubase 12 (which doesn't use eLicenser at all). Note: At the time of this writing, this tip mostly applies to Cubase since it was the first Steinberg product to switch to the new licensing method, but all Steinberg products will eventually make this change. You will definitely want to re-install all Absolute VST Collection plugins when the next version drops, for example.

Beware of the "My product downloads" section

I recently interacted with a fellow who didn't have any HALion or Groove Agent presets, and when he showed me a screenshot of his Steinberg Download Assistant, I knew exactly what the problem was. Since he had previously purchased an update from an earlier version of Cubase to Cubase 11, the Download Assistant placed a trimmed-down "Cubase Pro 11 Update" selection in his "My product downloads" list instead of the full Cubase Pro 11 package. Unfortunately, this option didn't include any plugin content at all- just the plugin installers!


Instead of relying on "My product downloads," simply locate the version of Cubase (or other Steinberg product) you know you own so you can be sure to see the full list of installers for that product. For example, note the difference between my acquaintance's screenshot above and the full Cubase Pro 11 selection below:


3. Re-run Steinberg Library Manager

If you had to install or re-install any content in the previous step, make sure to run Steinberg Library Manager once more, for two reasons:

  • So you can check that the content packs installed correctly; check the HALION and GROOVE AGENT for the individual libraries.

  • To allow the Library Manager to register the newly installed content with your other Steinberg apps and plugins. The Library Manager does this automatically whenever you launch it.

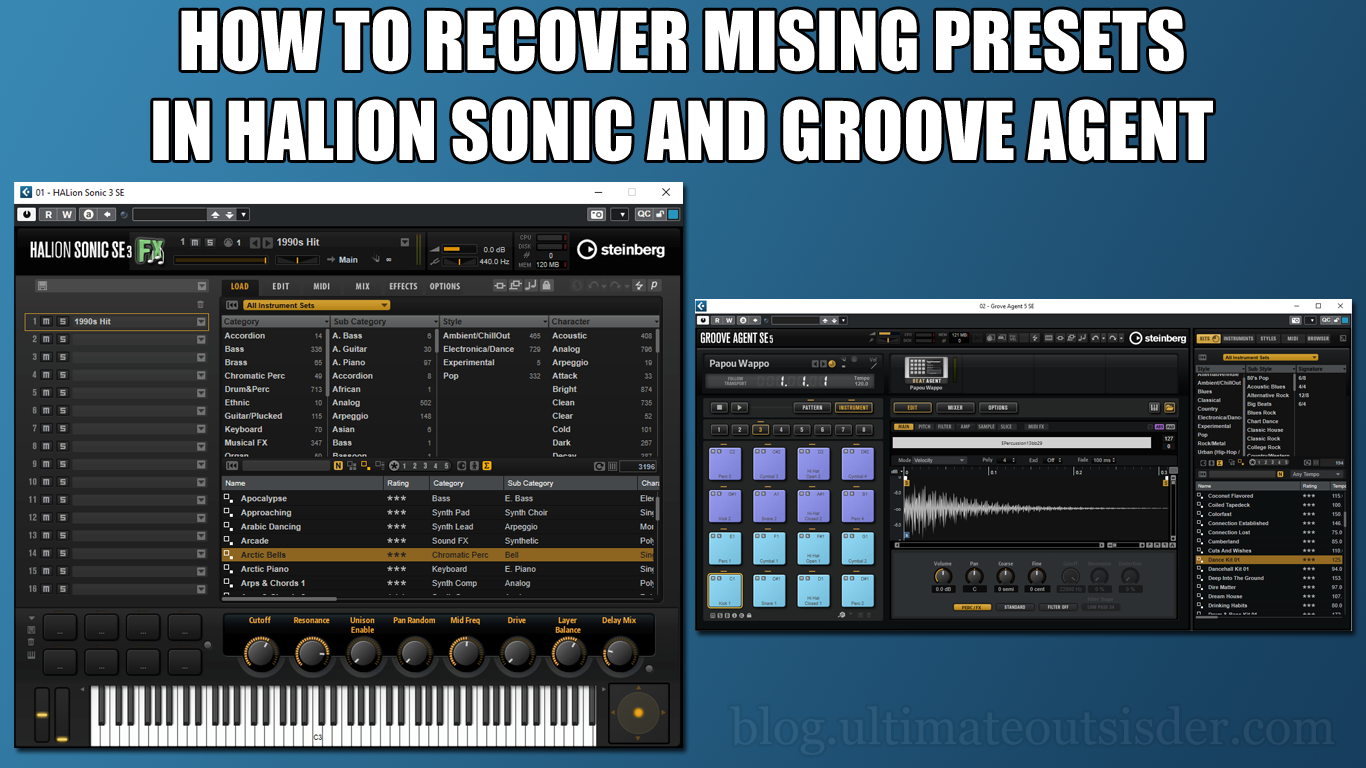
4. Force HALion or Groove Agent to rescan for presets

Now that you've double-checked that the latest content is installed, you will probably need to force your plugins to find the new presets. This applies to all versions of HALion, HALion Sonic, and Groove Agent. (Retrologue and Padshop don't require this step.)

Groove Agent and Groove Agent SE

If you don't have the right-side panel open, click the Show/Hide Load Panel button, select the Kits tab, and make sure "All Instrument Sets" is selected.


Next click the Rescan Disk button on the Kits tab. It can take a couple of minutes to perform the full scan. If everything's working you should see your list begin to populate.


HALion Sonic and HALion Sonic SE

On the Load tab, make sure All Instrument Sets is selected and then click the Rescan Disk button. It can take a couple of minutes to scan all of the content.


HALion (full version)

In the full version of HALion 6, select the LOAD/REC tab, and then select the MEDIABAY tab, and then make sure All Instrument Sets is selected. Next, click the Rescan Disk button. It can take a couple of minutes to scan the presets.


If you've reached this point, you should be good to go!

Related issues

Groove Agent "No license found" and "preset could not be loaded"

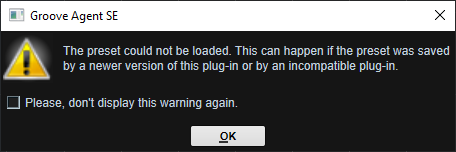
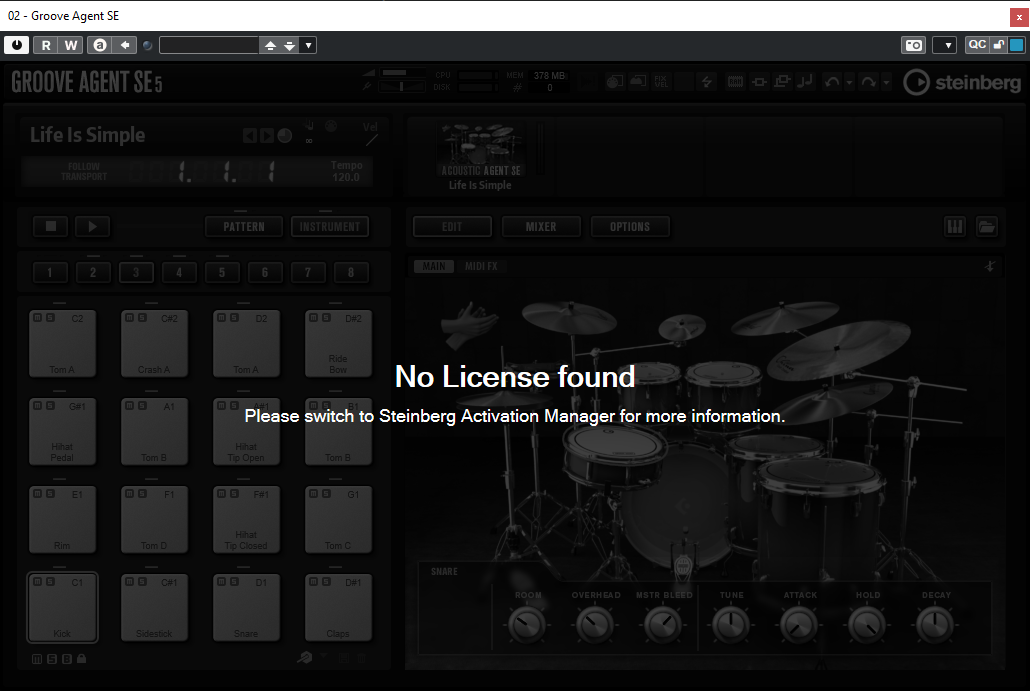
While writing this article I encountered another problem that I was able to resolve by following these same steps. On a computer where I had initially installed Cubase Elements, I later installed Cubase Artist- but I only installed the Artist application; I didn't install the "Artist" versions of the plugins or content. When I opened a Cubase project that used Groove Agent, I was first greeted by a dialog that said, "The preset could not be loaded. This can happen if the preset was saved by a newer version of this plug-in or by an incompatible plug-in."


And when the main plugin window opened, it was unusable, and there was a big "No License found" message plastered across the user interface. I was able to fix these issues by installing the Cubase Artist versions of both Groove Agent SE and its associated content.


Unable to add plugins to a project even though they're properly installed

This one really caught me by surprise. I was adding an Instrument track to a Cubase project, but when I was prompted to choose the desired plugin I couldn't find HALion 6 or Groove Agent 5 in the Instrument list of the Add Track dialog. I knew the plugins were installed, because I use them all the time!


But then I glanced over at the right-side panel of my project window and realized what was wrong- I was using a custom plugin collection that didn't include either of those plugins! You can create and manage custom plugin collections in the Studio > VST Plug-in Manager dialog. This gives you a way to surface only your most used plugins for a given project- but it has the effect of hiding any installed plugins that aren't in your selected collection! To fix this problem I just selected the Default plugin collection (which automatically contains all plugins), and I was then able to load those instruments in my project.


You can switch plugin collections by selecting the Media tab in the right zone of the project window and choosing the VST Instruments option. There, you can select your desired collection from the drop-down list. This picture shows the Default collection.


Cannot load presets marked by a red circle with a line through it

Both HALion Sonic and Groove Agent place a red and white icon before the names of presets that are currently installed but not correctly licensed. The number one cause of this problem is accidentally installing a version of the plugin content that was not included in the version of Cubase or Nuendo that you purchased. For example, if you own Cubase Elements 12, but you installed the Cubase Pro 12 version of HALion Sonic SE Content, there would be presets on your system that you are not licensed to use.
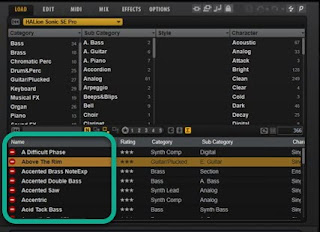
Unlicensed presets in HALion Sonic SE.

Unlicensed presets in Groove Agent SE.

The thing is, it may not even be your fault! For example, as of the time I am writing this, the Cubase Artist version of the "HALion Sonic SE 3.5 - Content" installer places the Cubase Pro versions of the HALion presets on your computer, even though your version of Cubase Artist isn't able to load them.

So the first thing to do here is to figure out if the unloadable presets are even supposed to load in your version of Cubase/Nuendo/Dorico. I am not sure what all comes with the different editions of Nuendo or Dorico, but here is a list of which instrument sets work in which versions of Cubase:

HALion Sonic SE instrument sets

Different Cubase flavors support different HALion Sonic instrument sets:
  • Cubase Elements: HS SE Artist, HS SE Basic, TRIP
  • Cubase Artist: Flux, HS SE Artist, HS SE Basic, HS SE Hybrid, TRIP, Verve
  • Cubase Pro: Flux, HS SE Artist, HS SE Basic, HS SE Hybrid, HS SE Pro, TRIP, Verve

Groove Agent SE instrument sets

Currently, all included Groove Agent sets work in all major flavors of Cubase:
  • Cubase Elements, Artist, and Pro: Allen Morgan Signature Drums, Laser Beams, Production Grooves, Rock Pop Toolbox, SE Kits, SE Studio Kit, The Kit SE

Seeing which instrument sets you have installed

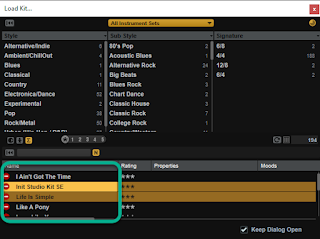
Just because you have a given pack installed doesn't mean it will necessarily work in your version of Cubase, Nuendo, or Dorico. To see which packs you currently have installed, in both HALion Sonic and Groove Agent, just click the "All Instrument Sets" button in the preset browser, which brings up a thumbnail view of the installed sets.
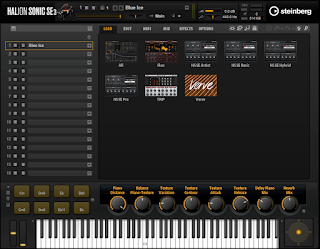
The above instrument sets are currently installed with Cubase Artist 12, even though the HS SE Pro set doesn't work with Cubase Artist.

If the instrument set you're having problems with is supposed to work with your flavor of Cubase, Nuendo, or Dorico:

If it's a set that should be loadable but currently isn't, the best way to fix this is to:
  • Quit all Steinberg applications, then open the Apps & Features control panel in Windows and uninstall the options for Steinberg HALion Sonic SE 3 Component and Steinberg HALion Sonic SE Content. (The same applies to Steinberg Groove Agent SE 5 Component and Steinberg Groove Agent SE Content if you're having problems with Groove Agent instead.)
  • Launch Steinberg Download Assistant and be sure to select your version and flavor of Cubase or Nuendo (example: if you own Cubase Artist 12, navigate to Cubase > Cubase Artist 12).
  • Install both the Instrument and Content downloads for HALion Sonic SE or Groove Agent SE, depending on which plugin you're having trouble with.
  • Launch the Steinberg Library Manager to register the newly-installed content.
  • Close the Library Manager, launch Cubase, and open a project that uses the plugin. You should find all listed presets are now loadable.

If the instrument set isn't supposed to work with your flavor of Cubase:

If you've determined that the non-loading presets are in an instrument set that's not supposed to work with your Steinberg product, you can at least remove the problem instrument set so it doesn't clutter your preset browser with sounds you're unable to use.
  • Quit Cubase/Nuendo/Dorico.
  • Launch the Steinberg Library Manager and look at the appropriate tab for your plugin (HALION, GROOVE AGENT, etc.)
  • Locate the instrument set you wish to remove and click its Remove button.
  • When the program asks if you're sure you want to remove the instrument set, click Move to Trash.

  • Note: When the Library Manager removes a library, it really does move the files to the trash/Recycle Bin. You can empty your Recycle Bin to delete the files permanently.
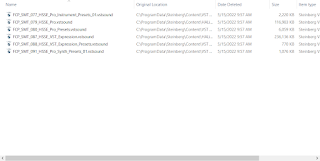
    HS SE Pro VST Sound files in the Windows Recycle Bin.

  • The next time you launch Cubase/Nuendo/Dorico, you will probably receive several prompts indicating that a VST Sound Library was not found. Click Remove on each of these prompts to remove them from your DAW's database of VST Sound files.
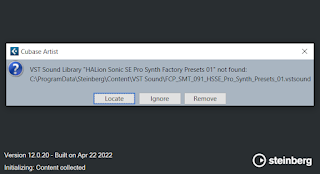
    Click Remove to clean up the VST Sound database after removing an instrument set.

  • If you now open up the plugin where you were having preset issues, you should now find that only presets that actually work in your Steinberg product are listed.
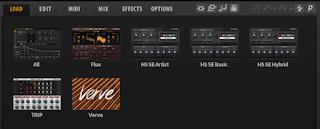
    The correct list of HALion Sonic SE Sets for Cubase Artist.

Wednesday, April 20, 2022

Updating or Upgrading to Cubase 12: A Step-by-step Walkthrough

Ever since Cubase 12 launched, every Cubase-related message board and Facebook group I visit is full of owners of prior Cubase versions struggling to update their rigs to version 12. This is partly because Steinberg is transitioning from their controversial USB eLicensers to their new Steinberg Licensing copy protection scheme, and partly because the update process is complex, involving many steps across a number of apps and web pages. I hope to clear up some of this confusion with my complete walkthrough of the update/upgrade process.


Several Steinberg products sometimes come in different flavors (Pro, Artist, Elements, AI, LE) as well as different versions (1-12). In Steinberg's terminology, an "update" is when you move from an older version number to the latest version (in our example, 7.5 to 12), and an "upgrade" is when you move from a limited flavor of Cubase to a more full-featured one (for example, upgrading from Cubase Elements to Cubase Pro). Prices vary depending on the product you're updating/upgrading from- if you are a long-time customer you might have multiple possible choices, so be sure to review all your options.

Before you start

  • Have your Steinberg ID credentials handy, because you will be logging in to various Steinberg sites and apps along the way. You can confirm your credentials by logging into the Steinberg Sign In page.

  • If you have ever used the Steinberg Shop before, you will want those credentials on-hand as well. Your Steinberg shop account is separate from your Steinberg ID/MySteinberg account. If you use different passwords for the two sites (like I do), make sure you have both. You only use the Steinberg Shop for eCommerce transactions (paying for new purchases, updates, or upgrades), while you use your Steinberg ID for everything else (downloads, activation, forums). If you don't already have a Steinberg Shop account, you can create one during the checkout process.

  • Also, make sure that you have Steinberg eLicenser Control Center installed on the computer where you plan to run Cubase 12, and that the Cubase license you plan to upgrade is available. You will not be able to properly activate your new product without access to the old license. I am going to be updating my Cubase Artist 7.5 license, which is stored on my USB eLicenser dongle that is currently plugged in. If you are upgrading from Cubase Elements, AI, or LE, your license might be on the Soft-eLicenser rather than on a USB dongle. While your old Cubase license needs to be available for this process, you do not have to have the old version currently installed in order to perform the upgrade. Cubase 12 installs into a different directory from prior versions, and does not rely on or conflict with other versions of the product.

  • While this article includes information about how to purchase an update/upgrade from a different Cubase version, most of the steps also apply to Cubase 11 owners who qualify for the free Cubase 12 Grace Period update. If you believe you qualify (if you activated your Cubase 11 license after November 9, 2021), you can follow these steps described at Steinberg's site, and then skip to the "Downloading and installing Cubase 12" section of this article. 

Purchasing the upgrade

  • Go to Steinberg's Cubase page, click Buy Cubase 12, and then click which flavor of Cubase you wish to purchase. For this article I am updating to Cubase Artist 12, so I'll pick Buy Cubase Artist 12.

  • On the next page, select the Updates & upgrades tab, choose the option that applies to you, and then click Add to Cart. Here I am choosing the option to update from Cubase Artist 7.5. Note: It is very important to choose the correct option here, if you choose to update/upgrade from a version that isn't on your eLicenser, you will not be able to activate Cubase 12!

  • After you add the update/upgrade to your cart, you can choose whether to redeem a coupon code (if you have one), continue shopping, or proceed to checkout, which I am doing now.

  • If you have credentials for the Steinberg Shop, you can click the LOG-IN button on the "Address Details" step of the checkout process. (Remember, this might be a different password from the one you use for license activation.) If you successfully log in to your shop account, the "Billing Address" info will populate automatically. Otherwise, just fill out your billing info here and click Go On to Overview and Payment at the bottom of the page. Note: I had problems logging in at this step, even though I was using the correct credentials. I disabled my browser's ad blocker (uBlock Origin), and that allowed me to log in successfully.

  • On the "Payment" step of checkout, fill in your payment details and click Go On To Overview & Payment at the bottom of the page.

  • On the "Verify Order" step, click Purchase Now.

  • If your purchase goes through successfully, you should now be at the "Done!" stage. Click Download Now to view your activation code and download link.

  • The My Downloads page presents you with activation codes for Steinberg products you own that are compatible with the Steinberg Download Assistant. Steinberg will also send you an email with the activation code for the product you just purchased. Click the Download link to proceed to the next step.


How to view your download codes

In the future, if you ever wish to get back to this list of activation codes, you can do the following:

  • Log in to the Steinberg Shop here.

  • Then click Show Orders.

  • Then click the most recent "Download" link next to where it says "Delivery status".

  • Then select "all entries" in the list at the top of the screen and click Apply. This displays all applicable download codes.


Downloading and installing the Steinberg Download Assistant:

If you already have the Steinberg Download Assistant installed and authorized, you can skip this section.

  • Steinberg uses the Download Assistant app to deliver all new versions of their software. At the "Get Your Steinberg Product" page click the button that applies to your operating system to download the appropriate installer. While all of my steps and screenshots are based on Windows 10, the general process is more or less the same for other Windows versions and Mac OS.

  • Locate the downloaded file, launch the installer, and click Next to proceed with installation.

  • Once initial installation is complete, you'll have the opportunity to launch the Steinberg Download Assistant for the first time. If the Download Assistant doesn't launch automatically, you should find an icon for it on your desktop. The first time you run the app, click the Sign in button to begin the first-run activation process.

  • When you click the Download Assistant's Sign in button it launches your default web browser where you might be prompted to sign in to Steinberg.net with your Steinberg ID credentials (which may be different from your Steinberg Shop credentials). Once you are properly signed in to the site, you might be prompted to allow the browser to open the Download Assistant. Click the Open Steinberg Download Assistant.exe button to proceed. You MUST successfully perform this step one time in order to activate the application.

  • Once authorized, the Download Assistant checks to see whether you have the latest versions of several other apps installed. (The other apps are eLicenser Control Center, Steinberg Library Manager, and Steinberg Activation Manager, which is the eventual replacement for eLicenser.) The Download Assistant will install or update them automatically. Depending on what's currently installed on your system, you may or may not see some of the following screens.

  • If the Download Assistant needs to install or update the eLicenser Control Center you might see a prompt like this for the USB eLicenser (dongle) driver. Click Install if prompted.

  • Once the initial activation/update steps are complete, you should now be logged in to the Download Assistant.


Downloading and installing Cubase 12

In order to download and activate Cubase 12 you need your Download Access Code (also called your Activation Code). This is a 25-character code, usually displayed as 5 groups of 5 letters and numbers, separated by dashes. This is different from eLicenser activation codes, which are 32 characters long (8 groups of 4). In order to proceed you will also need to have the Steinberg Download Assistant properly installed and activated. See the previous section if you're not sure.


Also, if you are performing an Update/Upgrade, your old license must be immediately available on the current computer as described in the "Before you start" section above.

  • After completing your update/upgrade purchase you should receive an Order Confirmation email that contains your code. Note: If you don't receive your email right away, first make sure to check your Junk/Spam folder. If you still can't find it, you should be able to view your codes at the Steinberg Shop. See the "How to view your download codes" section earlier in this article.

  • Launch the Steinberg Download Assistant. Don't be worried if you don't see your newly-purchased product listed under "My product downloads" yet. Grab the 25-digit access/activation code Steinberg provided you, click Enter your Download Access Code, type or paste in the code, and click OK.

  • If the code you entered is valid, after a few moments, the Download Assistant will present you with a 32-character license activation code and ask if you wish to upgrade. If your old eLicenser license is available on the PC as mentioned earlier in this article, click Upgrade.

  • The Download Assistant launches the eLicenser Control Center and populates it with your new activation code. (In my case, I was surprised to find that it said "Cubase Artist 11" considering I was upgrading from Artist 7.5, but it appears to work, regardless.) Click Continue to proceed.

  • Next, make sure the correct license-to-be-upgraded is selected. In my case the app automatically selected the correct license. Click the Upgrade License button to continue. (Note: I didn't crop this screenshot- the dialog buttons are actually cut in half on my screen for some reason!)

  • After several seconds you should be notified that the license upgrade is successful. Click Finish License Activation to return back to the Download Assistant.

  • Back in the Download Assistant you should now find your newly-activated product listed under My product downloads. Click OK.

  • Click the button for the Steinberg product you just purchased under My product downloads to display all of the downloadable components for your product on the right side of the window. You can choose a different "target folder" (download directory) by clicking the button or the Settings gear icon. Note that this is only the location where the Download Assistant downloads files. This is not the directory where your products will be installed. Depending on the product/component, you may not get to choose where the application/content is initially installed, but you will be able to move most content files elsewhere using the Steinberg Library Manager application that is already installed along with the Download Assistant. On this screen, click Install All to download/install everything in the list, or click Install on the individual items you need. At a minimum, I recommend you install at least:

    • The Cubase application

    • The instruments: HALion Sonic SE, Groove Agent SE, Retrologue, and Padshop

    • The Content items for the above instruments (you won't have any presets without them).


  • The Download Assistant is capable of downloading multiple items at the same time. As soon as it downloads the Cubase installer to your computer it will launch the installer wizard. Step through the wizard with the Next button to proceed.

  • After accepting the Steinberg license agreement you will have the chance to select a different program installation path for Cubase. This only affects where the main program goes. Plugins and content will mostly be installed in their default locations. After you click Next on this screen, click Install to perform the installation. ug21

  • If you see any errors that a given component was unable to install, you can usually get it to work by just clicking Install on each of the reported components individually. Just wait for all other installers to complete, then return to the Download Assistant and individually re-try the installs that failed the first time.


Activating and launching Cubase 12 for the first time:

  • After you quit the Steinberg Download Assistant, you should find a Cubase 12 icon on your desktop. When you first launch Cubase, the Steinberg License Manager will run in the background and attempt to silently activate your newly-installed copy of Cubase.

  • If everything works as intended, Cubase will launch normally and you won't have to worry about signing in to any more apps or activating any more software. If you see any warnings complaining that your copy of Cubase is not activated, quit Cubase and then run the Steinberg Activation Manager (it was installed along with the Download Assistant). Assuming you have an internet connection and you are logged in to the Activation Manager, the program will show you which versions of Cubase you are licensed to run. In my screenshot you can see that I own licenses for three different flavors of Cubase 12, but only Cubase Artist is activated. VERY IMPORTANT NOTE: The only way to deactivate a new Steinberg product is to click the Deactivate button in the Activation Manager on the computer where the program is currently installed. If your computer breaks or you reformat the hard drive without deactivating your product first YOU WILL LOSE YOUR ACTIVATION. This is an unfortunate drawback of the new Steinberg Licensing scheme.

  • On your first run of Cubase you will likely be prompted to select an audio driver. If you already have an audio interface installed and connected, you should select it before clicking OK. On Windows, if no audio interfaces are present, you will have the option to use the Generic Low Latency ASIO Driver.

  • Once the program is fully loaded, you will normally see the "Steinberg Hub" window, where there are links to Steinberg news and sites, and a number of production templates for creating new Cubase projects. You can disable the Hub feature in the program's preferences.

  • If Cubase detects that you don't have any audio output ports mapped, it will display the Missing Ports dialog. If there are no output ports mapped, you won't be able to hear sound in Cubase, so this is important!

  • If there are any ports available, you should be able to click the red "Unmapped" links and choose the correct outputs. In this screenshot I am selecting the speakers of my ASUS VG249 monitor.

  • By this point Cubase should be fully activated and ready to roll. Happy producing!


When to use the USB eLicenser

According to Steinberg, all future versions of their products will use Steinberg Licensing/Activation Manager instead of the USB or software eLicensers, but it could potentially take years for the company to transition all of their products. While the Cubase 12 application itself no longer uses eLicenser, at the time I am writing this, all commercial Steinberg plugins (like the full versions of Groove Agent and HALion Sonic) still require the eLicenser. Additionally, if you ever wish to run an older version of Cubase (which sometimes you might have to do if there are compatibility issues loading old projects on new software versions), you'll want to hang on to that USB eLicenser.


Keep an eye on this list of programs that use Steinberg Licensing to know when it's safe for you to drop the dongle.