Ever since Cubase 12 launched, every Cubase-related message board and Facebook group I visit is full of owners of prior Cubase versions struggling to update their rigs to version 12. This is partly because Steinberg is transitioning from their controversial USB eLicensers to their new Steinberg Licensing copy protection scheme, and partly because the update process is complex, involving many steps across a number of apps and web pages. I hope to clear up some of this confusion with my complete walkthrough of the update/upgrade process.
Several Steinberg products sometimes come in different flavors (Pro, Artist, Elements, AI, LE) as well as different versions (1-12). In Steinberg's terminology, an "update" is when you move from an older version number to the latest version (in our example, 7.5 to 12), and an "upgrade" is when you move from a limited flavor of Cubase to a more full-featured one (for example, upgrading from Cubase Elements to Cubase Pro). Prices vary depending on the product you're updating/upgrading from- if you are a long-time customer you might have multiple possible choices, so be sure to review all your options.
Before you start
Have your Steinberg ID credentials handy, because you will be logging in to various Steinberg sites and apps along the way. You can confirm your credentials by logging into the Steinberg Sign In page.
If you have ever used the Steinberg Shop before, you will want those credentials on-hand as well. Your Steinberg shop account is separate from your Steinberg ID/MySteinberg account. If you use different passwords for the two sites (like I do), make sure you have both. You only use the Steinberg Shop for eCommerce transactions (paying for new purchases, updates, or upgrades), while you use your Steinberg ID for everything else (downloads, activation, forums). If you don't already have a Steinberg Shop account, you can create one during the checkout process.
Also, make sure that you have Steinberg eLicenser Control Center installed on the computer where you plan to run Cubase 12, and that the Cubase license you plan to upgrade is available. You will not be able to properly activate your new product without access to the old license. I am going to be updating my Cubase Artist 7.5 license, which is stored on my USB eLicenser dongle that is currently plugged in. If you are upgrading from Cubase Elements, AI, or LE, your license might be on the Soft-eLicenser rather than on a USB dongle. While your old Cubase license needs to be available for this process, you do not have to have the old version currently installed in order to perform the upgrade. Cubase 12 installs into a different directory from prior versions, and does not rely on or conflict with other versions of the product.
While this article includes information about how to purchase an update/upgrade from a different Cubase version, most of the steps also apply to Cubase 11 owners who qualify for the free Cubase 12 Grace Period update. If you believe you qualify (if you activated your Cubase 11 license after November 9, 2021), you can follow these steps described at Steinberg's site, and then skip to the "Downloading and installing Cubase 12" section of this article.

Purchasing the upgrade
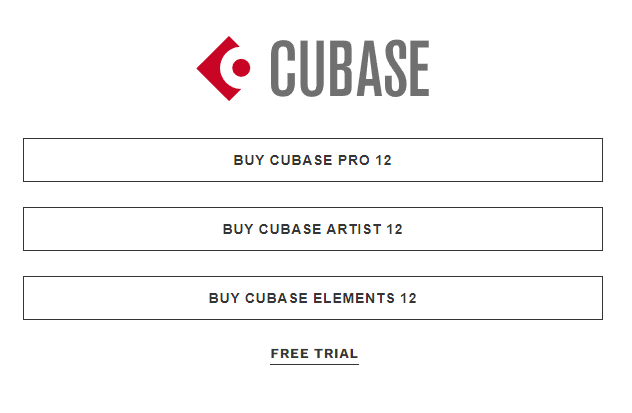
Go to Steinberg's Cubase page, click Buy Cubase 12, and then click which flavor of Cubase you wish to purchase. For this article I am updating to Cubase Artist 12, so I'll pick Buy Cubase Artist 12.
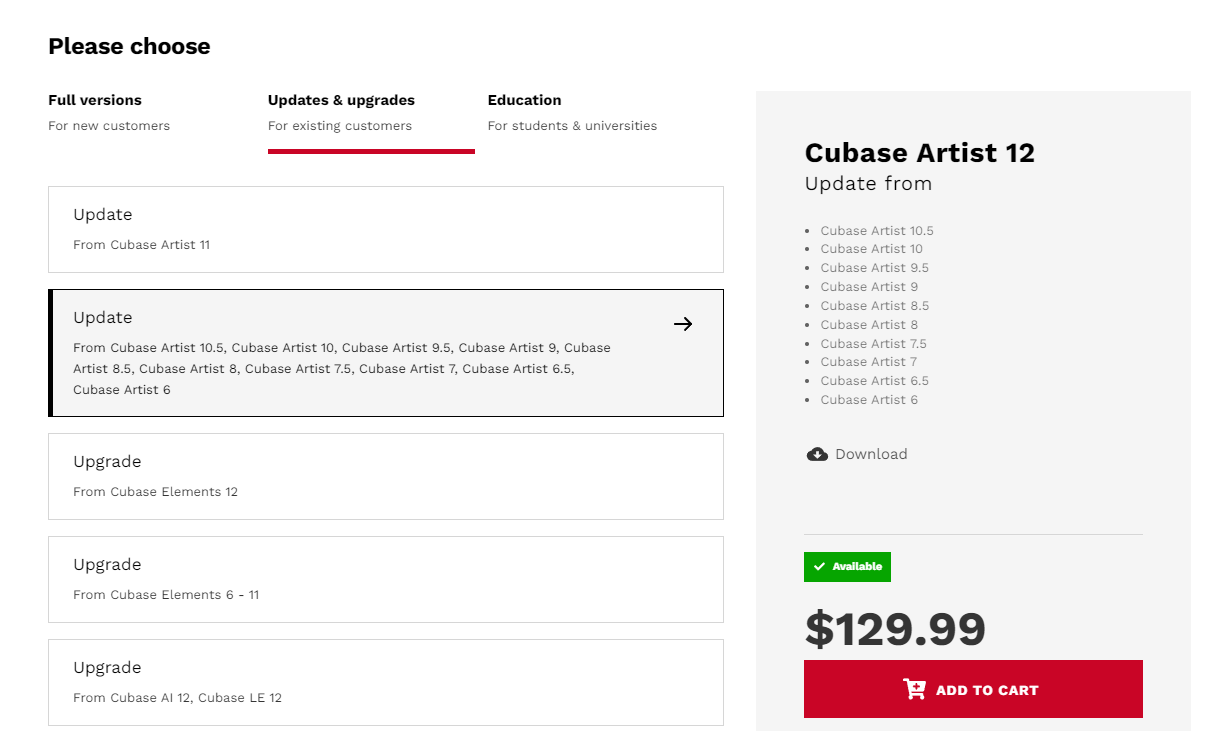
On the next page, select the Updates & upgrades tab, choose the option that applies to you, and then click Add to Cart. Here I am choosing the option to update from Cubase Artist 7.5. Note: It is very important to choose the correct option here, if you choose to update/upgrade from a version that isn't on your eLicenser, you will not be able to activate Cubase 12!
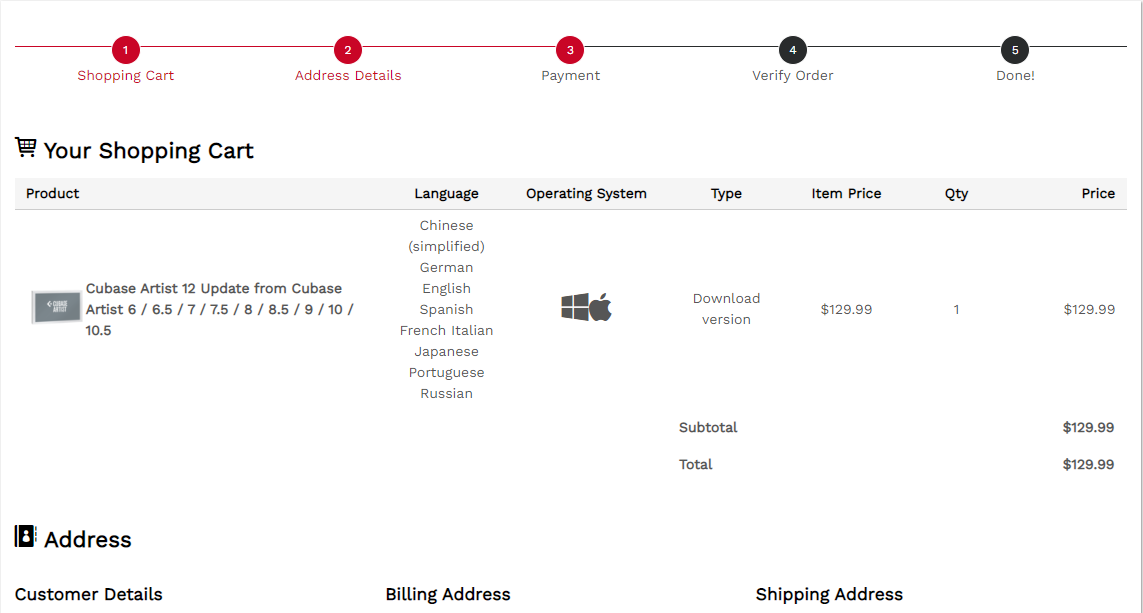
After you add the update/upgrade to your cart, you can choose whether to redeem a coupon code (if you have one), continue shopping, or proceed to checkout, which I am doing now.
If you have credentials for the Steinberg Shop, you can click the LOG-IN button on the "Address Details" step of the checkout process. (Remember, this might be a different password from the one you use for license activation.) If you successfully log in to your shop account, the "Billing Address" info will populate automatically. Otherwise, just fill out your billing info here and click Go On to Overview and Payment at the bottom of the page. Note: I had problems logging in at this step, even though I was using the correct credentials. I disabled my browser's ad blocker (uBlock Origin), and that allowed me to log in successfully.
On the "Payment" step of checkout, fill in your payment details and click Go On To Overview & Payment at the bottom of the page.
On the "Verify Order" step, click Purchase Now.
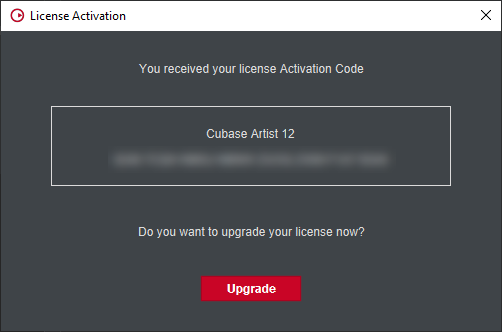
If your purchase goes through successfully, you should now be at the "Done!" stage. Click Download Now to view your activation code and download link.
The My Downloads page presents you with activation codes for Steinberg products you own that are compatible with the Steinberg Download Assistant. Steinberg will also send you an email with the activation code for the product you just purchased. Click the Download link to proceed to the next step.


How to view your download codes
In the future, if you ever wish to get back to this list of activation codes, you can do the following:
Log in to the Steinberg Shop here.
Then click Show Orders.
Then click the most recent "Download" link next to where it says "Delivery status".
Then select "all entries" in the list at the top of the screen and click Apply. This displays all applicable download codes.
Downloading and installing the Steinberg Download Assistant:
If you already have the Steinberg Download Assistant installed and authorized, you can skip this section.
Steinberg uses the Download Assistant app to deliver all new versions of their software. At the "Get Your Steinberg Product" page click the button that applies to your operating system to download the appropriate installer. While all of my steps and screenshots are based on Windows 10, the general process is more or less the same for other Windows versions and Mac OS.
Locate the downloaded file, launch the installer, and click Next to proceed with installation.
Once initial installation is complete, you'll have the opportunity to launch the Steinberg Download Assistant for the first time. If the Download Assistant doesn't launch automatically, you should find an icon for it on your desktop. The first time you run the app, click the Sign in button to begin the first-run activation process.
When you click the Download Assistant's Sign in button it launches your default web browser where you might be prompted to sign in to Steinberg.net with your Steinberg ID credentials (which may be different from your Steinberg Shop credentials). Once you are properly signed in to the site, you might be prompted to allow the browser to open the Download Assistant. Click the Open Steinberg Download Assistant.exe button to proceed. You MUST successfully perform this step one time in order to activate the application.
Once authorized, the Download Assistant checks to see whether you have the latest versions of several other apps installed. (The other apps are eLicenser Control Center, Steinberg Library Manager, and Steinberg Activation Manager, which is the eventual replacement for eLicenser.) The Download Assistant will install or update them automatically. Depending on what's currently installed on your system, you may or may not see some of the following screens.
If the Download Assistant needs to install or update the eLicenser Control Center you might see a prompt like this for the USB eLicenser (dongle) driver. Click Install if prompted.
Once the initial activation/update steps are complete, you should now be logged in to the Download Assistant.


Downloading and installing Cubase 12
In order to download and activate Cubase 12 you need your Download Access Code (also called your Activation Code). This is a 25-character code, usually displayed as 5 groups of 5 letters and numbers, separated by dashes. This is different from eLicenser activation codes, which are 32 characters long (8 groups of 4). In order to proceed you will also need to have the Steinberg Download Assistant properly installed and activated. See the previous section if you're not sure.
Also, if you are performing an Update/Upgrade, your old license must be immediately available on the current computer as described in the "Before you start" section above.
After completing your update/upgrade purchase you should receive an Order Confirmation email that contains your code. Note: If you don't receive your email right away, first make sure to check your Junk/Spam folder. If you still can't find it, you should be able to view your codes at the Steinberg Shop. See the "How to view your download codes" section earlier in this article.
Launch the Steinberg Download Assistant. Don't be worried if you don't see your newly-purchased product listed under "My product downloads" yet. Grab the 25-digit access/activation code Steinberg provided you, click Enter your Download Access Code, type or paste in the code, and click OK.
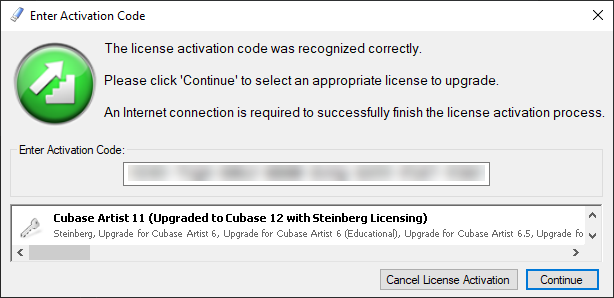
If the code you entered is valid, after a few moments, the Download Assistant will present you with a 32-character license activation code and ask if you wish to upgrade. If your old eLicenser license is available on the PC as mentioned earlier in this article, click Upgrade.
The Download Assistant launches the eLicenser Control Center and populates it with your new activation code. (In my case, I was surprised to find that it said "Cubase Artist 11" considering I was upgrading from Artist 7.5, but it appears to work, regardless.) Click Continue to proceed.
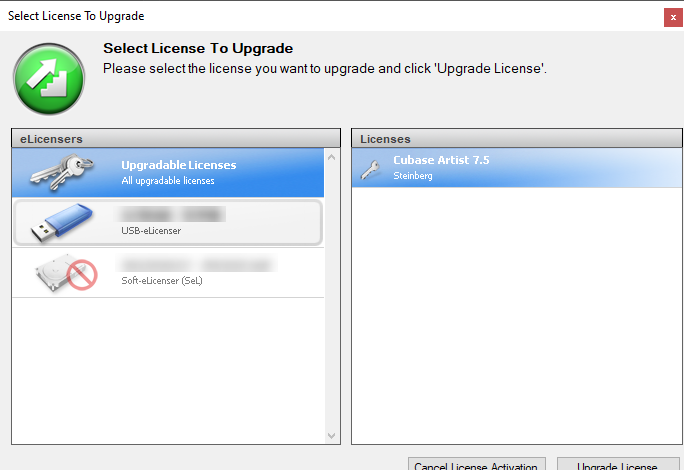
Next, make sure the correct license-to-be-upgraded is selected. In my case the app automatically selected the correct license. Click the Upgrade License button to continue. (Note: I didn't crop this screenshot- the dialog buttons are actually cut in half on my screen for some reason!)
After several seconds you should be notified that the license upgrade is successful. Click Finish License Activation to return back to the Download Assistant.
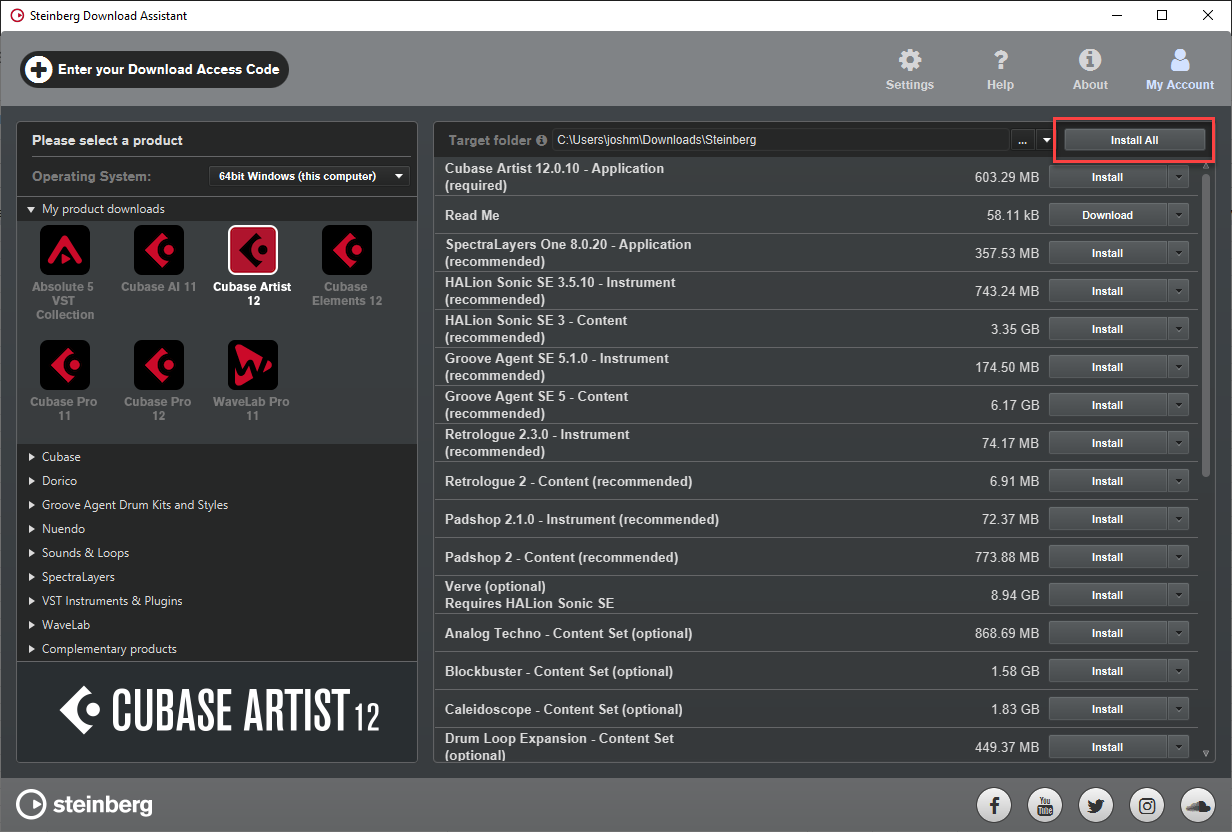
Back in the Download Assistant you should now find your newly-activated product listed under My product downloads. Click OK.
Click the button for the Steinberg product you just purchased under My product downloads to display all of the downloadable components for your product on the right side of the window. You can choose a different "target folder" (download directory) by clicking the … button or the Settings gear icon. Note that this is only the location where the Download Assistant downloads files. This is not the directory where your products will be installed. Depending on the product/component, you may not get to choose where the application/content is initially installed, but you will be able to move most content files elsewhere using the Steinberg Library Manager application that is already installed along with the Download Assistant. On this screen, click Install All to download/install everything in the list, or click Install on the individual items you need. At a minimum, I recommend you install at least:
The Cubase application
The instruments: HALion Sonic SE, Groove Agent SE, Retrologue, and Padshop
The Content items for the above instruments (you won't have any presets without them).


The Download Assistant is capable of downloading multiple items at the same time. As soon as it downloads the Cubase installer to your computer it will launch the installer wizard. Step through the wizard with the Next button to proceed.
After accepting the Steinberg license agreement you will have the chance to select a different program installation path for Cubase. This only affects where the main program goes. Plugins and content will mostly be installed in their default locations. After you click Next on this screen, click Install to perform the installation. ug21
If you see any errors that a given component was unable to install, you can usually get it to work by just clicking Install on each of the reported components individually. Just wait for all other installers to complete, then return to the Download Assistant and individually re-try the installs that failed the first time.


Activating and launching Cubase 12 for the first time:
After you quit the Steinberg Download Assistant, you should find a Cubase 12 icon on your desktop. When you first launch Cubase, the Steinberg License Manager will run in the background and attempt to silently activate your newly-installed copy of Cubase.
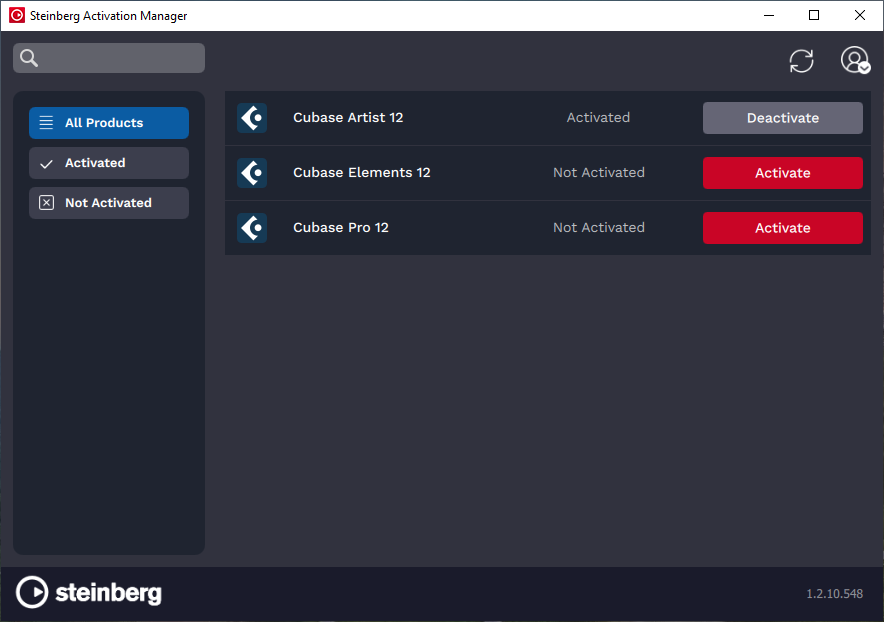
If everything works as intended, Cubase will launch normally and you won't have to worry about signing in to any more apps or activating any more software. If you see any warnings complaining that your copy of Cubase is not activated, quit Cubase and then run the Steinberg Activation Manager (it was installed along with the Download Assistant). Assuming you have an internet connection and you are logged in to the Activation Manager, the program will show you which versions of Cubase you are licensed to run. In my screenshot you can see that I own licenses for three different flavors of Cubase 12, but only Cubase Artist is activated. VERY IMPORTANT NOTE: The only way to deactivate a new Steinberg product is to click the Deactivate button in the Activation Manager on the computer where the program is currently installed. If your computer breaks or you reformat the hard drive without deactivating your product first YOU WILL LOSE YOUR ACTIVATION. This is an unfortunate drawback of the new Steinberg Licensing scheme.
On your first run of Cubase you will likely be prompted to select an audio driver. If you already have an audio interface installed and connected, you should select it before clicking OK. On Windows, if no audio interfaces are present, you will have the option to use the Generic Low Latency ASIO Driver.
Once the program is fully loaded, you will normally see the "Steinberg Hub" window, where there are links to Steinberg news and sites, and a number of production templates for creating new Cubase projects. You can disable the Hub feature in the program's preferences.
If Cubase detects that you don't have any audio output ports mapped, it will display the Missing Ports dialog. If there are no output ports mapped, you won't be able to hear sound in Cubase, so this is important!
If there are any ports available, you should be able to click the red "Unmapped" links and choose the correct outputs. In this screenshot I am selecting the speakers of my ASUS VG249 monitor.
By this point Cubase should be fully activated and ready to roll. Happy producing!


When to use the USB eLicenser
According to Steinberg, all future versions of their products will use Steinberg Licensing/Activation Manager instead of the USB or software eLicensers, but it could potentially take years for the company to transition all of their products. While the Cubase 12 application itself no longer uses eLicenser, at the time I am writing this, all commercial Steinberg plugins (like the full versions of Groove Agent and HALion Sonic) still require the eLicenser. Additionally, if you ever wish to run an older version of Cubase (which sometimes you might have to do if there are compatibility issues loading old projects on new software versions), you'll want to hang on to that USB eLicenser.
Keep an eye on this list of programs that use Steinberg Licensing to know when it's safe for you to drop the dongle.
