Showing posts with label waldorf. Show all posts

Tuesday, April 8, 2025

SOLUTION: Correctly Importing SampleRobot instruments to Waldorf Quantum and Iridium

 As a long-time user of SampleRobot and a recent owner of a Waldorf Iridium Core synthesizer, I was excited to learn that SampleRobot 6 has explicit support for the Waldorf Iridium and Quantum instruments. After working with the synth for several days, however, I encountered a number of unexpected roadblocks when attempting to import my own SampleRobot recordings into my Iridium Core that the existing documentation and tutorial videos didn't cover. After a couple days of research and experimentation, I have finally figured it out, and wanted to share my findings for future users.

Recent developments

So far I have only found one video describing the process of importing SampleRobot instruments, and it's the one Waldorf published to their YouTube channel, however that video glosses over a very important fact: If you follow their steps exactly as described, it will work at first- but only if you leave your USB drive or SD card inserted in the synthesizer. If you try to load any instruments you created without the original storage device connected, the synth will complain that it can't find the samples!

If you want to permanently import your SampleRobot instrument without having to leave the USB/SD storage connected, you must import the samples into flash memory, and create the instrument from there. But that leads us to another problem: YouTuber Tim Shoebridge has the most popular video that covers the process of importing samples into a Quantum or Iridium, and it is very good, but it was recorded before the 3.0 update to the Iridium system software, which changed how sample storage works. His steps involve using an "Import" action which no longer exists in current Iridium/Quantum software. That functionality has been combined with the pre-existing "Add" action, but the workflow is different from what you'll see in Tim's video.

My steps below will show you how to correctly (and permanently) import your SampleRobot instruments into your instrument, as of the 3.2.0 version of Iridium Core OS (January 16, 2024).

Importing the samples

These steps assume you have already recorded your instrument in SampleRobot and exported the project in "Waldorf Quantum and Iridium (*.map)" format. I am a heavy SampleRobot user, and have already written some guides on working with it. If you'd like to see some more info on using it to make instruments for Quantum/Iridium, let me know.

First off, after you export your instrument to Waldorf format, make sure that you copy the resulting files to your USB drive or SD card exactly as follows: The USB drive/SD card must have a directory named "samples" at the root, and that directory must contain one or more instrument directories, each one containing the instrument's samples and MAP file. There can be other stuff on the drive/card, but all your Waldorf files must follow the above directory structure.

In this image you can see we have a USB drive named "IRIDIUM" and it contains a folder named "samples" with a subfolder named "The Giant Piano" which contains all necessary samples, plus the MAP file.

Note: Because some physical buttons on these devices have the same text as some on-screen buttons on the touch screen, I will try to use the word "press" for physical buttons and "touch" for on-screen controls.
  1. Insert your USB drive or SD card into your synthesizer.
  2. Press the physical Load button on the synth.
  3. On the Load Patch screen, touch Init to create an empty patch.
  4. Press OSC 1.
  5. Touch Wavetable and then touch Particle to select the standard sampler engine.
  6. Touch Actions, and then touch Add.
  7. In the upper-left corner of the touchscreen, toggle to the correct storage device for your samples (USB Drive or SD Card).
  8. In the left pane of the touchscreen, touch samples.
  9. In the right pane of the touchscreen, touch the directory name of the instrument you want to import (for the instrument in my screenshot above, I'd touch "The Giant Piano").
  10. Leave the directory name selected (don't select any individual files), and then touch Add.
  11. An "Add Samples" dialog will appear, asking if you want to copy the files to internal flash memory. Touch Copy.
  12. The samples will be copied into the "samples" directory on the synth's internal "Samples" storage. (For example, my "The Giant Piano" directory now appears between the factory "Tanya Samples" and "Vocal chika" directories in my internal storage.)

Loading the instrument map

The MAP file contains all the information your Waldorf synth needs in order to place each sample in the correct pitch and velocity ranges.
  1. With your USB/SD storage still connected, press the physical Load button.
  2. On the Load Patch screen, touch Init to create an empty patch.
  3. Press OSC 1.
  4. Touch Wavetable and then touch Particle to select the standard sampler engine.
  5. Touch Actions, and then touch Load Map.
  6. Use the touchscreen to navigate inside the original directory that contained your samples on your USB stick or SD card, and touch the name of the MAP file. (In my example, I'd navigate to "USB Drive > samples > The Giant Piano > The Giant Piano.map".)
  7. Touch Load.
Your samples should now be mapped the way you set them up in SampleRobot.

Testing and saving the instrument

You should now have a very basic sample-mapped instrument. Use the pads or fire up your DAW to play around with it to make sure your velocity layers are mapped properly (if you used more than one layer) and the pitches are mapped across the keyboard as you expected. You can make the necessary changes in the Timbre page of OSC 1, on a per-sample basis if only minor changes are needed. If you find massive changes are required, it might be best to go back to SampleRobot and re-record. (Again, if anyone needs tips here, let me know.)

Your freshly-imported instrument has a "gated" envelope (extremely fast attack and release) and does not adjust volume in response to velocity changes. It WILL trigger the appropriate samples if you imported multiple velocity layers, but it won't adjust their playback volume without some modifications.

To change the amp envelope to attack/release like you want, press the Envelopes button, and then make the appropriate adjustments on the Amp tab. (For example, I increased the Release to 1.54 seconds for my piano instrument.)

To make the instrument adjust volume in response to different velocities, touch Mod Targets on the Amp tab and then dial in the appropriate "Amp VeloAmt" value. In my case, 80% gave me the best velocity curve for my MIDI controller and playing style.

When your instrument is ready to save, do the following:
  1. Press the physical Save button.
  2. Enter a name for your patch and fill out the appropriate attributes. (I put all my patches into an "ultimateoutsider" bank so I can find everything I've created quickly by just selecting that bank in the preset browser.)
  3. Touch the blank space beneath the Save and Cancel buttons on the touchscreen to bring up the patch number entry dialog.
  4. Type in a patch slot number as a starting point to find where to save your patch. At least on my unit, the first available patch slot was 164. You can use the selector dial to scroll through existing patch slots until you find a blank one.
  5. Touch the red Save button to store the patch in the current slot.
And that's it! I do hope I save some future Waldorf-owning SampleRobot fiends some time with these updated steps!

Friday, July 24, 2015

Setting Up Vocoders in Cubase Part 1: Getting Started


There are lots of great free and commercial vocoder plugins available these days, but setting them up in Cubase isn't always straightforward. On top of that, there's a lot more to getting a good-sounding vocoder than simply getting your DAW routing configured properly. For that reason, this first post covers some general tips that will help you get the most out of any vocoder plugin you end up using, and the posts that follow walk you through configuring a number of specific vocoders.

At the bottom of this post you'll find links to each of my tutorials for configuring several different vocoder plugins. But for now, let's cover the basics.

VOCODER FUNDAMENTALS

There are different applications for vocoders and their various components, but these tutorials are just going to cover the most common use case for music production: For our purposes, a vocoder is a tool that analyzes an incoming audio signal (usually a human voice) called the modulator, breaks that source signal into an arbitrary number of signal bands, and uses this encoded information to modulate a secondary audio source (usually a synth patch) called the carrier.

Another way of putting it: The vocoder attempts to approximate the sound of the modulator signal using audio material from the carrier.

Here's an example I put together for this tutorial. First, we have a three-part harmony I recorded to use as my modulator signal. There is some mild compression on it to even out the dynamics, and I edited the audio to remove some unwanted breath and to tighten up the timing:


Next, here's a MIDI track I recorded for the carrier signal. It's a synth pad from HALion Sonic that has some reverb and delay that creates some movement in the final vocoder output. In this example, the MIDI timing very closely follows the vocals (or rather, I sung the vocals to closely follow this MIDI part):


And here's the final result, as processed by Image-Line's Vocodex plug-in:

 
This very basic way of looking at the vocoder leads us to a few simple rules we can follow to ensure we get the best sounding results:

THE CARRIER AND MODULATOR SHOULD MATCH EACH OTHER IN PITCH


Vocoders are very often used for rich harmonized vocal sections. Frequently (even in some tutorials I've seen), I notice people will feed a non-harmonized vocal source/modulator into a vocoder where only the synth/carrier signal is harmonized. The result sometimes sounds okay, simply because of the harmonics (frequencies surrounding the root note) that might be going on in the carrier signal- but more often only the notes in the carrier that match whatever was in the source signal will come through very well.

So, if you want the end result to be harmonized both your carrier and your modulator signals need to be harmonized. And not just the same notes, but the same octaves/frequency ranges as well.

THE CARRIER SHOULD BE RICH IN HARMONICS


The human voice covers a lot of the audible spectrum when you consider not just the pitched vowel sounds, but the unpitched consonant sounds as well. All the various resonances and vibrations involved in the human voice, can result in a harmonically rich sound, even when just singing vowels. If you use a carrier signal that only matches the exact frequencies of the musical notes in your modulator's melody, you will likely lose a lot of the consonant sounds, because there won't be enough high-frequency content in your carrier to reproduce them.

Some vocoders include features to add noise to the carrier (which gives the vocoder some high-frequency content to shape consonants with) or mix some of the original modulator into the sound keep things intelligible, but simply choosing your carrier patches wisely can go a long way.

We can illustrate this pretty clearly. I used Voxengo SPAN to capture what some different signals look like on the audio spectrum. Here's a snapshot of my modulator signal, which is me singing a three-part harmony, with a little compression but no other processing or effects:


Here is my carrier signal, a synth pad from Steinberg HALion Sonic 2. The carrier is playing a MIDI version of the same harmonies I'm singing in the modulator. You can see that it has good coverage across the same spectrum as the vocal line. There is some content below 80Hz that will be discarded by the vocoder, since there's nothing that low in the modulator:


For comparison, here's a terrible carrier playing the same MIDI line. It's a pure sine patch I made in Native Instruments Massive. There are no harmonics and no high-frequency content. If your pitches didn't match this part's narrow frequency range exactly (like if your source singing went sharp or flat), you'd probably hear an unpleasant tremolo in the output:


You would also lose a ton of definition in the final product using the above signal as a carrier. Below you can see my vocals superimposed over the sine wave carrier. The yellow area on the left is where the two signals overlap. All the green on the right (everything above 250Hz) is signal information from the modulator that's simply lost in the final output:


START WITH A CARRIER THAT HAS FAST ATTACK, SHORT RELEASE, AND MINIMAL FX


In order to properly follow the melody of your incoming modulator signal, it helps to have a carrier that starts and stops quickly so it always (and only) plays the notes you need, when you need them. You can get some interesting results by messing with longer attack and especially release times once you've got everything set up, but sticking to fast/responsive patches can speed up your auditioning and troubleshooting process.

Similar to sounds with long release stages, patches that have noticeable reverb tails or delays can also be interesting, but they can also give you unexpected results when auditioning sounds. Try disabling reverb or dialing back decay times if you notice pitch changes that seem to get muddled in the vocoded results.

PICK REASONABLE VOLUMES FOR BOTH MODULATOR AND CARRIER


Some vocoders have limited "sweet spots" when it comes to the levels of the signals you feed to them- particularly the modulators. Vocoders are also easily overloaded due to the mixing of the various signals, and not all of them have level meters or internal gain controls. Start out with moderate, matching levels for both your carrier and modulator signals when you're just trying to confirm things are working properly. You can experiment with overdriving (or dialing back) different levels when you're refining your sound.

TREAT YOUR MODULATOR SIGNAL AS IF IT WERE A FINAL VOCAL TRACK


Even though little to none of the original modulator signal will make it into your final vocoded output, if your volumes are uneven, pitches are wobbly, or timing is bad, your final result will be bad as well. (Like some folks say, "Garbage in, garbage out.")

Compressing the modulator before it hits your vocoder can both even out the dynamics and bring out some of the unpitched consonant sounds, making the vocoder voice more intelligible.

TIP: EXPERIMENT WITH EVOLVING CARRIERS AND SIMPLIFIED MIDI


As you might imagine, synth patches that change over time can be very interesting vocoder carriers. To take advantage of such sounds you might find that it helps to simplify your MIDI data. For example, if you sing three notes in a row at the same pitch, your MIDI might just have a single extended note at that pitch to give your patch some time to evolve.

Patches that begin with a click or a pluck of some kind might also influence your decision of whether to exactly mirror the individual notes of the modulator in MIDI or only follow the pitches.

VOCODER TUTORIAL PROJECTS (DOWNLOAD)

I made a couple of simple tutorial projects you can use to test out the vocoder plugin of your choice. You can get them from the Ultimate Outsider Downloads page. I made the projects in Cubase Pro 8, but they should load in either Cubase Pro or Cubase Artist, and should work for version 7, 7.5, and 8. Each project is for a different kind of configuration:

VOCODER INTERNAL CARRIER PROJECT

This project is for cases where you want to use the plugin's built-in synthesizer/carrier instead of supplying your own carrier signal. The project includes an audio clip with harmonized vocals and a MIDI clip that plays the same harmony/melody as the vocal track.

The MIDI clip is not routed to any instrument when you first load the project, so you won't hear anything but the vocal track when you play it. The "internal carrier" examples in the following posts will tell you when to use this track.


VOCODER EXTERNAL CARRIER PROJECT

This is for situations where you want to provide your own external carrier signal instead of using the vocoder's built-in carrier. (Some vocoder plugins like mda Vocoder don't even have an internal carrier, so this is the project you'd use.)

The project contains a vocal clip to serve as the modulator and a synth pad clip to serve as the carrier.


MY VOCODER TEST PROJECT

When preparing this tutorial, I put together a Cubase project that uses five different vocoders in eight different configurations, with a lot of group channels for routing the source audio to the various plugins. Here's a quick run-down of the project, in case you're interested in more advanced routing than we'll talk about in the subsequent parts of the tutorial. (Note: This project is not included in the tutorial projects download, since it requires a number of commercial plugins.)


  • Tracks 3-8 are the original vocal audio tracks I recorded to use as my modulator. I recorded three parts, but duplicated each track to smooth out the initial "Hello" when looping. All of these tracks are routed to the "Modulator Vocals (Stereo)" group channel.
  • Track 14 is an instrument track with an instance of HALion Sonic, playing a MIDI part that serves as the carrier for all vocoder configurations that use an external carrier. This track has two sends, routed to each of the "External Carrier" group channels.
  • Tracks 16-19 are MIDI tracks which send MIDI to individual vocoder plugin instances that are configured to use the given plugin's internal carrier. They are color-coded to indicate which plugin instance they play into.
  • Tracks 20-23 are group channels that route audio to the various plugin configurations via sends. The reason there are two stereo groups and two single-channel groups is because some plugins only accept audio as a stereo pair, where the Left and Right channels independently deliver the carrier or modulator.
  • Tracks 25-32 are the individual plugin configuration groups. Each one contains a single instance of a given vocoder as an audio insert, and each one receives audio from one of the Modulator Vocals buses. Additionally, the "external carrier" configurations receive audio from one of the "External Carrier" groups, and the "internal carrier" configurations instead receive MIDI from their respective MIDI track, as indicated by the track color. NOTE: These are the only channels in the project that send audio to Cubase's "Stereo Out." All other channels and tracks are set to either "No bus" or routed to other channels, since we only want to hear the vocoder output, not the raw modulator or carrier signals.
Oh, and in case you were wondering what 8 vocoders stacked together sounds like, here you go:


SETTING UP SPECIFIC PLUGINS

Now that we have a good understanding of the fundamentals, let's start setting up some plugins:
I set up a SoundCloud playlist of all the clips I recorded for this tutorial. It contains the raw modulator and carrier as well as examples of every plugin mentioned in these tutorials, in each of their possible routing configurations- so you can hear all the vocoders side-by-side.

Monday, November 12, 2012

Using the Blofeld Virtual Editor on Live and Cubase

I love my Waldorf Blofeld desktop synthesizer (), but due to how my room’s set up, I can’t reach its controls or read its display when I’m at my computer. I was very pleased to learn about the free Blofeld Virtual Editor for Windows that you can use to edit Blofeld patches from your PC.

The editor runs as a VST plugin in a DAW or VST host, but there’s one major drawback- the editor needs exclusive access to your Blofeld’s MIDI ports; if your DAW is configured to “see” the Blofeld’s ports, you won’t be able to use them in the editor. And an unfortunate side-effect of this limitation is that once you configure your DAW to let the editor control the Blofeld’s MIDI ports, you can no longer send MIDI notes to the device... so unless you’ve got one of the Blofelds that has its own keyboard, you won’t have any way to test out your patches while you’re editing them!

Turns out there is a way to use the editor AND send MIDI notes to the Blofeld at the same time. And here’s how to do it:

Before You Start
1. Download the Blofeld Virtual Editor from here.
2. Copy the DLL file into your 32-bit plugins folder. For example, on my system, I keep all my 32-bit VSTs in: C:\Program Files (x86)\Vstplugins
3. Load up your DAW and make sure you can load the plugin.
4. Make sure you have a USB connection to your Blofeld. Full functionality of the editor is only possible with USB.
5. Plug a 5-pin MIDI cable into an available MIDI OUT port on any MIDI interface or device you may have available, and plug the other end of the cable into the MIDI IN port in the back of your Blofeld. Both the Blofeld’s MIDI and USB ports should now be occupied.

Setting up the Virtual Editor in Ableton Live

1. Create a new Live Set and delete the initial Audio track, leaving just a MIDI track.

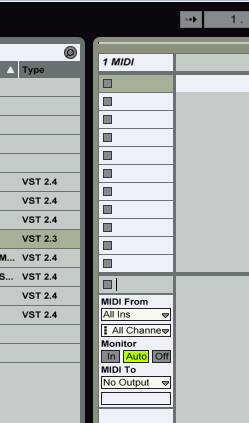
2. Go to Options > Preferences > MIDI Sync and make sure the “Waldorf Blofeld” MIDI Input and Output ports are set to Off. (The Blofeld Virtual Editor won’t be able to access the ports if Live is still using them.)

3. Find BlofeldVirtualEditor in your Plug-In Devices browser and drop it on the project’s MIDI track. If the plugin window doesn’t appear, click the little wrench on the BlofeldVirtualEditor device at the bottom of the screen.

4. In the Blofeld Virtual Editor window, select Waldorf Blofeld for both MIDI IN and MIDI OUT.

5. Click Get Patch in the bottom of the editor window. It should load the patch currently active on your Blofeld device into the editor.

6. Back in Live, create a new MIDI track and drag an External Instrument device onto it.

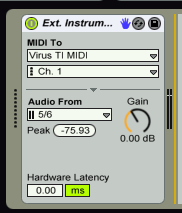
7. In the External Instrument device, set MIDI To to the physical MIDI port that will be sending MIDI notes to your Blofeld (in my example, I'm using the MIDI out from my Virus TI). Next, set Audio From to the audio input ports where your Blofeld sends its audio output. If you don’t see the desired port listed in the MIDI To list, you might need to make sure that port is turned on in the Track column of Options > Preferences > MIDI Sync. The same goes for the Audio ports, which are activated in Options > Preferences > Audio > Input Config.

8. Now, as long as the MIDI track is armed for recording, you can play notes on your keyboard controller while tweaking away at your blofeld patch in the virtual editor! (Be sure to read the PDF manual that comes with the editor, as it covers some things unrelated to getting things working in your DAW.)
Setting up the Virtual Editor in Cubase
1. Launch Cubase and start with a new, empty project.
2. Go to Devices > Device Setup > MIDI Port Setup and uncheck any boxes for the Blofeld MIDI ports so that the State column says Inactive, then click OK. (If you don’t do this, the Blofeld Virtual Editor won’t be able to communicate with your device.)

3. Go to Devices > VST Instruments and load BlofeldVirtualEditor into one of your VST slots. When Cubase asks if you want to create a MIDI track, click Yes.

4. In the MIDI Inspector of the newly-created track, click the Edit Instrument (keyboard) icon to open up the editor window.

5. In the Blofeld Virtual Editor window, select Waldorf Blofeld for both MIDI IN and MIDI OUT.

6. Click Get Patch in the bottom of the editor window. It should load the patch currently active on your Blofeld device into the editor.

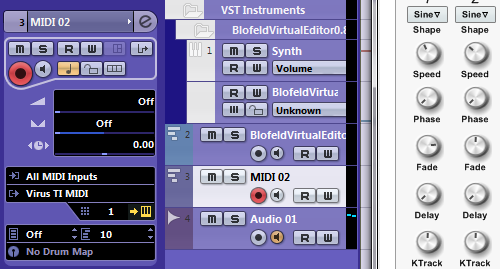
7. Back in Cubase, add a new MIDI track to the project. Set the MIDI “Output Routing” to the MIDI port that’s physically connected to your Blofeld’s MIDI IN port. In my case, it’s the Virus TI MIDI port. Also set the channel to one that your Blofeld will recognize (1 should work). If you play some keys on your controller while this track is armed, you should see the MIDI activity light on your Blofeld blink- you won’t be able to hear anything yet.

8. Add an audio track to your project. For Input Routing in the audio inspector of the track, select the input bus of your Blofeld’s stereo outputs. I named my bus “Blofeld Audio.” If you don’t have a viable choice in the Input Routing menu, you will need to set up a bus for your synth in Devices > VST Connections > Inputs.

9. Click the Monitor (speaker) button on the Audio track, then select the MIDI track and play notes. You should be able to hear notes you play now, and so long as the MIDI track is armed you’ll be able to audition sounds as you tweak them in the editor. Don't forget to read the PDF manual for the Virtual Editor. It will cover the rest.