I
love my Waldorf Blofeld desktop synthesizer
(), but due to how my
room’s set up, I can’t reach its controls or read its display when I’m
at my computer. I was very pleased to learn about the free Blofeld Virtual Editor for Windows that you can use to edit Blofeld patches from your PC.
The
editor runs as a VST plugin in a DAW or VST host, but there’s one major
drawback- the editor needs exclusive access to your Blofeld’s MIDI
ports; if your DAW is configured to “see” the Blofeld’s ports, you won’t
be able to use them in the editor. And an unfortunate side-effect of
this limitation is that once you configure your DAW to let the editor
control the Blofeld’s MIDI ports, you can no longer send MIDI notes to
the device... so unless you’ve got one of the Blofelds that has its own
keyboard, you won’t have any way to test out your patches while you’re
editing them!
Turns out there is a way to use the editor AND send MIDI notes to the Blofeld at the same time. And here’s how to do it:
Before You Start
2. Copy the DLL file into your 32-bit plugins folder. For example, on my system, I keep all my 32-bit VSTs in: C:\Program Files (x86)\Vstplugins
3. Load up your DAW and make sure you can load the plugin.
4. Make sure you have a USB connection to your Blofeld. Full functionality of the editor is only possible with USB.
5. Plug a 5-pin MIDI cable into an available MIDI OUT port on any MIDI interface or device you may have available, and plug the other end of the cable into the MIDI IN port in the back of your Blofeld. Both the Blofeld’s MIDI and USB ports should now be occupied.
Setting up the Virtual Editor in Ableton Live
2. Go to Options > Preferences > MIDI Sync and make sure the “Waldorf Blofeld” MIDI Input and Output ports are set to Off. (The Blofeld Virtual Editor won’t be able to access the ports if Live is still using them.)

3. Find BlofeldVirtualEditor in your Plug-In Devices browser and drop it on the project’s MIDI track. If the plugin window doesn’t appear, click the little wrench on the BlofeldVirtualEditor device at the bottom of the screen.

4. In the Blofeld Virtual Editor window, select Waldorf Blofeld for both MIDI IN and MIDI OUT.

5. Click Get Patch in the bottom of the editor window. It should load the patch currently active on your Blofeld device into the editor.

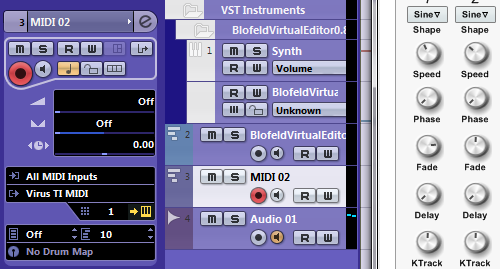
6. Back in Live, create a new MIDI track and drag an External Instrument device onto it.

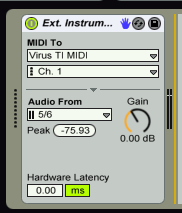
7. In the External Instrument device, set MIDI To to the physical MIDI port that will be sending MIDI notes to your Blofeld (in my example, I'm using the MIDI out from my Virus TI). Next, set Audio From to the audio input ports where your Blofeld sends its audio output. If you don’t see the desired port listed in the MIDI To list, you might need to make sure that port is turned on in the Track column of Options > Preferences > MIDI Sync. The same goes for the Audio ports, which are activated in Options > Preferences > Audio > Input Config.
8. Now, as long as the MIDI track is armed for recording, you can play notes on your keyboard controller while tweaking away at your blofeld patch in the virtual editor! (Be sure to read the PDF manual that comes with the editor, as it covers some things unrelated to getting things working in your DAW.)
Setting up the Virtual Editor in Cubase
2. Go to Devices > Device Setup > MIDI Port Setup and uncheck any boxes for the Blofeld MIDI ports so that the State column says Inactive, then click OK. (If you don’t do this, the Blofeld Virtual Editor won’t be able to communicate with your device.)

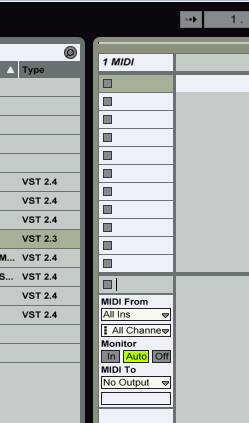
3. Go to Devices > VST Instruments and load BlofeldVirtualEditor into one of your VST slots. When Cubase asks if you want to create a MIDI track, click Yes.

4. In the MIDI Inspector of the newly-created track, click the Edit Instrument (keyboard) icon to open up the editor window.

5. In the Blofeld Virtual Editor window, select Waldorf Blofeld for both MIDI IN and MIDI OUT.
6. Click Get Patch in the bottom of the editor window. It should load the patch currently active on your Blofeld device into the editor.
7. Back in Cubase, add a new MIDI track to the project. Set the MIDI “Output Routing” to the MIDI port that’s physically connected to your Blofeld’s MIDI IN port. In my case, it’s the Virus TI MIDI port. Also set the channel to one that your Blofeld will recognize (1 should work). If you play some keys on your controller while this track is armed, you should see the MIDI activity light on your Blofeld blink- you won’t be able to hear anything yet.

8. Add an audio track to your project. For Input Routing in the audio inspector of the track, select the input bus of your Blofeld’s stereo outputs. I named my bus “Blofeld Audio.” If you don’t have a viable choice in the Input Routing menu, you will need to set up a bus for your synth in Devices > VST Connections > Inputs.

9. Click the Monitor (speaker) button on the Audio track, then select the MIDI track and play notes. You should be able to hear notes you play now, and so long as the MIDI track is armed you’ll be able to audition sounds as you tweak them in the editor. Don't forget to read the PDF manual for the Virtual Editor. It will cover the rest.