- Host multiple Kontakt instruments inside a single VST instance of Kontakt.
- Map each Kontakt instrument to separate Live MIDI channels.
- Receive stereo audio from each instrument on separate audio tracks in Live.
- Configure Kontak’ts Aux sends so you can hear them in Live.
- Save the whole configuration into a preset you can drop into any other Live set later on. You only have to follow these steps once!
I wrote this post using Kontakt 4, but it’s my understanding that the steps are the same for Kontakt 5. Here are some more details you might want to know before we start:
- If you are a Kontakt owner, you may have noticed the “8out” and “16out” flavors of Kontakt in your VSTPlugins folder. Those are limited versions of the plugin, I presume to conserve memory/CPU. We’ll need the one that’s just called “Kontakt 4,” which exposes up to 32 audio outputs.
- Even though Kontakt exposes dozens of outputs through the VST interface, Live 8 seems to have a problem displaying all of them, which will prevent us from being able to add support for all four Aux buses and still have stereo support for eight separate Kontakt instruments. We’ll only be able to set up the first 3 aux buses in this tutorial.
- There are other ways you can route your outputs, depending on what you need to achieve. Just consider this a starting point.
All right, let’s get started.
- Insert a new MIDI track in Live and name it KI 1 for Kontakt Instrument 1.
- From the Plug-in Device Browser, drop the “Kontakt 4” device onto your track. (Ignore the 8out and 16out versions; they don’t have enough outputs for what we’re going to do.) After a few seconds, Kontakt should open up.
 |
| The first MIDI track. Click the images in this post for a close-up view. |
Set up a template multi
- In Kontakt, start with a new, empty multi (Files > Reset multi).
- Select Files > New Instrument to add an empty instrument to your multi.
- Repeat the previous step seven times, for a total of eight empty instuments. Kontakt automatically assigns them MIDI channels in ascending order, which is what we want. (We can ignore the Output settings for the moment.)
- Name the first instrument Inst 1, the second one Inst 2, and so on until all instruments have uniquely numbered names.
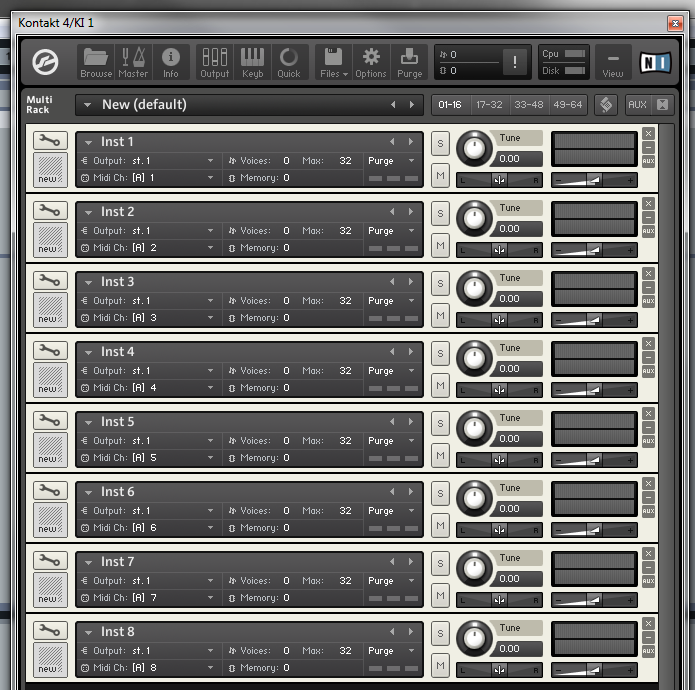
Eight empty instrument slots. - Click Output in the control panel to show the Outputs window if you can’t see it already.
- In the Outputs window, click Presets / Batch Configuration > Batch Functions > Clear output section and create one individual channel for each loaded instrument. You now have eight separate stereo outs, with their plugin outputs in consecutive pairs, from 1|2 through 15|16. Also note that each of the instruments you added to the multi has already been assigned to a different output.
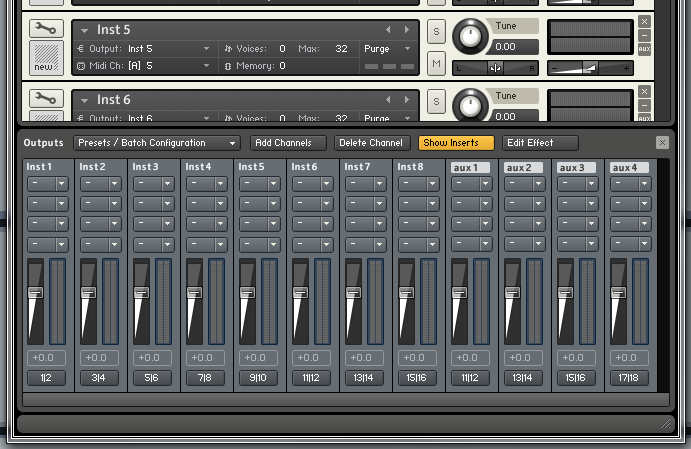
We have to fix the aux outputs next. - As you can see in the above picture, the Aux port assignments now overlap with the instrument outputs. (They’re still mapped to 11|12-17|18.) Fix this by clicking the button on the bottom of each fader strip and choosing different “physical out” options. NOTE: Things start to get confusing here. The port names you get to choose from are very misleadingly named and numbered. For your aux 1 bus, choose “Kt. unassigned [7]” and “Kt. unassigned [8]” for channels 01 and 02, respectively. For aux2-aux4, do the same thing, assigning two increasingly-numbered “Kt. unassigned” ports to your buses. There is a chart later on that tells you which ports to pick for every bus. Also, if you are prompted to close and re-open Kontakt, just ignore that for now.

The output names won't make any sense. Just trust me on this. - If you did the last step right, the output pairs along the bottom of the Outputs window should start at “1|2” for Inst 1 and end with “23|24” for aux 4.

Port assignments when properly configured. - It’s a good idea to now click Presets / Batch Configuration > Save output section preset as and save a copy of your output settings. If you plan on using custom multis a lot, you might also consider picking Presets / Batch Configuration > Save current output section state as default for > VST Plugin.
Set up the External Instrument tracks
- Back in Live, insert a new MIDI track and drop an External Instrument device on it from the Live Device Browser.
- Name this track KI 2 for Kontakt Instrument 2.
- On the new External Instrument device, select the name of your first MIDI track (KI 1) under MIDI To.
- Directly beneath that, select 2-Kontakt 4, because this track is for MIDI channel 2.
- Under Audio From, pick Kt. aux 1/-Kontakt 4 (it should be the first entry in the list). This is just the output name that Kontakt reports to Live, and can’t, as far as I know, be changed.

The first External Instrument track, properly configured. - Select your External Instrument track (KI 2) and press CTRL + D six times to create six duplicate tracks.
- For each of the new tracks do the following: Rename the track, select the correct MIDI channel, and select the next Kontakt audio output. Follow the chart below to see which Audio From option to select for each track. (You can ignore the bottom three rows of the chart for the moment.) NOTE: As you will notice in the chart, once you get to track KI 6 (exhausing the last of the aux pairs), you have to start skipping audio ports, because the ones labeled “Kt. aux” are stereo pairs, and the ones labeled “Kt. unassigned” are mono outputs.
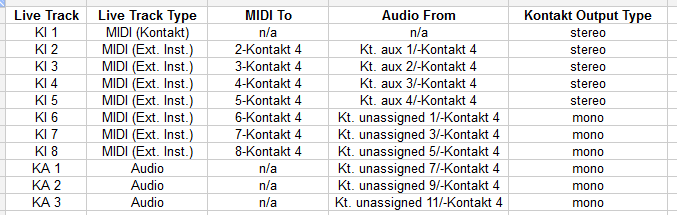
This shows the MIDI and Kontakt audio assignments for each Live track. - If you’ve done it correctly, your screen should look like this now:

The Kontakt Instrument tracks, once completed.
Kontakt has four aux send buses. Unfortunately, due to a limitation (of Live, I think), you will only be able to set up Live tracks for three of them, unless you decide to sacrifice an instrument from your multi.
- Insert an Audio track (not a MIDI track) and name it KA 1 (for Kontakt Aux 1).
- For Audio From select KI 1, and below that pick Kt. unassigned [7]-Kontakt 4, and then click the In button under Monitor.
- Now duplicate this track two times, naming the others KA 2 and KA 3.
- Refer to the bottom three rows of chart from the earlier section to see which Kontakt output ports to choose for KA 2 and KA 3. When you’re finished, the audio tracks should look like this:

Don't forget to click the In button under Monitor on the aux tracks!
Group and save
- Select track KI 1.
- Hold down SHIFT while clicking the last track, KA 3, to select all tracks.
- Right-click one of the selected tracks and pick Group Tracks.
- Name the track group Kontakt Multi.
- Drag the group track into one of your personal Preset folders in one of the File Browsers. This will actually save an ALS file (a Live Set) that you can drop into any existing Live Set to instantly have access to Kontakt with all the MIDI and audio ports mapped and ready.

The preset is now in my Library, ready for use in other projects.
- If you’ve done everything right, you can now drag an instrument into any of your 8 slots on your multi in Kontakt, play MIDI on the corresponding track in Live, and you’ll hear the instrument with audio coming in on that same track.
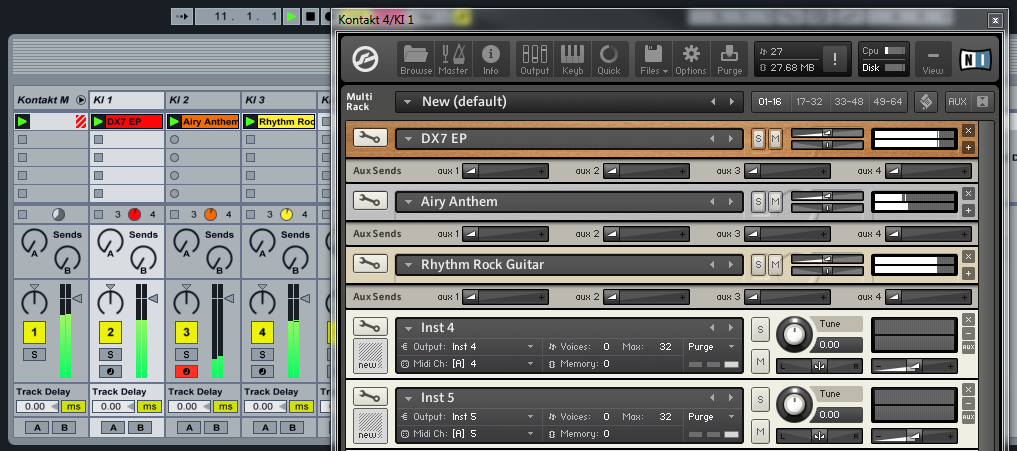
Three different Kontakt instruments playing audio on three Live tracks! - Also, if you performed the optional Aux steps, you can now send signals to the first three buses in Kontakt and hear them on your KA tracks in Live. Enjoy!
