
Please note that while this post is specifically about Windows, there is a Mac OS version of jBridge, called jBridgeM. (There's also a Mac OS bridging solution for 32-bit AU plugins, called 32 Lives.)
These steps should work the same for both version 8 and 9 of Ableton Live Intro, Standard, and Suite. But before we get started, let's have a quick talk about plugins.
YOU GOTTA KEEP 'EM SEPARATED
Most music folks running 64-bit Windows keep their 32-bit and 64-bit plugins in separate folders, and for good reason: Not only are 64-bit and 32-bit binaries not compatible with one another without special bridging logic, but even in the case of DAWs that have built-in bridging support (like Cubase), if your DAW detects two plugin files with the same plugin ID (even if they have different filenames- for example, ValhallaRoom.dll and ValhallaRoom_x64.dll), that can confuse your DAW and result in unexpected behavior. In general it's best to keep the different types of plugins in different directories, and to make sure your 64-bit DAWs and plugin hosts don't search in your 32-bit plugin directories, and vice versa.What we're going to do with jBridge is create 64-bit "wrappers" for each of the 32-bit plugins we wish to use in 64-bit Live, and the easiest way to do this is to start with a single directory that only contains the plugins we're planning to bridge.
I keep all of my VST 2.x plugins in these two directories on my DAW PC:
- g:\vstplugins32
- g:\vstplugins64
- g:\vstplugins32\plugins_to_bridge

Likewise, I have another subfolder where I keep the 64-bit jBridge wrappers for those plugins:
- g:\vstplugins64\bridged_plugins

You will minimize confusion and potential problems by following a similar scheme.
ONE-TIME SETUP STEPS
Before you can successfully bridge and use your 32-bit plugins in 64-bit Live, you need to perform some one-time configuration steps for both jBridge and Live. This is generally covered at the official How to use jBridge walkthrough, but I've customized these instructions for Live.- If you haven't done so already, install jBridge on your PC. While you will need a licensed version in order to get the most from your bridged plugins, the free demo version will work fine for the purposes of this tutorial.
- Locate the folder where you installed jBridge, and perform the following step for auxhost.exe, auxhost64.exe, and jBridger.exe: Right-click the program and click Properties. On the Compatibility tab, check Run this program as an administrator, and then click OK.

- Locate the folder where your copy of 64-bit Ableteton Live is installed. I installed Live under g:\programs64\Ableton, but if you didn't pick a custom location when you installed Live, it's probably somewhere inside your hidden ProgramData folder. Once you find it, right-click your Ableton Live executable and click Properties. On the Compatibility tab, check Run this program as an administrator, and then click OK.


BRIDGING YOUR 32-BIT PLUGINS
Also, make sure you've completed the "One-time Setup Steps" mentioned above.
- Launch jBridger.exe. If you see a User Account Control dialog, just click Yes.

- On the first jBridger screen, click I'll be using a x64 (64-bit) host.

- On the next screen make sure that the following options are checked:
- Thorough file analysis
- Create bridging files for 32 bit plugins
- Don't add .32./.64. in filenames in destination folder (This one's important!)
- Optional: If the 32-bit plugin directory you're going to specify in the next step contains plugins that you don't want to bridge, check Confirm each file individually. This will display a Yes/No dialog for each plugin jBridger detects, letting you choose which plugins to create wrappers for. If you don't do this, you'll have to manually delete any unwanted plugin wrappers that jBridger creates after bridging is complete.
- Create bridging files for 64 bit plugins

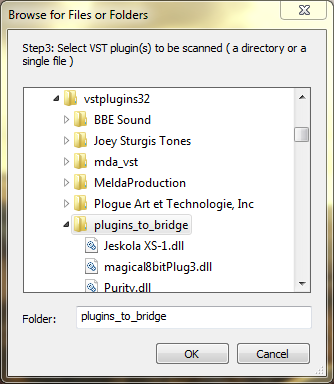
- First, jBridger prompts you to locate the directory containing the 32-bit plugins you want to bridge.

- Next, jBridger prompts you to select the directory where you want the 64-bit wrappers to go (again, a subfolder under your main 64-bit VstPlugins directory is ideal).

- When jBridger finishes creating wrappers for your plugins, you'll see this message.

- Now locate the destination folder that you specified in step 5 and confirm that it only contains wrappers for the 32-bit plugins you wanted to bridge. There should be a TXT file and a DLL file for each plugin.

Important: Make sure that the files don't have ".32." or ".64." in their filenames. In my experience Ableton Live 9 won't display these files in its plugin browser. This is what the "Don't add .32./.64. in filenames in destination folder" is intended to avoid.
Also, remember that it's only possible to specify a single VST Plug-in Custom Folder in the File Folder Preferences of Ableton Live, so the directory where your plugin wrappers are stored must be inside that folder.
- Now launch Ableton Live. If everything worked, you should now see the bridged versions of your 32-bit plugins inside Live's Plug-ins browser, inside the directory where you saved them.


1 comment:
I can't point jBridge to my vsts because it only offers me folders under personal folder, I would need to access the Programs folder in my C drive.
Post a Comment